Portable Inkjet Printer

Best Portable Inkjet Printer for Graphic Designer

 Portable Inkjet Printer
Portable Inkjet Printer

Table of Contents

Discover why the Kenpiko KP008 Handheld Inkjet Printer stands out as the Best Portable Inkjet Printer for Graphic Designers in 2025. Learn about its print quality, usability, features, and how it compares to other compact printers for creative professionals.

Introduction

For graphic designers, a portable printer is not just a convenience—it’s an essential creative tool. Whether it’s for on-the-spot packaging mockups, client presentations, or field labeling, the right printer should offer flexibility, sharp image reproduction, and efficient operation. In 2025, the Kenpiko KP008 1-inch Handheld Inkjet Printer has become a favorite among professionals who need mobility without sacrificing precision.

This guide explores why the Kenpiko KP008 deserves the title of the Best Portable Inkjet Printer, what makes it ideal for designers, and how it compares to other leading options in the portable printing market.

Why Graphic Designers Need a Portable Inkjet Printer

Design professionals often work across multiple settings—from studios and offices to client sites and workshops. A portable inkjet printer offers a powerful combination of flexibility and control, allowing designers to produce high-quality visuals anywhere.

On-the-Go Creativity

A portable inkjet printer allows designers to bring their ideas to life instantly. Whether you need to print a mockup, label, or sample, the convenience of handheld printing ensures no creative opportunity is missed.

Professional Presentation

Graphic designers often need to showcase their work in physical form. Being able to print directly onto packaging, materials, or labels demonstrates both skill and professionalism, leaving a lasting impression on clients.

Efficiency and Time Savings

Traditional printers require setup time and space, while a handheld inkjet printer like the Kenpiko KP008 eliminates that hassle. Its compact design supports quick deployment, making it ideal for time-sensitive design tasks or fieldwork.

Introducing the Kenpiko KP008 Handheld Inkjet Printer

The Kenpiko KP008 is not just another compact printer—it’s an advanced portable printing solution built for precision and adaptability. This 2025 upgraded model combines enhanced print quality, longer battery life, and multi-surface compatibility, making it an indispensable tool for professionals in design, packaging, and production.

Let’s explore its core attributes and why it’s ideal for designers seeking the Best Portable Inkjet Printer.

Portable Inkjet Printer for Graphic Designer

Key Features of the Kenpiko KP008 Handheld Inkjet Printer

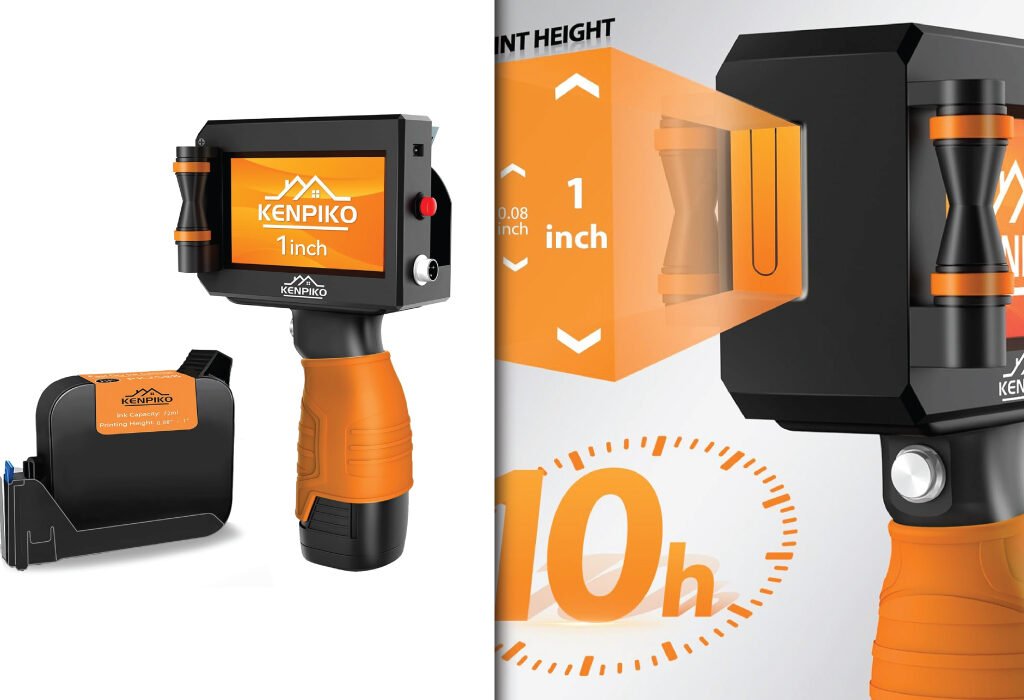
Extended Print Height and High Resolution

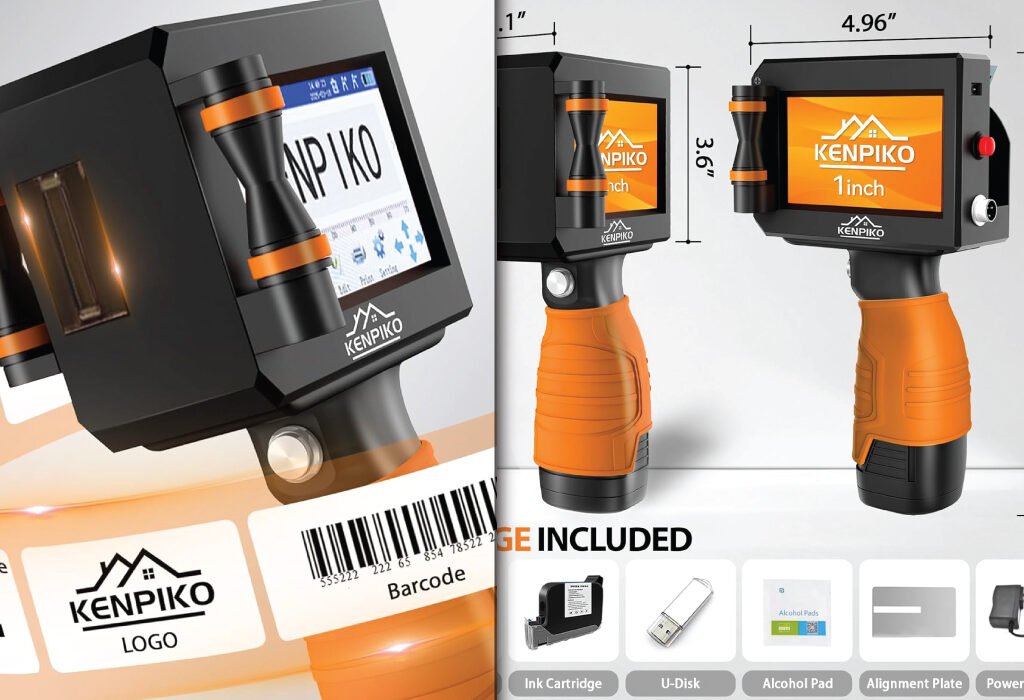
Unlike standard portable models that print only up to 0.5 inches, the Kenpiko KP008 offers an adjustable print height ranging from 0.08 inch (2mm) to 1 inch (25.4mm). With a high-resolution output of 600 dpi, it produces crisp text, sharp barcodes, and clean logo prints. This feature is particularly valuable for packaging designers who demand clarity and precision in every detail.

Long Battery Life and Memory Flexibility

The Kenpiko KP008 is equipped with a 10-hour battery, allowing uninterrupted operation throughout the day. It includes an upgraded memory card for storing designs and supports importing content via USB. With 28 language settings, it’s globally compatible, a big advantage for designers working with international clients or suppliers.

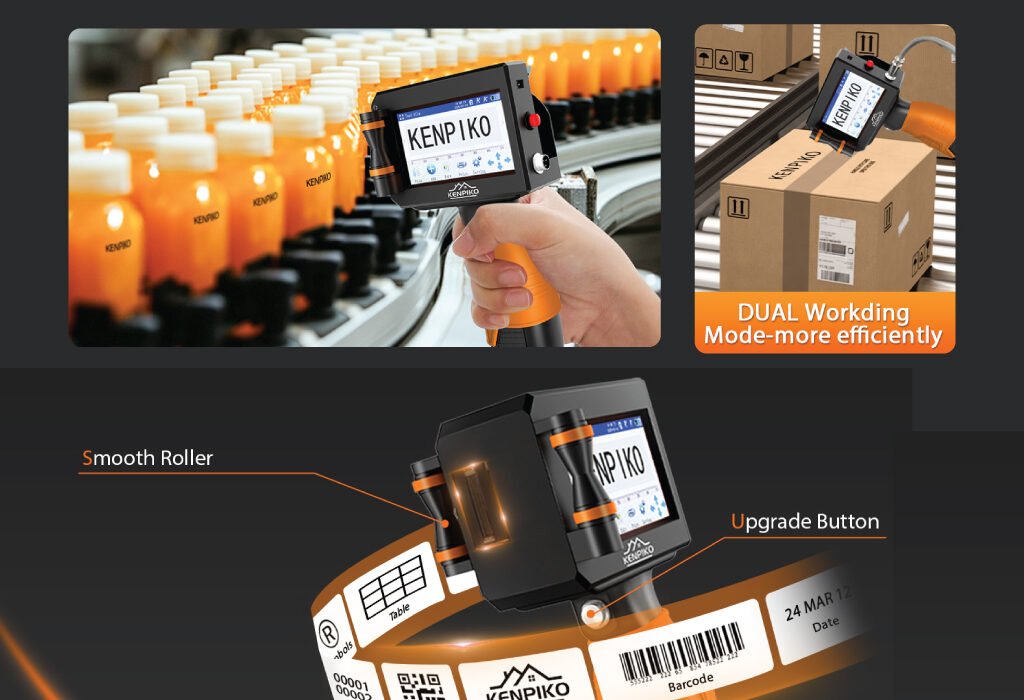
Ergonomic Design and 360° Printing

This printer’s design reflects attention to both comfort and performance. A 4.3-inch touchscreen ensures intuitive control, while smooth-rolling wheels and a non-slip silicone grip enhance handling accuracy. The 360° printing capability allows consistent output on both flat and curved surfaces—perfect for printing on bottles, boxes, and textured materials.

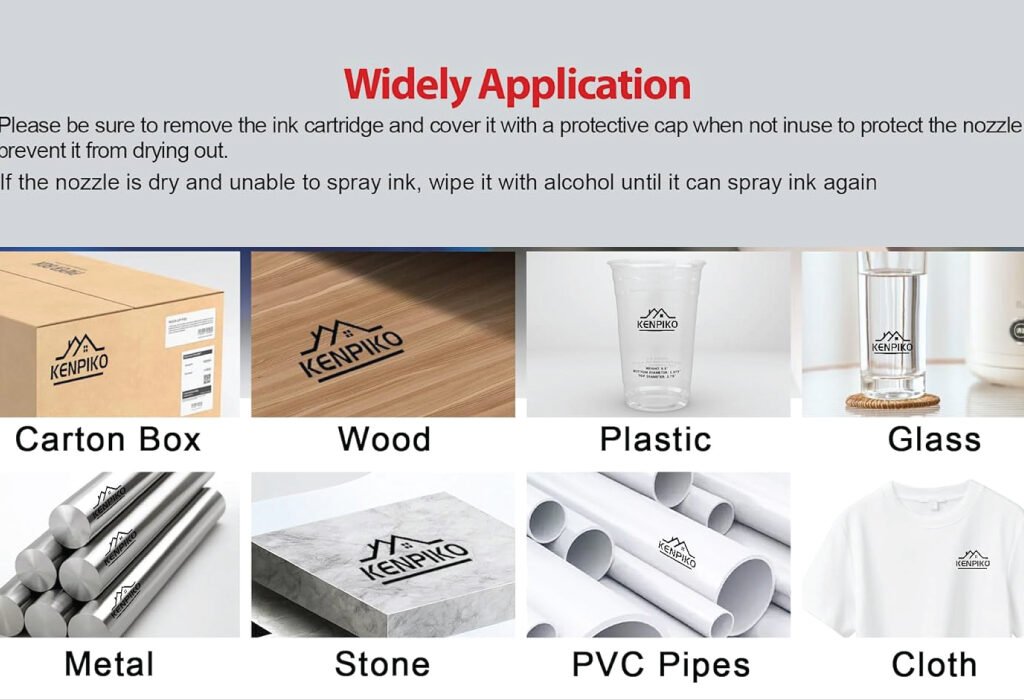
Multi-Surface Printing Capability

One of the standout advantages of the Kenpiko KP008 is its versatility across materials. It can print on wood, metal, glass, plastic, leather, ceramics, fabric, aluminum foil, and fiberboard, maintaining crisp results on every surface. For designers creating labels or prototypes, this means true creative freedom without material limitations.

High-Capacity Quick-Dry Ink Cartridge

The Kenpiko KP008 uses a 72ml fast-drying black ink cartridge designed for smudge-proof printing. Its ink dries in seconds and resists fading, making it suitable for industrial, retail, and creative environments. Whether you’re printing product labels or decorative text, this cartridge ensures vibrant and lasting impressions.

Product Specification

SpecificationDetails
BrandKenpiko
Model NameKP008 1-inch Handheld Printer
Model NumberKP008
Model SeriesKENPIKO KP008 Handheld Inkjet Printer
Printer TypeInkjet (Portable Handheld Inkjet Printer Gun)
Printer Output TypeMonochrome
Printing TechnologyHandheld Inkjet with Quick-Dry Ink
Maximum Print Height1 inch (25.4 mm)
Adjustable Print Range0.08 inch (2 mm) – 1 inch (25.4 mm)
Maximum Print Resolution (B/W)600 × 600 dpi
Maximum Print Resolution (Color)600 dpi
Ink Cartridge Capacity72 mL (Black Quick-Dry Ink)
Ink TypeFast-Dry Solvent Ink – Smudge-Proof
Supported File FormatsBMP, JPG, PNG
Print Media TypeLabels, Text, Logos, Barcodes, Symbols, Numbers
Supported SurfacesWood, Metal, Glass, Plastic, Leather, Ceramic, Fabric, Fiberboard, Aluminum Foil
Printing Direction360° Printing (Flat & Curved Surfaces)
Display Type4.3″ Touch Screen
Controller TypeHandheld Inkjet Printer Gun
Memory & StorageUpgraded Memory Card + U-Disk Support
ConnectivityUSB
Languages Supported28 Languages
Battery LifeUp to 10 Hours Continuous Use
Power SupplyAC Power Adapter (Included)
Item Dimensions (D × W × H)2.1″ × 4.92″ × 9.1″
Item Weight≈ 2.4 lb (1.09 kg)
Color1-Inch Handheld Printer (Black)
Package ContentsPrinter, Touch Pen, Power Adapter, U-Disk, 72 mL Ink Cartridge, Positioning Plate, Manual
Warranty TypeLimited Warranty + Unconditional Technical Support
Return Policy30-Day Amazon Voluntary Return Guarantee
ASINB0F12MNMNV
Customer Rating⭐ 5.0 out of 5 (28 Reviews)
Best Sellers Rank#96 in Portable Photo Printers / #64,334 in Electronics

Design and Build Quality

The printer’s compact body (2.1″ D x 4.92″ W x 9.1″ H) balances portability with durability. The smooth, lightweight construction supports long working sessions, while the positioning plate assists in maintaining consistent alignment. Its robust materials and ergonomic structure make it reliable for field use and studio environments alike.

Transitioning from design studios to workshops is effortless thanks to the printer’s comfortable grip and handheld controller type. It feels professional yet simple, perfect for designers accustomed to precision tools.

Portable Printer for Graphic Designer

Ease of Use and Interface

One of the biggest strengths of the Kenpiko KP008 is its 4.3-inch touchscreen display. The user interface is straightforward, allowing quick editing, logo uploads, and layout adjustments directly from the device. For graphic designers, this intuitive workflow reduces the need for external editing software during quick print jobs.

The touchscreen also allows users to adjust print height, preview graphics, and switch between text and image printing modes. In fast-paced environments, this level of control makes it an efficient creative companion.

Printing Performance and Quality

The Kenpiko KP008 Handheld Inkjet Printer delivers 600×600 dpi resolution, ensuring clean and detailed prints. Its advanced ink technology minimizes smudging and ensures rich, dark lines even on textured surfaces. For graphic designers, this translates to professional-grade visual consistency, especially for packaging prototypes and product labels.

The printer also excels in maintaining edge sharpness on both porous and non-porous materials. Designers who often work with mockup materials such as coated boxes, kraft paper, or aluminum packaging will find this feature especially beneficial.

Battery and Portability

With up to 10 hours of continuous printing, the Kenpiko KP008 supports long creative sessions without frequent recharging. Its rechargeable battery is built for reliability, offering consistent voltage for stable print output.

The printer’s compact, handheld design makes it easy to carry to client sites or trade shows, and the included accessories—such as a power adapter, touch pen, and USB drive—enhance convenience for traveling designers.

Connectivity and Compatibility

The Kenpiko KP008 connects through a USB interface, making it compatible with most computers and devices used in design environments. This ensures quick content transfers and file loading for printing text, logos, or barcodes.

It supports standard image formats such as BMP, JPG, and PNG, providing flexibility for designers using Adobe Illustrator, Photoshop, or other creative software. Its plug-and-play design also minimizes setup time, letting you start printing immediately.

Portable Printer
Portable Printer

Package and Accessories Included

Each Kenpiko KP008 printer comes as a complete kit, ready for professional use. The box includes:

  • 1× Handheld Inkjet Printer
  • 1× Touch Pen
  • 1× Power Adapter
  • 1× U Disk
  • 1× 72ml Black Ink Cartridge
  • 1× Positioning Plate
  • 1× Instruction Manual

Kenpiko also provides detailed operation videos and technical support, ensuring users can master the device quickly and maximize its performance.

Best Use Cases for Graphic Designers

The Kenpiko KP008 shines across multiple design applications.

It’s perfect for custom packaging, branding prototypes, and creative labeling projects. Designers can print brand logos, expiration dates, QR codes, or visual elements directly onto physical materials—making it an excellent choice for small studios and product-based businesses.

Beyond packaging, it’s also effective for signage, retail displays, event branding, and craft design, providing unmatched adaptability in different creative workflows.

Tips for Getting the Best Results

To achieve the best possible prints with the Kenpiko KP008, consider these professional recommendations:

  • Use compatible surfaces such as smooth metal, glass, or treated wood for sharper results.
  • Store the ink cartridge properly to prevent drying.
  • Clean the print head regularly to maintain resolution quality.
  • Use the positioning plate for consistent alignment during large print runs.
  • Test print small samples before starting full-scale production.

These steps ensure optimal performance, color accuracy, and long-lasting print clarity for all design projects.

Printer portable
Printer portable

Why the Kenpiko KP008 Is the Best Portable Inkjet Printer for Designers

In a competitive market of compact printers, the Kenpiko KP008 stands out for its professional-grade precision, ergonomic handling, and cross-material compatibility. Its extended print height, high-resolution output, and quick-drying ink make it the ultimate choice for designers needing flexibility and quality on the go.

For creative professionals who value efficiency, portability, and design accuracy, this model represents the perfect blend of technology and craftsmanship.

Conclusion

Finding the Best Portable Inkjet Printer for graphic design work requires balancing portability, performance, and precision. The Kenpiko KP008 Handheld Inkjet Printer excels in all these areas, offering superior print quality, broad material support, and user-friendly operation.

Whether you’re developing packaging concepts, branding prototypes, or industrial labels, the Kenpiko KP008 delivers reliable results that match professional expectations. For designers seeking a versatile, durable, and portable printing solution in 2025, this handheld inkjet printer stands out as the smart investment for creativity on the move.

Also, check the recent article about the best laptop for graphic design here.


Why should a graphic designer use a portable inkjet printer?

A portable inkjet printer gives designers the flexibility to print samples, packaging prototypes, or artwork anywhere. It’s ideal for on-site work, client demonstrations, or small production runs where creativity and speed matter.

Can a portable inkjet printer handle professional-quality designs?

Yes. Modern portable printers support resolutions up to 600 DPI or higher, ensuring clean lines, vibrant colors, and sharp text—suitable for visual presentations, branding mockups, and quick concept prints.

What types of surfaces can a portable inkjet printer print on?

Depending on the model, these printers can print on a variety of materials, including paper, cardboard, plastic, metal, wood, and fabric. Always check the product’s surface compatibility before printing.

What makes the Kenpiko KP008 a good choice for designers?

The Kenpiko KP008 (2025 version) stands out because of its high print quality, compact body, and wireless connectivity. It’s easy to carry, supports color printing, and can handle different materials—making it versatile for packaging and prototype work.

How long does the battery last on most portable inkjet printers?

Battery life typically ranges from 4 to 8 hours depending on the workload. For designers who print regularly, it’s best to choose a model with a rechargeable lithium battery and fast charging support.

Can I print directly from my smartphone or tablet?

Yes. Many modern portable inkjet printers, including the Kenpiko KP008, support Wi-Fi and mobile app connectivity. This allows designers to send designs directly from mobile devices without needing a computer.

How do I maintain a portable inkjet printer for long-lasting performance?

Clean the print head regularly, store ink cartridges properly, and keep the printer covered when not in use. Avoid printing on dusty or wet surfaces to prevent ink smudging or nozzle clogs.

Are portable inkjet printers expensive to maintain?

Not necessarily. While replacement ink cartridges add to the cost, portable printers generally use less ink than large studio printers. Choosing refillable cartridges or bulk ink options can help reduce long-term expenses.

Can portable inkjet printers print full-page designs or large graphics?

Portable printers are best for small to medium prints, such as labels, logos, and packaging artwork. For full-page or poster-size prints, a studio-grade printer is more suitable.

What should I check before buying the best portable inkjet printer?

Look for high resolution, long battery life, surface compatibility, easy connectivity (USB, Wi-Fi, app), and portability. Also, read user reviews about ink quality and durability to make a confident choice.

Pantone Color Bridge Set

Essential Pantone Color Bridge Set for Creative Professionals

Pantone Color Bridge Set

Table of Contents

Discover the Pantone Color Bridge Set (GP1601B), the ultimate color-matching tool for designers. Learn how it ensures accurate color reproduction across print and digital media with over 2,359 spot colors and 224 new shades.

Introduction

Color is at the heart of all visual design, influencing branding, packaging, marketing materials, and digital graphics. Maintaining color consistency across screens and printed materials can be challenging for creative professionals. The Pantone Color Bridge Set bridges this gap, providing a reliable reference for accurate color matching in both coated and uncoated paper applications.

With its comprehensive library, portable design, and technical precision, the Pantone Color Bridge Set has become a staple for designers, printers, and brand managers. In this guide, we’ll explore everything you need to know about this essential tool, including its features, usage, technical details, and creative applications.

What is the Pantone Color Bridge Set?

Purpose of the Color Bridge Set

The set helps designers maintain color accuracy from digital design to print output, ensuring that brand colors remain consistent across all media.

Who Uses It?

Graphic designers, brand managers, packaging professionals, and printing specialists all rely on the Pantone Color Bridge Set for accurate color representation.

Coated vs. Uncoated Paper

Coated (C) paper provides a glossy, vibrant finish, ideal for magazines and high-quality printed materials. Uncoated (U) paper absorbs ink, producing softer, matte results commonly used for stationery.

Transitioning from understanding the set’s purpose to its benefits highlights why it is indispensable for creative professionals.

Benefits of Using the Pantone Color Bridge Set

Accurate Color Reproduction

By providing both Pantone spot colors and CMYK equivalents, designers can confidently predict printed color results.

Streamlined Collaboration

The universal reference simplifies communication with clients, printers, and team members, reducing errors and revisions.

Expanded Creative Options

With 2,359 market-driven spot colors plus 224 new, on-trend colors, designers can explore a wide range of shades and achieve more creative freedom.

Portability and Convenience

Handheld fan deck design allows easy access to colors during client presentations, design reviews, and on-location work.

Best Product Overview

The Pantone Formula Guide | Coated & Uncoated (GP1601B) is a professional color-matching tool designed to help creatives maintain consistent color in their work.

Pantone Color Bridge Set

Product Specifications: Pantone Formula Guide GP1601B

SpecificationDetails
Product NamePantone Formula Guide
ModelGP1601B
BrandPantone
ColorNew Version – Formula Guide
Finish TypeGloss
Size1 Count (Pack of 1)
Item Volume480 Cubic Centimeters
Special FeatureFormula Guide
Unit Count1.0 Count
Paint TypePAINT
Specific Uses for ProductInterior/Exterior Design
Surface RecommendationPaper
Spot Colors Included2,359 Pantone Spot Colors + 224 new market-relevant colors
Paper Stock Weights100 lb (168 gsm) coated, 80 lb (118 gsm) uncoated
Portable Fan DeckYes, handheld for on-the-go reference
Lighting Indicator PageYes, for proper color evaluation
Replacement RecommendationEvery 12–18 months due to fading, smudging, or yellowing
Delta E Tolerance< 2.0 ∆E00 to Pantone master standard reference data

This tool ensures accurate color reproduction across branding, logos, marketing, packaging, and other design applications. Its fan deck format makes it portable, while printed samples on both coated and uncoated paper ensure reliable reference in any professional environment.

Key Features of the Pantone Color Bridge Set

Comprehensive Color Library

Includes 2,359 Pantone spot colors, 224 new market-relevant shades, and 5 new base inks for enhanced creative possibilities. The back index provides numeric locations for easy reference.

Coated and Uncoated References

Displays color on both coated and uncoated papers, allowing accurate visualization for different print applications.

Lighting Indicator Page

Ensures proper lighting for accurate color evaluation, essential for professional color matching.

Delta E (∆E00) Standard

Quantifies color differences between the selected color and the Pantone master reference. Lower Delta E indicates greater accuracy.

Durable and Portable Fan Deck

Compact design allows for portability, while durable pages maintain color integrity even with regular handling.

Transitioning from features, we now explore practical usage tips to maximize accuracy.

How to Use the Pantone Color Bridge Set

Selecting Colors

Use the numeric index to locate the desired Pantone color and compare it with the closest CMYK equivalent.

Matching Print Output

Ensure that the selected color will appear consistent in print, particularly for branding and packaging projects.

Communicating with Printers

Provide the exact Pantone reference number to your printer to ensure spot printing or CMYK approximations match your design intent.

Checking Lighting Conditions

Always verify your environment using the lighting indicator page for accurate color perception.

Replacing Guides

Pantone guides should be replaced every 12–18 months, as handling, light exposure, and ambient moisture can alter color accuracy over time.

Technical Insights

Spot Printing vs. Process Printing

Spot printing uses pre-mixed inks for exact color reproduction, ideal for bold, vibrant designs. Process printing uses CMYK to approximate the color, often necessary for mass production.

Delta E (∆E00) Measurement

Standardized measurement of color difference; lower values indicate a closer match to the Pantone master.

Coated vs. Uncoated Effects

Paper finish significantly affects color appearance; designers must select the right paper type for desired results.

Aging and Environmental Impact

Light, moisture, and handling can alter swatch colors over time, which is why periodic replacement is necessary.

Creative Applications

Branding and Logos

Ensures brand colors remain consistent across all platforms and print materials.

Packaging Design

Predicts color appearance on different materials, preventing surprises during production.

Marketing Materials

Maintains uniform color for brochures, flyers, and business cards, enhancing brand recognition.

Interior and Product Design

Supports color harmony in product finishes and interior design elements.

Trend-Driven Design

Incorporates the latest 224 market-relevant colors for modern, on-trend creative projects.

Conclusion

The Pantone Color Bridge Set (GP1601B) is a must-have tool for creative professionals. By providing accurate spot-to-CMYK color translation, it ensures brand consistency, reduces production errors, and expands creative possibilities. With portable fan decks, a comprehensive color library, and a Delta E accuracy standard, this set is indispensable for designers, printers, and brand managers who require reliable, professional-grade color matching.

Proper usage, care, and regular replacement keep your color selections precise, allowing your designs to consistently look exactly as intended across all media.

Also, check the recent article about the best laptop for graphic design here.


What is the Pantone Color Bridge Set?

The Pantone Color Bridge Set is a professional color-matching system that provides Pantone spot colors alongside their closest CMYK equivalents. It helps designers maintain consistent color from digital design to print.

Who should use the Pantone Formula Guide GP1601B?

Graphic designers, brand managers, packaging designers, and printers who require accurate color reproduction in their work will benefit from this tool.

What is the difference between coated and uncoated paper?

Coated paper (C) provides a glossy, vibrant finish, ideal for magazines and high-quality printed materials. Uncoated paper (U) absorbs ink, resulting in a softer, matte finish commonly used for stationery.

How often should I replace my Pantone guides?

Pantone guides should be replaced every 12–18 months. Handling, exposure to light, and ambient moisture can alter colors over time, reducing accuracy.

How many colors are included in the GP1601B Formula Guide?

The guide includes 2,359 Pantone spot colors plus 224 new market-relevant colors, giving designers a total of 2,390 solid colors for creative projects.

What is Delta E (∆E00) and why is it important?

Delta E (∆E00) measures the difference between two colors. A lower Delta E indicates a closer match to the Pantone master, ensuring color accuracy in print and design.

Can I use the Pantone Color Bridge Set for digital design?

Yes. The set helps designers approximate Pantone spot colors to CMYK equivalents, which is useful for both print and digital projects.

Is the Pantone fan deck portable?

Yes. The fan deck is handheld and portable, making it convenient for on-site client presentations and color evaluations.

Does the Pantone Formula Guide include lighting guidelines?

Yes. The guide includes a lighting indicator page to ensure accurate color evaluation under proper lighting conditions.

Graphic-Designer-Desk-Essentials-What-You-Actually-Need

Graphic Designer Desk Essentials: What You Actually Need

Discover the essential items every graphic designer needs on their desk. From tools to tech, organize your workspace with the right desk essentials for productivity and creativity.

Introduction

A well-organized workspace can dramatically impact a graphic designer’s productivity, creativity, and comfort. Knowing the desk essentials to include ensures you have everything at hand for smooth workflows, whether designing logos, editing images, or creating complex layouts.

In this guide, we’ll cover both the physical tools and digital necessities that make up the ultimate designer desk. You’ll learn which items truly matter, how to organize them effectively, and tips to maintain an inspiring and efficient workspace.

Why Desk Essentials Matter for Graphic Designers

Improves Productivity

Having all necessary tools within reach minimizes distractions and workflow interruptions.

Enhances Creativity

A clean, organized desk encourages free thinking and creative problem-solving.

Promotes Comfort

Proper placement of essentials, such as ergonomic chairs and monitor stands, reduces strain and fatigue.

Saves Time

Quick access to tools, stationery, and tech devices streamlines your design process.

Essential Hardware for a Designer Desk

High-Quality Monitor

A color-accurate monitor is crucial for design work, ensuring precise color representation.

Ergonomic Chair

Comfortable seating supports long hours of work and prevents back and neck pain.

Keyboard and Mouse

Ergonomic and responsive input devices reduce strain and increase efficiency.

Graphics Tablet

For illustrators and digital artists, a tablet is essential for precision and creative control.

External Hard Drives

Backup and storage solutions are critical to safeguard project files and assets.

Essential Desk Accessories

Desk Organizer

Keeps pens, pencils, sticky notes, and small tools neatly arranged.

Cable Management Tools

Velcro straps, clips, and trays reduce clutter and keep your workspace tidy.

Desk Lamp

A lamp with adjustable brightness prevents eye strain and enhances focus.

Notepads and Sketchbooks

For quick sketches, idea mapping, or jotting down notes during brainstorming sessions.

Mouse Pad with Wrist Support

Supports ergonomics during extended design sessions, reducing wrist fatigue.

Digital Desk Essentials

Design Software

Applications like Adobe Creative Cloud, Sketch, or Figma are indispensable.

Cloud Storage and Collaboration Tools

Services like Google Drive, Dropbox, and Slack ensure easy file sharing and team communication.

Color Calibration Tools

Hardware and software calibration tools maintain accurate monitor colors for print and digital work.

Reference Monitors or Secondary Screens

Extra screens improve multitasking and provide better workspace for tool panels.

Organization and Ergonomics Tips

Maintain a Clean Desk

Regularly declutter to keep only essential items on your desk.

Position Monitors Correctly

Place monitors at eye level to avoid neck strain and maximize productivity.

Use Vertical Storage

Shelves and racks save space while keeping tools within reach.

Group Similar Items Together

Organize stationery, gadgets, and tech tools in sections to streamline workflow.

Prioritize Accessibility

Frequently used items should be closest to your dominant hand for efficiency.

Mistakes to Avoid with Desk Essentials

Overcrowding Your Desk

Too many items create distraction and limit workspace functionality.

Ignoring Ergonomics

Improper monitor height, seating, or input devices can lead to discomfort and health issues.

Neglecting Backups

Failing to have external drives or cloud solutions can risk project loss.

Using Low-Quality Tools

Cheap accessories or devices may hinder workflow and cause frustration.

Forgetting Maintenance

Regular cleaning and organization are crucial to keep your desk functional and inspiring.

Conclusion

A graphic designer’s desk should reflect both functionality and creativity. With the right desk essentials, you can enhance productivity, maintain comfort, and foster a workspace that inspires creativity. From high-quality monitors and ergonomic chairs to digital tools and organization accessories, each item plays a vital role in ensuring smooth workflow and efficient design output.

By prioritizing essential hardware, desk accessories, and digital tools, and maintaining proper ergonomics and organization, you can build a designer desk that meets your professional needs while keeping your creativity flowing.

lso, check the recent article about the best laptop for graphic design here.


What are the most important desk essentials for graphic designers?

High-quality monitor, ergonomic chair, graphics tablet, organized stationery, and reliable storage solutions.

How can I organize my desk for maximum productivity?

Use organizers, cable management tools, vertical storage, and keep frequently used items within easy reach.

Are digital tools considered desk essentials?

Yes, design software, cloud storage, color calibration tools, and secondary screens are crucial for modern design workflows.

How often should I review my desk essentials?

Periodically, at least every few months, to remove unused items and update tools.

Can a minimalist desk be effective for designers?

Absolutely. Minimalism reduces distractions and emphasizes the most necessary tools for a clean, productive workspace.

Untitled-4

The Designer’s Guide to Choosing the Right Monitor Size

Learn how to choose the right monitor size for designers. Discover factors like resolution, ergonomics, screen space, and productivity to optimize your creative workspace.

Table of Contents

Introduction

For designers, the monitor is one of the most critical tools in the creative process. The right monitor size can influence how effectively you work, how comfortably you view details, and how efficiently you manage multiple applications. Choosing the wrong size can result in eye strain, poor productivity, and inefficient workspace layouts.

In this guide, we’ll explore the factors that determine the ideal monitor size for designers, discuss key technical considerations, and provide practical tips to help you select a monitor that fits both your creative needs and your workspace.

Why Monitor Size Matters for Designers

Design work requires attention to detail, multi-tasking, and an organized workspace. Monitor size plays a central role in all three.

Screen Real Estate

Larger monitors allow designers to spread out design software, toolbars, and multiple project windows. This reduces the need to constantly switch between applications.

Detail Visibility

The correct monitor size ensures you can see fine details in your work. This is particularly important for graphic design, photo editing, UI/UX design, and video production.

Ergonomics and Comfort

A monitor that is too small or too large for your workspace can cause neck strain, poor posture, and eye fatigue. Choosing the right size ensures a comfortable and healthy working environment.

Factors to Consider When Choosing the Right Monitor Size

Workspace Dimensions

Measure your desk space before purchasing a monitor. Oversized monitors can overwhelm small desks and hinder ergonomics.

Resolution and Pixel Density

The right monitor size should pair well with resolution. For example, a 27-inch screen with 4K resolution provides excellent clarity, while a 27-inch monitor with 1080p resolution may appear pixelated.

Viewing Distance

The distance between your eyes and the screen affects how comfortably you view content. Larger monitors may require more distance to prevent eye strain.

Aspect Ratio

Common aspect ratios like 16:9 or 16:10 affect workspace layout. Ultra-wide monitors offer more horizontal space for multitasking, which can be a big advantage for designers.

Panel Type and Color Accuracy

IPS panels are preferred for accurate color representation, crucial for creative work. Ensure the panel size and type support your workflow requirements.

24 to 27 Inches

Ideal for small desks or dual-monitor setups. Provides clarity without dominating the workspace.

28 to 32 Inches

Perfect for single-monitor setups, balancing screen real estate and desk space. Excellent for detailed design work.

Ultra-Wide Monitors (34 to 38 Inches)

Offers expansive horizontal workspace for multitasking. Ideal for video editors, UI/UX designers, and creative professionals handling multiple windows simultaneously.

40 Inches and Above

More suited for collaborative environments or digital signage. Not typically recommended for individual desks due to ergonomics.

Tips for Optimizing Your Monitor Setup

Adjust Monitor Height

The top of the monitor should be at or slightly below eye level to reduce neck strain.

Use Dual or Triple Monitor Setups

Multiple smaller monitors can provide flexibility and better multitasking without overwhelming a single screen.

Calibrate Your Monitor

Regular calibration ensures colors remain accurate and details are consistent across projects.

Minimize Glare

Position your monitor to avoid reflections from windows or lights. Use matte screens or monitor hoods if necessary.

Organize Workspace Efficiently

Ensure sufficient desk space and maintain proper cable management to complement your right monitor size setup.

Common Mistakes Designers Make

Choosing Size Without Considering Resolution

A large monitor with low resolution can reduce clarity, causing pixelation and discomfort.

Ignoring Ergonomics

Selecting a monitor too big or too small for your seating position can lead to neck and eye strain.

Overlooking Aspect Ratio Needs

Ultra-wide or 16:10 monitors offer productivity advantages, but some may not suit standard software layouts.

Forgetting Calibration

Color accuracy is critical; an uncalibrated monitor can misrepresent design work.

Neglecting Workspace Layout

Failing to plan for desk space and viewing distance can make even the perfect monitor size ineffective.

Conclusion

Choosing the right monitor size is crucial for any designer who wants to maximize productivity, comfort, and visual clarity. Consider your workspace dimensions, resolution, aspect ratio, and ergonomic setup before purchasing.

Whether you opt for a 27-inch IPS monitor, a 34-inch ultra-wide display, or a dual-monitor setup, ensuring the monitor fits your workflow will improve your efficiency and help you create high-quality designs. Remember, the perfect monitor isn’t just about size—it’s about creating a workspace that works for you.

READ MORE

Also, check the recent article about the best laptop for graphic design here.


What is the ideal monitor size for graphic designers?

Typically, 27 to 32 inches is ideal for single-monitor setups, providing balance between detail visibility and desk space.

Are ultra-wide monitors better for designers?

Yes, they provide more horizontal workspace, useful for multitasking and video or UI/UX design projects.

How far should I sit from a 32-inch monitor?

Approximately 24 to 36 inches from your eyes is recommended to reduce strain while maximizing clarity.

Does resolution matter more than size?

Both matter. High resolution on the right-sized monitor ensures clarity, while a large monitor with low resolution may appear pixelated.

Can dual monitors be better than one large monitor?

Yes, dual monitors offer flexibility and allow multiple applications to be visible simultaneously without overwhelming a single screen.

Cable Management

Cable Management Tips for a Clean Creative Space

Cable Management

Table of Contents

Discover the best cable management tips for a clean creative space. Organize your wires, reduce clutter, and boost productivity with simple yet effective strategies.

Introduction

A creative space should be inspiring, comfortable, and functional. However, nothing disrupts focus like tangled wires and cluttered cables running across your desk or floor. Effective cable management not only improves the look of your workspace but also enhances safety, efficiency, and productivity.

Whether you’re a graphic designer, video editor, gamer, or simply someone who values a neat environment, taking control of your cables is a must. This guide provides practical cable management tips to help you achieve a clean and organized creative space without unnecessary stress.

Why Cable Management Matters in a Creative Space

Before exploring specific techniques, it’s important to understand why cable management should be a priority.

Boosts Productivity

A clutter-free workspace allows you to concentrate on your projects without the distraction of messy cables.

Improves Safety

Loose wires can cause tripping hazards or damage to equipment if accidentally pulled.

Protects Equipment

Organized cables reduce wear and tear, preventing connection issues and extending the lifespan of your devices.

Enhances Aesthetics

Clean lines and hidden cables contribute to a professional and visually appealing creative environment.

Essential Tools for Cable Management

Having the right tools makes the process easier and more effective.

Cable Clips and Holders

These small accessories keep individual cables in place along desks or walls.

Velcro Straps and Zip Ties

Reusable Velcro straps or disposable zip ties bundle multiple wires together neatly.

Cable Sleeves

Fabric or plastic sleeves group cables into one streamlined channel, reducing visual clutter.

Cable Raceways and Trays

Mounted under desks or along walls, these structures hide and guide cables.

Desk Grommets

Installed in desktop surfaces, grommets allow cables to pass through while staying contained.

Best Finisher Wire Clamp to Keep Your Graphic Design Desk Organized

Practical Cable Management Tips

Now that you know the tools, let’s go through practical ways to manage your cables effectively.

Label Cables for Easy Identification

Use labels or colored tags to avoid confusion when unplugging or moving devices.

Route Cables Along Desk Edges

Attach cables to the underside or backside of desks to keep them out of sight.

Use a Power Strip with Surge Protection

Consolidating plugs into one power strip minimizes floor clutter while protecting equipment.

Keep Cable Lengths in Check

Avoid extra slack by using shorter cables or coiling excess length with Velcro ties.

Separate Power and Data Cables

Reducing interference ensures smoother performance for sensitive electronics.

Cable Management for Desks

Since desks are central to most creative spaces, they deserve special attention.

Install Under-Desk Cable Trays

These trays hide cables and keep them off the floor.

Mount Power Strips Under the Desk

This keeps plugs accessible yet invisible.

Use Desk Grommets for Clean Pass-Through

Directing cables through grommets reduces visible clutter.

Bundle Monitor and Peripheral Cables Together

Grouping related wires creates a streamlined setup.

Cable Management for Desks

Cable Management for Home Studios

For music producers, video editors, or podcasters, cable organization is even more critical.

Color-Code Audio Cables

Assign colors to different types of connections for quick recognition.

Use Rack Mounts and Panels

Studios benefit from structured cable routing systems that improve both function and appearance.

Secure Heavy Cables Separately

Power cords for amplifiers and mixers should be supported to prevent strain on connections.

Regularly Audit and Replace Old Cables

Over time, studio setups change, so eliminating unused cables prevents clutter.

Cable Management for Gaming and Streaming Setups

Gamers and streamers often deal with multiple devices, making cable management a challenge.

Wall-Mount or Desk-Mount Monitors

Freeing desk space reduces visible wires.

Hide Console Cables Behind Furniture

Position consoles and PCs near walls or racks to conceal connections.

Use RGB Cable Sleeves for Style

For those who enjoy visual flair, colorful sleeves add a unique touch without compromising neatness.

Invest in Wireless Accessories

Wireless keyboards, mice, and headsets reduce the number of cables to manage.

Mistakes to Avoid in Cable Management

Even with the best intentions, mistakes can happen. Here’s what to watch out for.

Over-Tightening Zip Ties

This can damage cables and reduce flexibility.

Ignoring Airflow

Bundling cables too tightly near vents can cause overheating in computers and consoles.

Forgetting Accessibility

Over-hiding cables may make future adjustments difficult.

Using Cheap Accessories

Low-quality clips and trays can break easily, leading to frustration.

Long-Term Maintenance of Cable Management

Cable management isn’t a one-time task; it requires ongoing care.

Revisit Setup Every Few Months

New devices often require adjustments in cable routing.

Clean Dust Around Cables

A clean environment prevents buildup and keeps cables safe.

Replace Worn-Out Organizers

Velcro and clips may lose grip over time, so keep replacements handy.

Stay Minimalist with Devices

The fewer gadgets and unnecessary cables you have, the easier your space is to manage.

Conclusion

A clean creative space begins with effective cable management. From using basic clips and Velcro ties to installing under-desk trays and sleeves, organizing your cables is both practical and aesthetically rewarding.

By keeping wires neat and hidden, you create an environment that fosters focus, reduces stress, and protects your valuable equipment. Whether you’re setting up a home studio, a gaming corner, or a professional creative desk, the right cable management strategy ensures your space looks and performs at its best.

Also, check the recent article about the best laptop for graphic design here.


Why is cable management important for creative spaces?

It improves productivity, safety, equipment longevity, and workspace aesthetics.

What are the easiest tools for cable management?

Cable clips, Velcro straps, sleeves, and trays are simple yet effective.

How can I manage cables on a small desk?

Use grommets, under-desk trays, and short cables to minimize clutter.

Is it worth investing in wireless devices?

Yes, wireless accessories reduce cable count, making management easier.

How often should I redo my cable management?

Check and adjust every few months or whenever adding new equipment.

Two laptops with the text ESSENTIAL AI TOOLS AND SUBSCRIPTIONS overlaid on the image.

Essential AI Tools and Subscriptions Every Graphic Designer Needs in 2025

Two laptops with the text ESSENTIAL AI TOOLS AND SUBSCRIPTIONS overlaid on the image.
Explore the essential AI tools and subscriptions that can boost your productivity and creativity.

Table of Contents

Introduction

Graphic design in 2025 is evolving faster than ever. With the rise of artificial intelligence, designers now have access to advanced tools that make creativity smoother, speed up workflow, and expand the boundaries of what’s possible. For any designer looking to stay competitive, investing in the right AI tools and subscriptions is no longer optional—it’s essential.

This guide explores the best AI tools and subscriptions every graphic designer needs in 2025. From image generation to smart editing, typography assistance, and project management, these solutions can transform how designers approach their work. Each section will explain the benefits, key features, and how designers can integrate these tools into daily projects.

Why AI Tools Matter for Graphic Designers in 2025

Before diving into the list of subscriptions and platforms, it’s important to understand why AI has become so crucial in design workflows. Designers face growing demands from clients, tighter deadlines, and increasing competition. AI tools bridge this gap by reducing repetitive tasks, enhancing creative freedom, and ensuring designs meet industry standards faster.

AI-Powered Design Platforms

AI-powered design platforms have transformed how graphic designers approach creative projects. These platforms integrate artificial intelligence into the design workflow, offering smart suggestions, automation, and collaboration features. They help designers save time, maintain consistency, and enhance creativity across projects.

Adobe Firefly

Adobe Firefly is one of the most powerful AI tools for graphic designers. It allows designers to generate images, textures, and backgrounds quickly. Its integration with Adobe Creative Cloud ensures seamless workflow, making it easy to adjust designs or experiment with multiple versions.

A screenshot of the Adobe Firefly website with the text Adobe Firefly. The ultimate creative AI solution.
Adobe Firefly is a leading creative AI solution for generating images, videos, audio, and vector graphics.

Verified site: Adobe Firefly

Canva AI

Canva AI has become a favorite among both beginners and professionals. It helps automate layouts, color palettes, and content generation, enabling designers to produce professional marketing materials in less time. Its user-friendly interface makes it accessible for fast design needs.

illustrator vs canva

Verified site: Canva AI

Figma AI

Figma AI focuses on collaborative design, especially for UI/UX projects. It can predict layouts, suggest improvements, and automate resizing across multiple devices. This AI integration is particularly useful for web and app design, improving both speed and accuracy.

 Figma AI website with the text Figma AI is your creative collaborator.
Figma AI is a creative collaboration tool that helps teams bring their best ideas to life.

Verified site: Figma AI

Comparison Table: AI-Powered Design Platforms

PlatformBest ForKey AI FeaturesPricing (2025)Ideal Use Case
Adobe FireflyProfessional designersImage generation, texture creation, versioning$20.99/month (Creative Cloud)High-quality image and branding projects
Canva AIBeginners & marketersLayout automation, color palette suggestions, templatesFree / $12.99 ProMarketing materials, social media graphics
Figma AIUI/UX & collaborative teamsLayout prediction, resizing automation, component suggestionsFree / $15 ProfessionalWeb, app, and interface design

AI-powered design platforms are essential for modern designers because they combine automation with creative flexibility. While Adobe Firefly excels in professional-quality visuals, Canva AI provides speed and ease for marketing materials, and Figma AI focuses on collaborative interface design.

By understanding the strengths of each platform, designers can select the right AI tools for their workflow, improving efficiency while maintaining high-quality outputs. Using these platforms strategically allows graphic designers to stay competitive and produce work that meets both client expectations and industry standards.

AI Tools for Image Generation and Editing

AI tools for image generation and editing are transforming how designers, marketers, and creators produce visuals. These tools save time, boost creativity, and allow for the rapid creation of high-quality graphics. From concept art to professional mockups, AI tools can handle almost any visual project.

MidJourney

MidJourney is a subscription-based AI tool ideal for concept art, brand illustrations, and mood boards. It generates highly detailed visuals from text prompts, helping designers explore creative ideas quickly and efficiently.

Midjourney AI website with text and three buttons for Sign Up, Log In, and Explore.
Midjourney is a powerful AI tool for generating images and art from text prompts.

Verified site: MidJourney

DALL·E 3

DALL·E 3 by OpenAI is an industry-standard AI tool for image generation. Integrated with multiple platforms, it allows designers to create unique graphics, artwork, and mockups with just a few sentences. Its realistic outputs make it perfect for professional workflows.

DALL·E 3 website with the DALL·E 3 logo and a button that says Try in ChatGPT.
DALL·E 3 is a powerful AI tool developed by OpenAI for generating images from text descriptions.

Verified site: DALL·E 3

Recraft.ai

Recraft.ai is an advanced AI tool for generating high-quality images. Designers can create illustrations, concept visuals, and detailed artwork from text prompts. Its AI ensures realistic textures and styles, offering flexibility for a wide range of design projects.

The word Recraft in a stylized, three-dimensional font on a purple background.
Recraft is a design AI tool for creating and editing vector art, images, and illustrations.

Verified site: Recraft.ai

Runway ML

Runway ML combines AI-powered image and video editing. It enables background removal, object replacement, and style transfer with ease. This tool is excellent for designers working on multimedia projects who need both image and video capabilities.

Verified site: Runway ML

Comparison Table: AI Tools for Image Generation

AI ToolKey FeaturesEase of UsePricingBest For
MidJourneyText-to-image, highly detailed visualsModeratePaidConcept art, mood boards
DALL·E 3Text-to-image, platform integrationEasyFree & PaidProfessional graphics, mockups
Recraft.aiRealistic textures, versatile stylesEasyFree & PaidIllustrations, concept visuals
Runway MLBackground removal, style transferModerateFree & PaidMultimedia projects

AI tools for image generation and editing allow designers to produce high-quality visuals faster than traditional methods. Choosing the right AI tool depends on your workflow, project type, and budget. MidJourney and DALL·E 3 excel in generating creative concepts, Recraft.ai provides versatile styles, and Runway ML bridges image and video editing needs. Using these tools strategically enhances productivity while maintaining professional design standards.

AI Tools for Typography and Fonts

Typography is one of the most critical elements of design. Choosing the right fonts can define a brand, set a mood, and improve readability. AI tools are now making typography easier, faster, and more precise for designers. These tools help find the perfect font, suggest font pairings, and maintain consistency across projects.

FontJoy

FontJoy uses AI to generate beautiful font pairings automatically. Designers can test different combinations and see real-time previews. This saves hours of trial and error, especially when creating websites, branding materials, or social media graphics. FontJoy’s interface is simple and intuitive, making it ideal for both beginners and professionals.

a website with the title Font pairing made simple, and an explanation of how it generates font combinations using deep learning.
Fontjoy is an AI tool that simplifies font pairing by generating font combinations with deep learning.

Verified site: FontJoy

DeepFont

DeepFont is an AI tool that scans designs and suggests fonts with similar styles. It is particularly useful for matching brand typography or recreating font styles seen in inspiration sources. DeepFont ensures design consistency by helping designers quickly find fonts that complement existing projects.

Verified site: DeepFont

Comparison Table: AI Tools for Typography

AI ToolKey FeaturesEase of UsePricingBest For
FontJoyAutomatic font pairing, real-time previewEasyFreeQuick font pair exploration
DeepFontFont recognition, style matchingEasyFree & PaidBrand consistency, font matching
Adobe Sensei Typography ToolsAI font suggestions, brand consistencyModeratePaid (Creative Cloud)Professional projects, design automation

AI tools for typography simplify the process of selecting and pairing fonts. FontJoy is great for experimenting with combinations, DeepFont helps match and maintain brand styles, and Adobe Sensei provides intelligent recommendations integrated into professional design software. By using these AI tools, designers can save time, enhance creativity, and ensure their typography choices are visually appealing and cohesive across all projects.

AI Tools for Color and Layouts

Colors and layouts are essential in design because they influence aesthetics, readability, and user engagement. Choosing the right combinations can elevate a project, while poor choices can reduce its impact. AI tools now assist designers by generating palettes, analyzing harmony, and suggesting effective layouts, saving time and improving design quality.

Khroma

Khroma is an AI-powered color tool that generates customized palettes based on your preferences. Designers can train the AI by liking or disliking color schemes, and Khroma learns their style over time. This makes it easy to find palettes that align with branding, marketing materials, or personal projects. Its intuitive interface allows designers to experiment quickly, reducing the time spent manually testing color combinations.

Khroma website with the text Design with colors you love.
Khroma is an AI tool that helps you discover and create limitless color palettes based on your preferences.

Verified site: Khroma

Colormind

Colormind uses AI to analyze data from websites, apps, and popular designs. It generates palettes that are trendy, balanced, and visually appealing. Designers can input specific colors, and Colormind will produce compatible palettes while maintaining harmony. This ensures that projects stay fresh and aligned with current design trends. Colormind is particularly useful for web design, UI/UX, and social media graphics where color consistency is key.

Verified site: Colormind

Canva AI Color Tools

Canva AI also includes intelligent color suggestions. It evaluates your design and recommends complementary colors, gradient schemes, and highlights. With AI-driven color suggestions integrated into its design editor, Canva simplifies layout and color choices for both beginners and professional designers.

Comparison Table: AI Tools for Color and Layouts

AI ToolKey FeaturesEase of UsePricingBest For
KhromaPersonalized palette generationEasyFreeBranding, creative projects
ColormindData-driven palettes, trend analysisEasyFreeUI/UX, web, social media
Canva AI Color ToolsComplementary colors, gradientsVery EasyFree & PaidQuick design and layout work

AI tools for color and layouts help designers create visually cohesive and appealing designs efficiently. Khroma personalizes palettes for consistent style, Colormind ensures trendy and effective combinations, and Canva AI simplifies color application within layouts. Using these tools strategically allows designers to focus on creativity while maintaining professional quality and visual harmony across projects.

AI Tools for Productivity and Workflow

Productivity and workflow management are critical for graphic designers. Balancing client requirements, project deadlines, and creative tasks can be challenging. AI tools now help streamline processes, reduce manual effort, and improve team collaboration. Using AI-powered productivity tools allows designers to focus more on creativity while keeping projects organized and efficient.

Notion AI

Notion AI is a versatile tool for organizing design projects. It helps designers keep track of client requirements, deadlines, and creative ideas. Its AI-powered writing assistant can generate notes, design briefs, and meeting summaries. Notion AI makes collaboration simple by allowing teams to share updates and documents in one centralized workspace.

Notion AI website with the text The AI workspace that works for you.
Notion is an all-in-one AI workspace for taking notes, searching apps, and building workflows.

Verified site: Notion AI

Jasper AI

Jasper AI is primarily known for content creation, but designers benefit from it in multiple ways. It can generate taglines, product descriptions, ad copy, and social media captions to complement visual designs. Using Jasper AI reduces time spent brainstorming text and ensures that content aligns with the visual design strategy.

Verified site: Jasper AI

Trello with Butler AI

Trello integrates AI through Butler automation, providing powerful workflow management features. Designers can create rules that automatically trigger task updates, reminders, or notifications. Butler AI streamlines repetitive tasks, such as moving cards between project stages or assigning deadlines, helping teams stay on track without constant manual input.

Verified site: Trello with Butler AI

Comparison Table: AI Tools for Productivity and Workflow

AI ToolKey FeaturesEase of UsePricingBest For
Notion AIProject organization, AI writing assistantEasyFree & PaidDesign projects, client tracking
Jasper AIContent generation, tagline and copy ideasEasyPaidMarketing, social media, product copy
Trello with Butler AIWorkflow automation, task managementModerateFree & PaidTeam collaboration, project efficiency

AI tools for productivity and workflow help designers manage projects efficiently while reducing repetitive tasks. Notion AI centralizes project organization, Jasper AI enhances creative content workflows, and Trello with Butler AI automates team processes. By using these tools strategically, designers can maintain high productivity, meet deadlines consistently, and focus more on producing high-quality, creative work.

AI Tools for Mockup Creation

Mockups are an essential part of a designer’s workflow. They allow clients to visualize products, packaging, or digital assets in real-world contexts. Traditionally, creating mockups can be time-consuming, but AI-powered tools now make this process faster, more efficient, and highly professional. These tools help designers generate realistic mockups for presentations, marketing, and client approvals without starting from scratch.

Pacdora

Pacdora focuses on packaging and product mockups. Its AI-driven templates and automated 3D rendering allow designers to quickly visualize labels, boxes, and other packaging designs. Pacdora is ideal for branding and product design projects, as it reduces the time needed for client approvals while maintaining realistic, high-quality outputs.

 Pacdora website with options for Mockup Generator, 3D Modeling Software, and Dieline Template Maker.
Pacdora is an AI tool for creating mockups and dieline templates for product packaging and design.

Verified site: Pacdora

Placeit

Placeit is a versatile platform for AI-driven product, apparel, and digital mockups. It offers thousands of customizable templates, enabling designers to generate visuals for websites, advertisements, and social media campaigns. Its AI tools simplify layout adjustments, lighting, and perspective, producing polished results with minimal effort.

Verified site: Placeit

MockupBro

MockupBro provides online AI mockup generation for packaging, posters, and branding visuals. Designers can export high-resolution images ready for client presentations or social media. Its simplicity makes it suitable for quick design projects without compromising quality.

Verified site: MockupBro

Vexels Mockup Generator

Vexels Mockup Generator offers AI-assisted mockup creation for apparel, packaging, and print designs, along with a library of customizable templates to streamline workflow. Both tools are excellent for designers looking to save time and improve the presentation of their work.

Verified site: Vexels

Comparison Table: AI Tools for Mockup Creation

AI ToolKey FeaturesEase of UsePricingBest For
PacdoraPackaging mockups, 3D renderingEasyPaidProduct & branding mockups
SmartmockupsDevices, apparel, packagingVery EasyFree & PaidSocial media & online stores
PlaceitThousands of templates, AI adjustmentsEasyPaidDigital & product mockups
MockupBroHigh-resolution exports, quick creationEasyFree & PaidPosters, branding visuals
ShotSnap3D mockups, automatic lighting/shadowsModeratePaidProfessional product presentations
Vexels Mockup GeneratorAI templates, apparel & print designsEasyFree & PaidWorkflow streamlining & branding

AI tools for mockup creation simplify the presentation process, save designers hours of work, and ensure polished, professional outputs. Pacdora, Smartmockups, and Placeit excel in speed and flexibility, while ShotSnap and Vexels provide high-quality, realistic visuals for professional-grade presentations.

AI Tools for Branding and Marketing Support

Graphic designers today are often expected to provide more than just visual design. Clients look for complete branding and marketing solutions, including logos, brand identity, and campaign content. AI tools now make it easier for designers to deliver full-service creative solutions. These tools streamline workflows, inspire ideas, and save time while maintaining high-quality outputs.

Looka

Looka is an AI-powered branding tool that generates logo concepts, branding kits, and visual identities. Designers can use it to quickly explore multiple logo options and brand variations. While it doesn’t replace professional creativity, Looka provides a strong starting point for brainstorming brand designs. Its AI also suggests complementary colors and font pairings, helping designers maintain cohesive visual identities.

Verified site: Looka

Copy.ai

Copy.ai specializes in generating advertising text, product descriptions, and social media content. Designers can pair these AI-generated copy outputs with visuals to deliver complete marketing campaigns. Using Copy.ai reduces the time spent brainstorming taglines and content, ensuring consistency across a brand’s messaging. It’s especially useful for social media campaigns, e-commerce product launches, and promotional materials.

Verified site: Copy.ai

Brandmark

Brandmark offers comprehensive AI-driven branding solutions. It generates logo variations, color palettes, and typography suggestions, creating a cohesive brand kit. Designers working with startups or small businesses find Brandmark invaluable for producing professional brand identities quickly. It helps maintain a consistent look and feel across all marketing materials and online platforms.

Verified site: Brandmark

Comparison Table: AI Tools for Branding and Marketing Support

AI ToolKey FeaturesEase of UsePricingBest For
LookaLogo concepts, branding kits, visual identityEasyPaidLogo design and brand brainstorming
Copy.aiAdvertising copy, product descriptions, social media contentVery EasyPaidMarketing campaigns, e-commerce
BrandmarkLogo variations, color palettes, typography suggestionsEasyPaidStartups, small business branding

AI tools for branding and marketing support help designers deliver full-service creative solutions. Looka provides initial logo and brand ideas, Copy.ai ensures marketing copy aligns with visuals, and Brandmark creates cohesive brand kits. By integrating these AI tools into their workflow, designers can enhance efficiency, maintain brand consistency, and offer clients professional, end-to-end creative solutions.

How to Choose the Right AI Tools for Your Design Workflow

With so many AI subscriptions available in 2025, choosing the right ones depends on a designer’s focus area. Some designers work mostly in branding, while others specialize in UI, print, or motion graphics. Selecting the right combination ensures that tools enhance creativity rather than overwhelm the process.

Evaluate Your Needs

Start by identifying areas where you spend the most time. If image generation is a frequent task, MidJourney or DALL·E 3 may be worth the investment.

Consider Budget and Subscription Models

Some Ai tools offer free plans, but professional designers often need premium subscriptions for higher-quality results. Balancing costs with features ensures long-term value.

Test Integration with Existing Software

The best AI tools are those that fit seamlessly into your existing workflow. If you use Adobe Creative Cloud, for instance, Firefly and Sensei tools will integrate better than standalone platforms.

Future of AI in Graphic Design

The role of AI in graphic design will continue to grow. In the next few years, tools will become more predictive, personalized, and collaborative. Designers who embrace AI now will stay ahead of trends and create more impactful work for clients.

Conclusion

AI tools and subscriptions have transformed the design industry in 2025. From Adobe Firefly and MidJourney to productivity apps like Notion AI, these solutions empower graphic designers to work faster, smarter, and more creatively. While AI cannot replace the human touch, it acts as a powerful partner in producing high-quality, original designs.

For any graphic designer, adopting the right Ai tools is an investment in both efficiency and creativity. By using these technologies strategically, designers will not only meet client demands but also push the boundaries of what’s possible in the world of modern design.

Also, check the recent article about the best laptop for graphic design here.


What are AI tools for graphic design?

AI tools for graphic design are software or platforms that use artificial intelligence to automate, assist, or enhance design tasks. They can generate images, suggest colors, pair fonts, create mockups, or even help with branding and marketing content.

Are AI design tools suitable for beginners?

Yes. Many AI tools, such as Canva AI, FontJoy, and Pacdora, are user-friendly and do not require advanced design skills. Beginners can quickly generate visuals, experiment with fonts and colors, and produce professional-looking mockups.

Can AI replace professional graphic designers?

AI tools cannot fully replace designers. They assist with repetitive tasks, inspiration, and efficiency, but creative decision-making, storytelling, and brand strategy still require human expertise. AI is best used as a complement to professional skills.

Which AI tool is best for image generation?

Tools like MidJourney, DALL·E 3, and Recraft.ai are excellent for image generation. They convert text prompts into detailed visuals, concept art, or mockups, making them ideal for designers seeking creative flexibility.

Which AI tool is best for mockups?

Pacdora, Smartmockups, Placeit, and ShotSnap are top choices for mockup creation. They provide realistic, high-quality previews for packaging, products, apparel, and digital designs, saving time for client presentations.

Are AI tools for typography and color reliable?

Yes. Tools like FontJoy, DeepFont, Khroma, and Colormind provide accurate font pairings and color palettes. They save time and ensure consistency across design projects, although final decisions should align with brand guidelines and creative intent.

Do AI productivity tools really save time?

Absolutely. Notion AI, Jasper AI, and Trello with Butler automation help organize tasks, generate copy, and automate workflows. Designers can focus more on creative work rather than repetitive administrative tasks.

Are AI tools expensive?

Pricing varies. Some tools are free with limited features (e.g., FontJoy, Khroma, Colormind), while others require subscriptions (e.g., MidJourney, Adobe Firefly, Pacdora). Most paid tools offer advanced features that save significant time and improve workflow quality.