Table of Contents
- Why Choosing the Right WordPress Hosting Service Provider Platform Matters
- What Makes Hostinger the Top WordPress Hosting Service Provider Platform
- Hostinger WordPress Hosting Plans and Pricing
- How to Get Started with Hostinger WordPress Hosting
- Hostinger Specification Table
- Hostinger's Exceptional Support System Explained
- Hostinger Performance and Uptime — Built for US Traffic
- Year-over-Year User Growth (2021–2025)
- WordPress-Specific Features That Set Hostinger Apart
- Hostinger Security Features for WordPress Websites
- Who Should Use Hostinger for WordPress Hosting
- Final Thoughts on the Top WordPress Hosting Service Provider Platform
Looking for the top WordPress hosting service provider platform with exceptional support? Discover why Hostinger leads the pack in 2026 with blazing speed, affordable plans, and 24/7 expert customer support for US-based websites.
Why Choosing the Right WordPress Hosting Service Provider Platform Matters
Every great WordPress website starts with one critical decision — choosing the right hosting platform. If you pick the wrong one, you end up dealing with slow load times, server crashes, and support teams that take days to respond. That is a nightmare no website owner wants to face, especially when your business depends on it.
In the United States, millions of businesses, bloggers, and eCommerce store owners rely on WordPress to power their online presence. The demand for a reliable WordPress hosting service provider platform has never been higher. People want speed, security, uptime, and most importantly, a support team that actually helps when things go wrong.
That is exactly where Hostinger stands out from the crowd. Hostinger has built a strong reputation as one of the most trusted WordPress hosting service provider platforms available today. From affordable pricing to a world-class support system, Hostinger checks every box that US-based website owners care about most.
In this post, we are going to break down everything you need to know about Hostinger — its features, performance, pricing, and support quality — so you can make a confident, informed decision for your WordPress website.
What Makes Hostinger the Top WordPress Hosting Service Provider Platform
Hostinger was founded in 2004 and has grown to serve over 29 million users across 178 countries. That kind of scale does not happen by accident. It happens because the platform consistently delivers on its promises. Hostinger has earned its place as a top WordPress hosting service provider platform through years of improving its infrastructure, support systems, and overall user experience.
What truly separates Hostinger from the rest is the combination of premium features at an accessible price point. Most hosting providers force you to choose between affordability and quality. Hostinger removes that trade-off entirely.
Hostinger’s Core Strengths at a Glance
Hostinger offers a custom-built control panel called hPanel, which is far easier to use than the outdated cPanel found on most competitors. It also provides a one-click WordPress installer, automatic updates, and a built-in WordPress staging environment — all features that help you manage your site with confidence and ease.
Performance That Powers Real Results
Hostinger uses LiteSpeed web servers, which are significantly faster than the standard Apache servers used by many other hosts. Combined with built-in caching and a global content delivery network, your WordPress site loads quickly no matter where your visitors are coming from across the United States.
Security You Can Count On
Every Hostinger plan includes a free SSL certificate, weekly automatic backups, a web application firewall, and malware scanning. These protections run quietly in the background, keeping your site safe without you having to manage anything manually.
Hostinger WordPress Hosting Plans and Pricing
Understanding the pricing structure is one of the first things most website owners look at when evaluating a WordPress hosting service provider platform. Hostinger makes this easy with clear, transparent pricing across several tiers.
Single WordPress Plan
This plan is designed for new website owners who are just getting started. It supports one website and includes 50 GB of SSD storage, a free SSL certificate, and managed WordPress features. The introductory price makes it one of the most affordable entry points in the US hosting market.
WordPress Starter Plan
The WordPress Starter plan steps things up by supporting 100 websites and providing 100 GB of SSD storage. It also includes a free domain name for the first year, which adds even more value for those building their first website.
WordPress Business Plan
This plan is ideal for growing businesses and established blogs. It includes 200 GB of SSD storage, daily backups, a free CDN, and priority support. The daily backup feature alone is worth the upgrade for any site that publishes content regularly.
Cloud Startup Plan
For high-traffic websites and eCommerce stores, the Cloud Startup plan delivers dedicated resources, improved server performance, and the highest level of support priority. This plan is built for websites that cannot afford any downtime.
Understanding which plan fits your needs is straightforward because Hostinger provides a clear breakdown of each option on their pricing page, making the decision process simple and stress-free.
How to Get Started with Hostinger WordPress Hosting
Getting started with Hostinger is simple and takes less than ten minutes from signup to a live WordPress site. Follow these exact steps to get up and running the right way.
Step One — Go to the Hostinger Website
Open your browser and go to Hostinger.com. This is the official website where you will find all plans, pricing, and hosting options available for WordPress users in the United States.
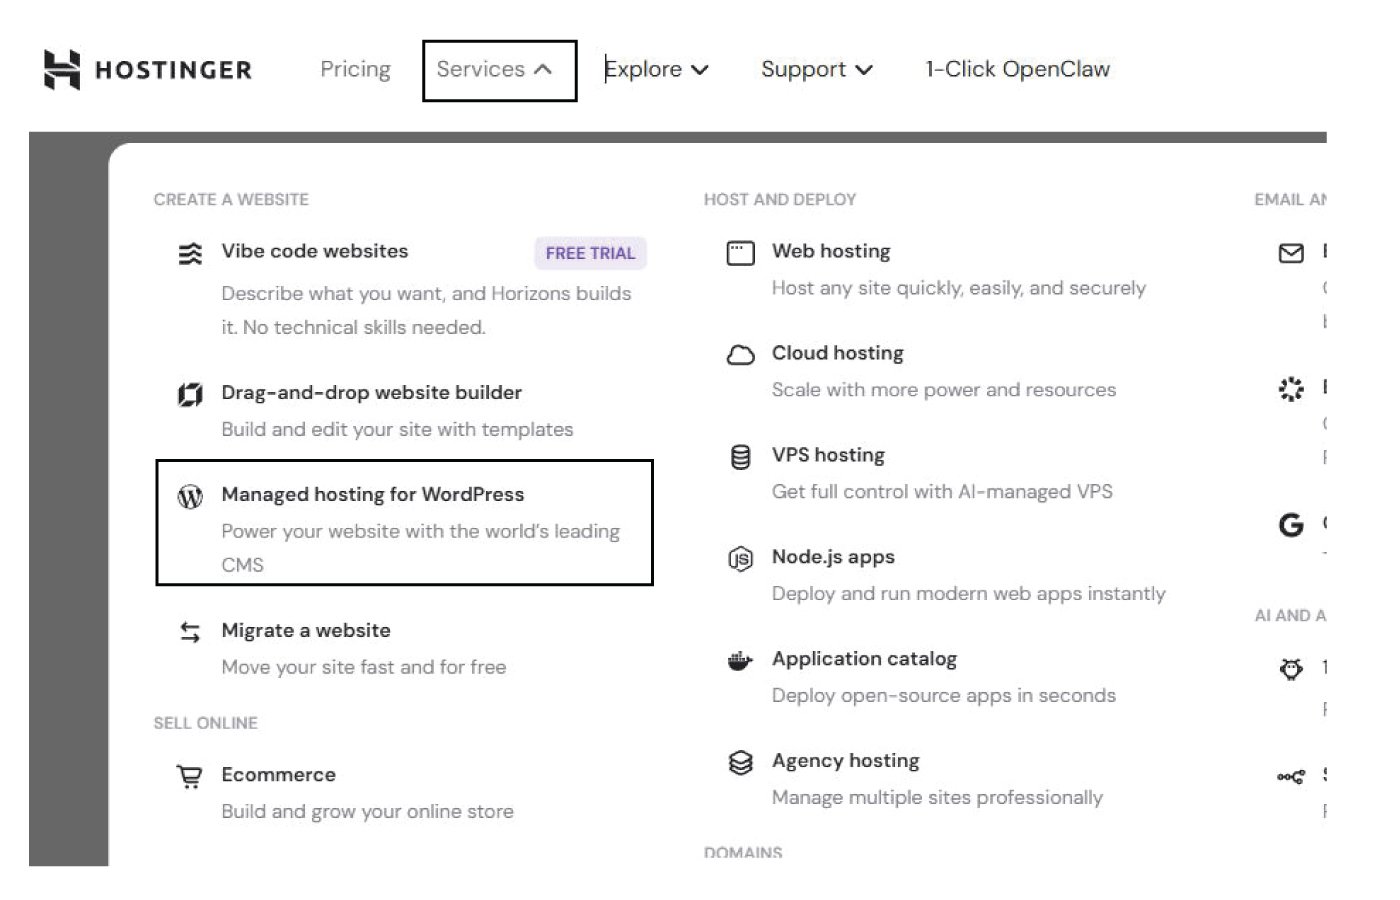
Step Two — Click Services from the Header Menu
Once you are on the Hostinger homepage, look at the top navigation bar. You will see a menu with several options. Click on Services from the header menu to expand the dropdown and reveal the full list of hosting categories Hostinger offers.
Step Three — Click Managed Hosting for WordPress
Under the Services dropdown menu, you will find a list of hosting types. Look for and click on Managed Hosting for WordPress. This will take you directly to the WordPress hosting page where all available plans are displayed with full feature breakdowns and pricing details.
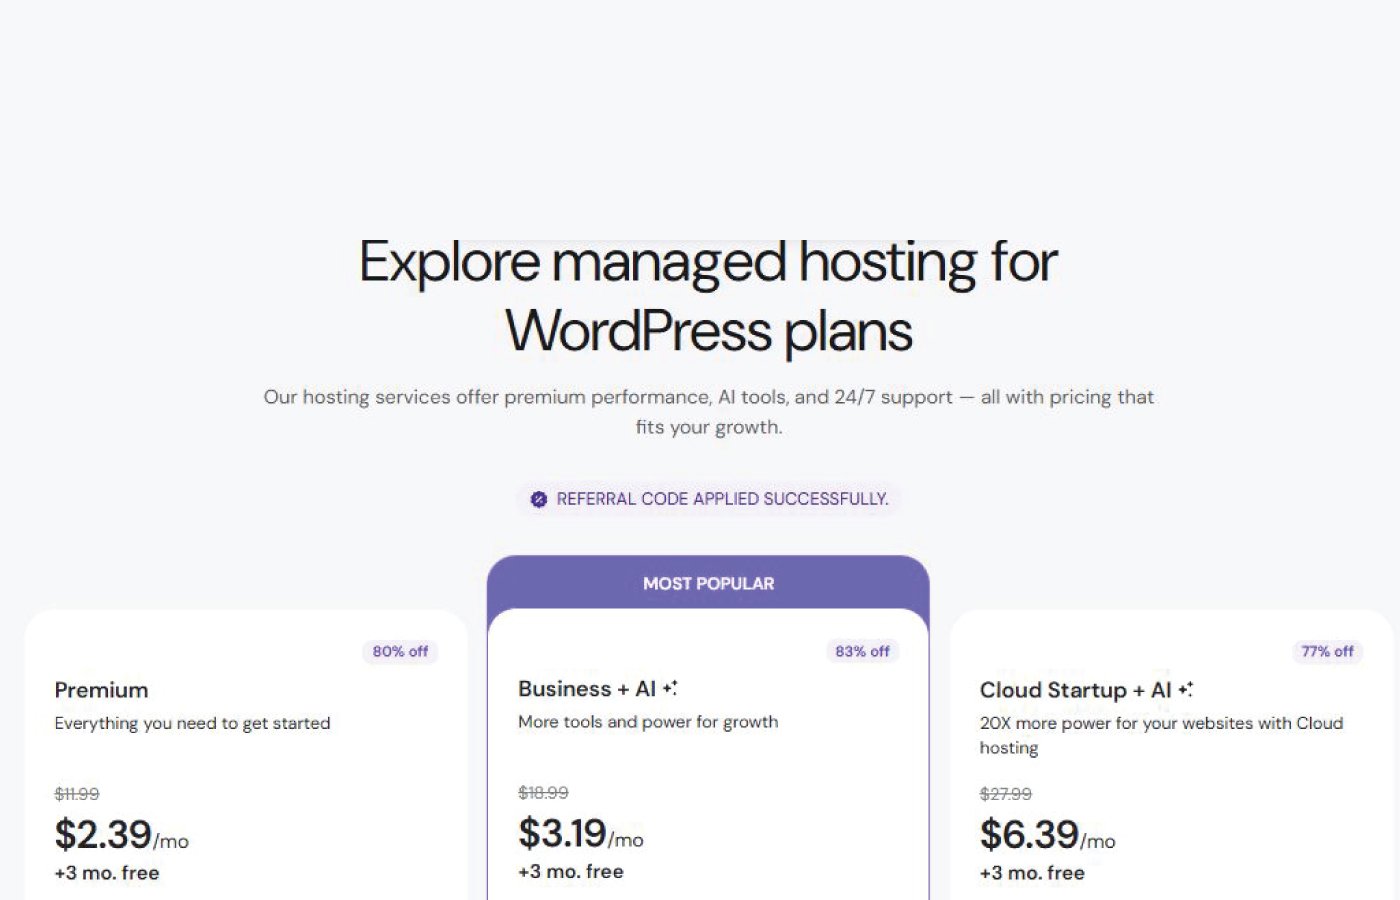
Step Four — Select Your Plan Based on Your Need
Hostinger offers three main WordPress hosting plans to choose from depending on your goals and budget:
- Premium — Best for beginners and personal websites. Includes essential features at the lowest price point, making it a great starting plan for new WordPress users.
- Business — Best for growing websites and small businesses. Includes daily backups, a free CDN, a staging environment, and priority support — everything a serious website owner needs.
- Cloud Startup — Best for high-traffic websites and eCommerce stores. Delivers dedicated resources, maximum performance, and the highest level of support priority for sites that cannot afford any downtime.
Review each plan carefully and select the one that matches your current website size, expected traffic, and business goals.
Step Five — Complete Checkout and Install WordPress
After selecting your plan, follow the checkout process to register your domain, enter your billing details, and finalize your purchase. Once inside your hPanel dashboard, use the one-click WordPress installer to have your site live in under two minutes.
Step Six — Launch and Grow
With WordPress installed, you can choose a theme, install plugins, and start creating content. If you run into any questions along the way, Hostinger’s 24/7 live chat support and extensive knowledge base are always available to help.
Hostinger Specification Table
| Feature | Single WordPress | WordPress Starter | WordPress Business | Cloud Startup |
|---|---|---|---|---|
| Websites | 1 | 100 | 100 | 300 |
| SSD Storage | 50 GB | 100 GB | 200 GB | 200 GB |
| Free SSL | Yes | Yes | Yes | Yes |
| Free Domain | No | Yes (1 Year) | Yes (1 Year) | Yes (1 Year) |
| WordPress Installs | 1 | 100 | 100 | 300 |
| Backups | Weekly | Weekly | Daily | Daily |
| CDN | No | No | Yes (Free) | Yes (Free) |
| Uptime Guarantee | 99.9% | 99.9% | 99.9% | 99.9% |
| Support | 24/7 Live Chat | 24/7 Live Chat | 24/7 Priority | 24/7 Priority |
| LiteSpeed Cache | Yes | Yes | Yes | Yes |
| Staging | No | No | Yes | Yes |
| Monthly Visitors | 10,000 | 25,000 | 100,000 | 200,000 |
This table gives you a clear picture of what each plan includes so you can match the right option to your current needs and future growth plans.

Hostinger Business Hosting
Get high-speed, secure hosting for your website. Limited-time 20% discount available.
Claim 20% Discount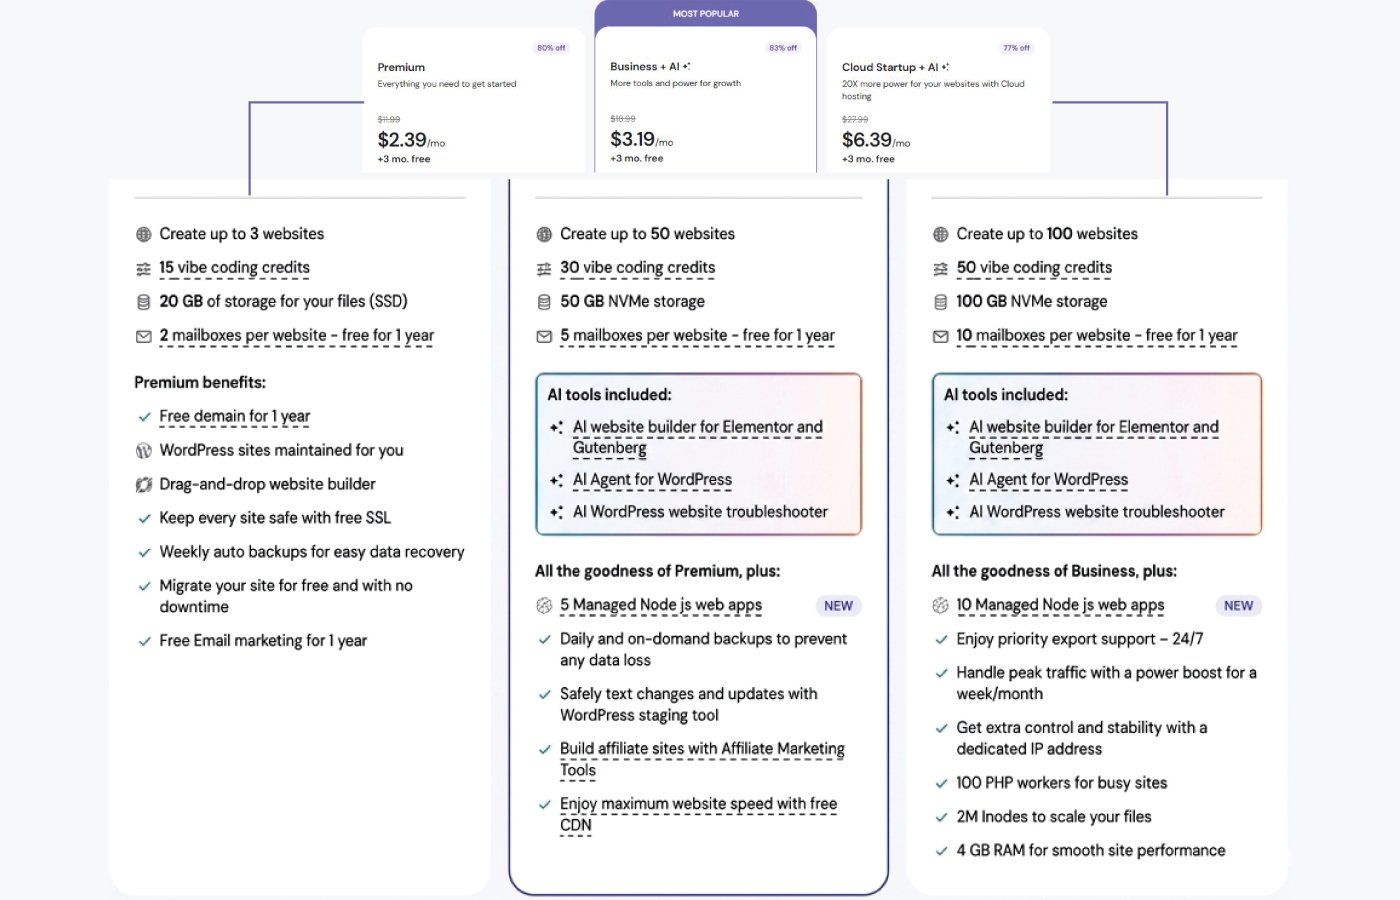
Hostinger’s Exceptional Support System Explained
No matter how good a hosting platform is, problems can arise. A server can go down. A plugin can break your site. A domain setting can cause an error. When those moments happen, you need a support team that responds fast, knows what they are doing, and actually solves the problem. That is what exceptional support looks like in practice — and it is one of the biggest reasons Hostinger ranks as the top WordPress hosting service provider platform for US users.
24/7 Live Chat Support
Hostinger offers round-the-clock live chat support, which means help is always just a few clicks away. Whether it is two in the afternoon or three in the morning, you can connect with a support agent in real time. The average response time is under two minutes, which is well above the industry standard.
AI-Powered Support Assistant
Hostinger has integrated an AI-powered assistant called Kodee into their support system. Kodee can handle a wide range of common WordPress issues instantly, including plugin conflicts, login problems, and basic configuration questions. For more complex issues, Kodee seamlessly connects you to a live agent without any long wait times.
Knowledge Base and Tutorial Library
For those who prefer to solve problems on their own, Hostinger maintains one of the most detailed knowledge bases in the hosting industry. With thousands of step-by-step tutorials, video guides, and troubleshooting articles, you can find answers to almost any WordPress-related question without ever needing to contact support.
Priority Support for Higher-Tier Plans
Users on the WordPress Business and Cloud Startup plans receive priority support, which means their tickets are escalated ahead of standard queue. For business owners who cannot afford extended downtime, this level of service is invaluable.
Hostinger Performance and Uptime — Built for US Traffic
Performance is not just about how fast a page loads. It is about how consistently fast it loads, even during peak traffic hours. US-based website owners need a WordPress hosting service provider platform that can handle spikes in visitor traffic without slowing down or crashing.
99.9% Uptime Guarantee
Hostinger backs all of its plans with a 99.9% uptime guarantee. This means your website is available to visitors virtually all of the time. When Hostinger fails to meet this guarantee, users are eligible for service credits — a sign that the company stands behind its infrastructure.
LiteSpeed Servers and NVMe Storage
Hostinger’s servers run on LiteSpeed technology paired with NVMe SSD storage, which is significantly faster than traditional SATA SSDs. This combination results in faster database queries, quicker file access, and overall snappier WordPress performance.
Global Data Centers Including US Locations
Hostinger operates data centers across multiple continents, including locations in the United States. When you choose a US-based data center for your hosting plan, your website data is physically closer to your American visitors, which reduces latency and improves page load speed.
Built-In Caching for WordPress
Every Hostinger WordPress plan includes LiteSpeed Cache, a powerful caching plugin that automatically optimizes your WordPress site for speed. It handles page caching, image optimization, and database cleanup without requiring any technical setup on your part.
Year-over-Year User Growth (2021–2025)
Hostinger’s rise as the top WordPress hosting service provider platform is not just backed by features and support quality — it is backed by real numbers that tell a story of consistent, accelerating growth. The following data reflects the number of active clients, including paying businesses and solopreneurs, recorded at the end of each fiscal year from 2021 through 2025.
How Hostinger Grew from 1.1 Million to 4.6 Million Users
In 2021, Hostinger closed the fiscal year with approximately 1.1 million active users and reached the significant internal milestone of employing 1,000 people globally. That foundation set the stage for what came next. By the end of 2022, the platform had grown to approximately 1.5 million active users, representing a 36 percent annual growth rate driven largely by its expansion into high-demand cloud hosting services. US-based businesses and solopreneurs were increasingly turning to Hostinger as a trusted WordPress hosting service provider platform that could scale alongside their ambitions.
The 2023 Breakthrough and the Launch of Kodee
The year 2023 marked a genuine turning point for Hostinger. Active users climbed from 1.5 million to approximately 2.2 million, a 46 percent increase in a single year. A major driver of that momentum was the launch of Kodee, Hostinger’s AI-powered customer support assistant. Kodee changed the way users interacted with the support system by providing instant, intelligent responses to common WordPress questions around the clock. The message was clear — when a hosting platform invests in smarter, faster support, users take notice and word spreads quickly.
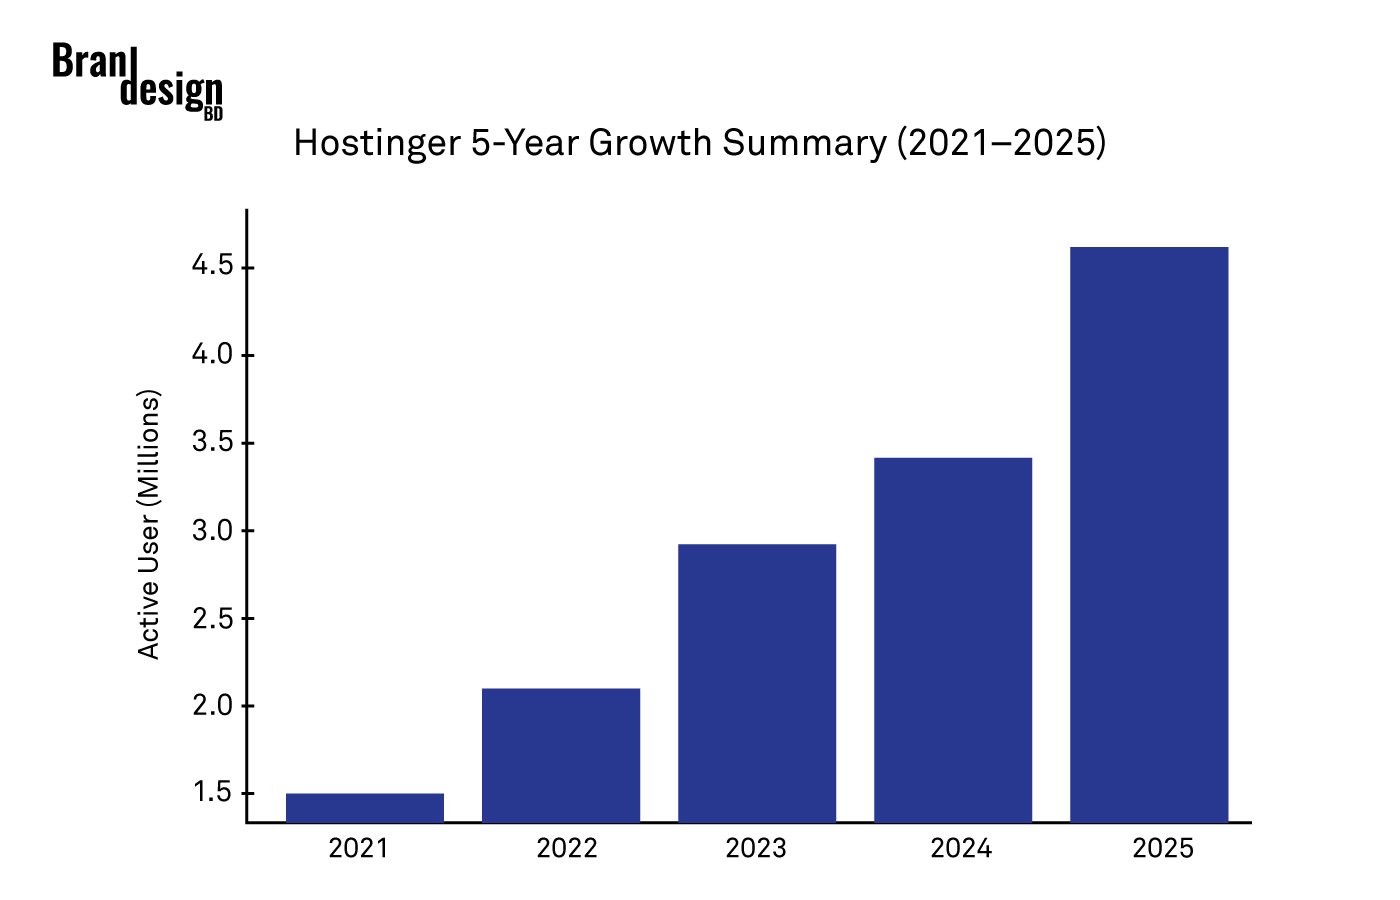
2024 — The Breakout Year with 54 Percent Growth
Hostinger’s strongest year on record came in 2024, when the platform achieved a 54 percent annual growth rate and expanded its active user base from 2.2 million to approximately 3.4 million. That single year added more than 1.2 million new users — a number that reflects genuine trust built through performance and support excellence. The platform also crossed a landmark milestone in 2024 when total managed domains surpassed 5 million, cementing Hostinger’s position as one of the most relied-upon WordPress hosting service provider platforms in the world. For US-based website owners evaluating their options, that domain milestone signals the kind of infrastructure experience and server reliability that only comes from managing websites at massive scale.
2025 and the Era of AI-Powered Website Building
By 2025, Hostinger had reached 4.6 million active users, adding over 1.2 million new clients during the year despite a moderated growth rate of 35 percent. What made 2025 particularly significant was the adoption of Hostinger’s AI Website Builder, which attracted more than 800,000 users to the platform. This shift toward AI-assisted website creation represents a broader evolution in how people build and manage their WordPress sites. Rather than relying entirely on technical knowledge, users can now launch professional websites faster and with far less friction than ever before. Hostinger’s decision to invest in this technology early placed it ahead of most competitors in the US market.
What This Growth Means for You as a Website Owner
A platform that grows at this pace does so for one reason — it delivers results that users trust enough to recommend to others. From 1.1 million users in 2021 to 4.6 million in 2025, Hostinger has added nearly 3.5 million active clients over four years. That is not growth fueled by marketing alone. It is growth earned through fast servers, transparent pricing, and an exceptional support system that resolves problems quickly and keeps websites running smoothly. For anyone evaluating a WordPress hosting service provider platform in 2026, Hostinger’s user growth story is one of the strongest signals that you are choosing a platform built for the long term.
Hostinger Business Hosting
Get high-speed, secure hosting for your website. Limited-time 20% discount available.
Claim 20% DiscountWordPress-Specific Features That Set Hostinger Apart
A great WordPress hosting service provider platform does not just offer generic hosting. It offers tools, features, and workflows built specifically for WordPress users. Hostinger has invested heavily in WordPress-specific functionality that makes managing your site faster and easier.
One-Click WordPress Installation
Getting WordPress up and running on Hostinger takes less than two minutes. From the hPanel dashboard, you simply click the WordPress installer, enter a few basic details, and your site is live. There is no need to manually upload files, configure databases, or wrestle with technical settings.
Managed WordPress Features
Hostinger handles automatic WordPress core updates, plugin compatibility checks, and performance optimizations in the background. This managed approach means your site stays secure and current without you having to monitor it manually every week.
WordPress Staging Environment
Higher-tier Hostinger plans include a staging environment, which allows you to test changes, updates, and new plugins on a copy of your live site before publishing them. This is an essential feature for anyone who manages a business website where mistakes can directly impact revenue.
Free Domain and Professional Email
Most Hostinger WordPress plans include a free domain name for the first year along with professional business email hosting. Having a branded email address like yourname@yourwebsite.com adds credibility and professionalism to your online presence.
Hostinger Business Hosting
Get high-speed, secure hosting for your website. Limited-time 20% discount available.
Claim 20% DiscountHostinger Security Features for WordPress Websites
Security is not optional when you run a WordPress website. WordPress powers over 43% of all websites on the internet, which also makes it the most targeted platform by hackers and bots. A reliable WordPress hosting service provider platform must have strong security measures built in at every level.
Free SSL Certificate on Every Plan
Every Hostinger plan includes a free SSL certificate through Let’s Encrypt. SSL encrypts the connection between your website and your visitors, which protects sensitive data and also improves your Google search rankings since Google uses HTTPS as a ranking signal.
Web Application Firewall
Hostinger’s web application firewall monitors incoming traffic and blocks malicious requests before they reach your WordPress site. It filters out common attack patterns like SQL injections, cross-site scripting, and brute force login attempts.
Automatic Malware Scanning
Hostinger scans your hosting account regularly for malware and suspicious files. If anything is detected, you receive an immediate alert so you can take action before the issue spreads or causes visible damage to your site.
DDoS Protection
Distributed denial-of-service attacks can overwhelm a server and take your website offline. Hostinger includes DDoS protection on all plans to absorb and filter out malicious traffic spikes, keeping your site online even when under attack.
Who Should Use Hostinger for WordPress Hosting
Hostinger is a strong fit for a wide range of users, but understanding exactly who benefits most helps you decide if it is the right match for your specific situation.
Beginner Website Owners
If you are launching your first WordPress site and you want an easy, affordable, and well-supported platform, Hostinger is one of the best starting points available. The one-click installer, beginner-friendly hPanel, and 24/7 live chat support make the learning curve much less steep.
Bloggers and Content Creators
Bloggers who publish content regularly need fast page loads, reliable uptime, and enough storage to handle growing media libraries. Hostinger’s LiteSpeed servers and scalable storage options make it an excellent match for content-driven websites.
Small Business Owners
Small businesses in the US need a website that stays online, loads fast, and looks professional. Hostinger’s plans include everything a small business needs — free domain, SSL, professional email, fast servers, and priority support on higher-tier plans.
eCommerce Stores
For WooCommerce-powered online stores, performance and security are non-negotiable. Hostinger’s NVMe SSD storage, LiteSpeed caching, DDoS protection, and daily backups on business plans create a solid foundation for running a successful online store.
Hostinger Business Hosting
Get high-speed, secure hosting for your website. Limited-time 20% discount available.
Claim 20% DiscountFinal Thoughts on the Top WordPress Hosting Service Provider Platform
Choosing a WordPress hosting service provider platform is one of the most important decisions you will make for your website. The right choice gives you speed, security, reliability, and the peace of mind that comes from knowing expert support is always available when you need it.
Hostinger has earned its position as the top WordPress hosting service provider platform through consistent performance, industry-leading support response times, and a pricing structure that makes professional-grade hosting accessible to everyone — from first-time bloggers to established eCommerce businesses in the United States.
Whether you are just launching your first WordPress site or looking to migrate an existing website to a faster, better-supported platform, Hostinger delivers everything you need to succeed online. The combination of LiteSpeed servers, NVMe SSD storage, 24/7 live chat support, managed WordPress features, and robust security tools makes it the clear top choice for US-based website owners in 2026.
If exceptional support, reliable performance, and great value are what you are looking for in a WordPress hosting service provider platform — Hostinger is the answer.
Also, check the recent article about the best laptop for graphic design here.
Yes, Hostinger is one of the best WordPress hosting service provider platforms available today. It offers managed WordPress features, one-click installation, LiteSpeed servers, NVMe SSD storage, and 24/7 live chat support — all at a price point that is significantly lower than most competitors. Millions of users worldwide, including a large and growing base in the United States, rely on Hostinger to keep their WordPress websites fast, secure, and online.
Yes, Hostinger provides 24/7 live chat support on every WordPress hosting plan. Whether you have a technical issue at midnight or a billing question on a Sunday afternoon, a support agent is always available to help. Higher-tier plans such as WordPress Business and Cloud Startup also include priority support, which means your request moves to the front of the queue for even faster resolution.
Hostinger uses LiteSpeed web servers combined with NVMe SSD storage and built-in LiteSpeed Cache to deliver some of the fastest WordPress load times in the industry. Independent speed tests consistently show Hostinger performing well above the industry average, with time-to-first-byte results that compete directly with hosting providers that charge significantly more per month.
Yes, Hostinger includes multiple layers of security on every plan. Each account comes with a free SSL certificate, a web application firewall, automatic malware scanning, and DDoS protection. Higher-tier plans also include daily automatic backups, which means your WordPress site data is protected and recoverable even if something unexpected goes wrong.
Yes, depending on the plan you choose. The Single WordPress plan supports one website, while the WordPress Starter and WordPress Business plans support up to 100 websites. The Cloud Startup plan supports up to 300 websites. This makes Hostinger an excellent choice for web designers, digital agencies, and entrepreneurs who manage multiple WordPress sites from a single hosting account.
Yes, most Hostinger WordPress plans include a free domain name for the first year. This applies to the WordPress Starter, WordPress Business, and Cloud Startup plans. The free domain offer allows you to get your website online without any additional upfront cost, making it an especially attractive option for first-time website owners in the United States.
hPanel is Hostinger’s custom-built hosting control panel. Unlike the outdated cPanel interface used by many other hosts, hPanel is designed to be clean, intuitive, and easy to navigate even for beginners. It gives you quick access to your WordPress installations, domain settings, email accounts, file manager, backups, and support — all from a single, well-organized dashboard. Most users find hPanel significantly easier to use than cPanel from their very first login.
Yes, Hostinger fully supports WooCommerce, which is the most popular eCommerce plugin for WordPress. The WordPress Business and Cloud Startup plans are particularly well suited for WooCommerce stores because they include daily backups, a free CDN, priority support, and the server resources needed to handle product pages, checkout processes, and payment transactions smoothly and securely.
Yes, Hostinger offers a free website migration service that handles the transfer of your existing WordPress site from another hosting provider. Their migration team manages the technical process so your site moves over without downtime or data loss. You can also use the built-in WordPress migration plugin available through hPanel if you prefer to handle the process yourself.
Hostinger guarantees 99.9% uptime on all WordPress hosting plans. This means your website is available to visitors virtually all of the time. In the rare event that uptime falls below the guaranteed threshold, Hostinger provides service credits to affected accounts. This commitment to reliability is one of the main reasons Hostinger has earned the trust of over 4.6 million active users worldwide.
Absolutely. Hostinger is widely regarded as one of the most beginner-friendly WordPress hosting service provider platforms on the market. The one-click WordPress installer, easy-to-navigate hPanel dashboard, AI Website Builder, and 24/7 live chat support make it straightforward for anyone to launch and manage a WordPress website — even with zero prior technical experience.