Portable Inkjet Printer

Best Portable Inkjet Printer for Graphic Designer

 Portable Inkjet Printer
Portable Inkjet Printer

Table of Contents

Discover why the Kenpiko KP008 Handheld Inkjet Printer stands out as the Best Portable Inkjet Printer for Graphic Designers in 2025. Learn about its print quality, usability, features, and how it compares to other compact printers for creative professionals.

Introduction

For graphic designers, a portable printer is not just a convenience—it’s an essential creative tool. Whether it’s for on-the-spot packaging mockups, client presentations, or field labeling, the right printer should offer flexibility, sharp image reproduction, and efficient operation. In 2025, the Kenpiko KP008 1-inch Handheld Inkjet Printer has become a favorite among professionals who need mobility without sacrificing precision.

This guide explores why the Kenpiko KP008 deserves the title of the Best Portable Inkjet Printer, what makes it ideal for designers, and how it compares to other leading options in the portable printing market.

Why Graphic Designers Need a Portable Inkjet Printer

Design professionals often work across multiple settings—from studios and offices to client sites and workshops. A portable inkjet printer offers a powerful combination of flexibility and control, allowing designers to produce high-quality visuals anywhere.

On-the-Go Creativity

A portable inkjet printer allows designers to bring their ideas to life instantly. Whether you need to print a mockup, label, or sample, the convenience of handheld printing ensures no creative opportunity is missed.

Professional Presentation

Graphic designers often need to showcase their work in physical form. Being able to print directly onto packaging, materials, or labels demonstrates both skill and professionalism, leaving a lasting impression on clients.

Efficiency and Time Savings

Traditional printers require setup time and space, while a handheld inkjet printer like the Kenpiko KP008 eliminates that hassle. Its compact design supports quick deployment, making it ideal for time-sensitive design tasks or fieldwork.

Introducing the Kenpiko KP008 Handheld Inkjet Printer

The Kenpiko KP008 is not just another compact printer—it’s an advanced portable printing solution built for precision and adaptability. This 2025 upgraded model combines enhanced print quality, longer battery life, and multi-surface compatibility, making it an indispensable tool for professionals in design, packaging, and production.

Let’s explore its core attributes and why it’s ideal for designers seeking the Best Portable Inkjet Printer.

Portable Inkjet Printer for Graphic Designer

Key Features of the Kenpiko KP008 Handheld Inkjet Printer

Extended Print Height and High Resolution

Unlike standard portable models that print only up to 0.5 inches, the Kenpiko KP008 offers an adjustable print height ranging from 0.08 inch (2mm) to 1 inch (25.4mm). With a high-resolution output of 600 dpi, it produces crisp text, sharp barcodes, and clean logo prints. This feature is particularly valuable for packaging designers who demand clarity and precision in every detail.

Long Battery Life and Memory Flexibility

The Kenpiko KP008 is equipped with a 10-hour battery, allowing uninterrupted operation throughout the day. It includes an upgraded memory card for storing designs and supports importing content via USB. With 28 language settings, it’s globally compatible, a big advantage for designers working with international clients or suppliers.

Ergonomic Design and 360° Printing

This printer’s design reflects attention to both comfort and performance. A 4.3-inch touchscreen ensures intuitive control, while smooth-rolling wheels and a non-slip silicone grip enhance handling accuracy. The 360° printing capability allows consistent output on both flat and curved surfaces—perfect for printing on bottles, boxes, and textured materials.

Multi-Surface Printing Capability

One of the standout advantages of the Kenpiko KP008 is its versatility across materials. It can print on wood, metal, glass, plastic, leather, ceramics, fabric, aluminum foil, and fiberboard, maintaining crisp results on every surface. For designers creating labels or prototypes, this means true creative freedom without material limitations.

High-Capacity Quick-Dry Ink Cartridge

The Kenpiko KP008 uses a 72ml fast-drying black ink cartridge designed for smudge-proof printing. Its ink dries in seconds and resists fading, making it suitable for industrial, retail, and creative environments. Whether you’re printing product labels or decorative text, this cartridge ensures vibrant and lasting impressions.

Product Specification

SpecificationDetails
BrandKenpiko
Model NameKP008 1-inch Handheld Printer
Model NumberKP008
Model SeriesKENPIKO KP008 Handheld Inkjet Printer
Printer TypeInkjet (Portable Handheld Inkjet Printer Gun)
Printer Output TypeMonochrome
Printing TechnologyHandheld Inkjet with Quick-Dry Ink
Maximum Print Height1 inch (25.4 mm)
Adjustable Print Range0.08 inch (2 mm) – 1 inch (25.4 mm)
Maximum Print Resolution (B/W)600 × 600 dpi
Maximum Print Resolution (Color)600 dpi
Ink Cartridge Capacity72 mL (Black Quick-Dry Ink)
Ink TypeFast-Dry Solvent Ink – Smudge-Proof
Supported File FormatsBMP, JPG, PNG
Print Media TypeLabels, Text, Logos, Barcodes, Symbols, Numbers
Supported SurfacesWood, Metal, Glass, Plastic, Leather, Ceramic, Fabric, Fiberboard, Aluminum Foil
Printing Direction360° Printing (Flat & Curved Surfaces)
Display Type4.3″ Touch Screen
Controller TypeHandheld Inkjet Printer Gun
Memory & StorageUpgraded Memory Card + U-Disk Support
ConnectivityUSB
Languages Supported28 Languages
Battery LifeUp to 10 Hours Continuous Use
Power SupplyAC Power Adapter (Included)
Item Dimensions (D × W × H)2.1″ × 4.92″ × 9.1″
Item Weight≈ 2.4 lb (1.09 kg)
Color1-Inch Handheld Printer (Black)
Package ContentsPrinter, Touch Pen, Power Adapter, U-Disk, 72 mL Ink Cartridge, Positioning Plate, Manual
Warranty TypeLimited Warranty + Unconditional Technical Support
Return Policy30-Day Amazon Voluntary Return Guarantee
ASINB0F12MNMNV
Customer Rating⭐ 5.0 out of 5 (28 Reviews)
Best Sellers Rank#96 in Portable Photo Printers / #64,334 in Electronics

Design and Build Quality

The printer’s compact body (2.1″ D x 4.92″ W x 9.1″ H) balances portability with durability. The smooth, lightweight construction supports long working sessions, while the positioning plate assists in maintaining consistent alignment. Its robust materials and ergonomic structure make it reliable for field use and studio environments alike.

Transitioning from design studios to workshops is effortless thanks to the printer’s comfortable grip and handheld controller type. It feels professional yet simple, perfect for designers accustomed to precision tools.

Portable Printer for Graphic Designer

Ease of Use and Interface

One of the biggest strengths of the Kenpiko KP008 is its 4.3-inch touchscreen display. The user interface is straightforward, allowing quick editing, logo uploads, and layout adjustments directly from the device. For graphic designers, this intuitive workflow reduces the need for external editing software during quick print jobs.

The touchscreen also allows users to adjust print height, preview graphics, and switch between text and image printing modes. In fast-paced environments, this level of control makes it an efficient creative companion.

Printing Performance and Quality

The Kenpiko KP008 Handheld Inkjet Printer delivers 600×600 dpi resolution, ensuring clean and detailed prints. Its advanced ink technology minimizes smudging and ensures rich, dark lines even on textured surfaces. For graphic designers, this translates to professional-grade visual consistency, especially for packaging prototypes and product labels.

The printer also excels in maintaining edge sharpness on both porous and non-porous materials. Designers who often work with mockup materials such as coated boxes, kraft paper, or aluminum packaging will find this feature especially beneficial.

Battery and Portability

With up to 10 hours of continuous printing, the Kenpiko KP008 supports long creative sessions without frequent recharging. Its rechargeable battery is built for reliability, offering consistent voltage for stable print output.

The printer’s compact, handheld design makes it easy to carry to client sites or trade shows, and the included accessories—such as a power adapter, touch pen, and USB drive—enhance convenience for traveling designers.

Connectivity and Compatibility

The Kenpiko KP008 connects through a USB interface, making it compatible with most computers and devices used in design environments. This ensures quick content transfers and file loading for printing text, logos, or barcodes.

It supports standard image formats such as BMP, JPG, and PNG, providing flexibility for designers using Adobe Illustrator, Photoshop, or other creative software. Its plug-and-play design also minimizes setup time, letting you start printing immediately.

Portable Printer
Portable Printer

Package and Accessories Included

Each Kenpiko KP008 printer comes as a complete kit, ready for professional use. The box includes:

  • 1× Handheld Inkjet Printer
  • 1× Touch Pen
  • 1× Power Adapter
  • 1× U Disk
  • 1× 72ml Black Ink Cartridge
  • 1× Positioning Plate
  • 1× Instruction Manual

Kenpiko also provides detailed operation videos and technical support, ensuring users can master the device quickly and maximize its performance.

Best Use Cases for Graphic Designers

The Kenpiko KP008 shines across multiple design applications.

It’s perfect for custom packaging, branding prototypes, and creative labeling projects. Designers can print brand logos, expiration dates, QR codes, or visual elements directly onto physical materials—making it an excellent choice for small studios and product-based businesses.

Beyond packaging, it’s also effective for signage, retail displays, event branding, and craft design, providing unmatched adaptability in different creative workflows.

Tips for Getting the Best Results

To achieve the best possible prints with the Kenpiko KP008, consider these professional recommendations:

  • Use compatible surfaces such as smooth metal, glass, or treated wood for sharper results.
  • Store the ink cartridge properly to prevent drying.
  • Clean the print head regularly to maintain resolution quality.
  • Use the positioning plate for consistent alignment during large print runs.
  • Test print small samples before starting full-scale production.

These steps ensure optimal performance, color accuracy, and long-lasting print clarity for all design projects.

Printer portable
Printer portable

Why the Kenpiko KP008 Is the Best Portable Inkjet Printer for Designers

In a competitive market of compact printers, the Kenpiko KP008 stands out for its professional-grade precision, ergonomic handling, and cross-material compatibility. Its extended print height, high-resolution output, and quick-drying ink make it the ultimate choice for designers needing flexibility and quality on the go.

For creative professionals who value efficiency, portability, and design accuracy, this model represents the perfect blend of technology and craftsmanship.

Conclusion

Finding the Best Portable Inkjet Printer for graphic design work requires balancing portability, performance, and precision. The Kenpiko KP008 Handheld Inkjet Printer excels in all these areas, offering superior print quality, broad material support, and user-friendly operation.

Whether you’re developing packaging concepts, branding prototypes, or industrial labels, the Kenpiko KP008 delivers reliable results that match professional expectations. For designers seeking a versatile, durable, and portable printing solution in 2025, this handheld inkjet printer stands out as the smart investment for creativity on the move.

Also, check the recent article about the best laptop for graphic design here.


Why should a graphic designer use a portable inkjet printer?

A portable inkjet printer gives designers the flexibility to print samples, packaging prototypes, or artwork anywhere. It’s ideal for on-site work, client demonstrations, or small production runs where creativity and speed matter.

Can a portable inkjet printer handle professional-quality designs?

Yes. Modern portable printers support resolutions up to 600 DPI or higher, ensuring clean lines, vibrant colors, and sharp text—suitable for visual presentations, branding mockups, and quick concept prints.

What types of surfaces can a portable inkjet printer print on?

Depending on the model, these printers can print on a variety of materials, including paper, cardboard, plastic, metal, wood, and fabric. Always check the product’s surface compatibility before printing.

What makes the Kenpiko KP008 a good choice for designers?

The Kenpiko KP008 (2025 version) stands out because of its high print quality, compact body, and wireless connectivity. It’s easy to carry, supports color printing, and can handle different materials—making it versatile for packaging and prototype work.

How long does the battery last on most portable inkjet printers?

Battery life typically ranges from 4 to 8 hours depending on the workload. For designers who print regularly, it’s best to choose a model with a rechargeable lithium battery and fast charging support.

Can I print directly from my smartphone or tablet?

Yes. Many modern portable inkjet printers, including the Kenpiko KP008, support Wi-Fi and mobile app connectivity. This allows designers to send designs directly from mobile devices without needing a computer.

How do I maintain a portable inkjet printer for long-lasting performance?

Clean the print head regularly, store ink cartridges properly, and keep the printer covered when not in use. Avoid printing on dusty or wet surfaces to prevent ink smudging or nozzle clogs.

Are portable inkjet printers expensive to maintain?

Not necessarily. While replacement ink cartridges add to the cost, portable printers generally use less ink than large studio printers. Choosing refillable cartridges or bulk ink options can help reduce long-term expenses.

Can portable inkjet printers print full-page designs or large graphics?

Portable printers are best for small to medium prints, such as labels, logos, and packaging artwork. For full-page or poster-size prints, a studio-grade printer is more suitable.

What should I check before buying the best portable inkjet printer?

Look for high resolution, long battery life, surface compatibility, easy connectivity (USB, Wi-Fi, app), and portability. Also, read user reviews about ink quality and durability to make a confident choice.

Pantone Color Bridge Set

Essential Pantone Color Bridge Set for Creative Professionals

Pantone Color Bridge Set

Table of Contents

Discover the Pantone Color Bridge Set (GP1601B), the ultimate color-matching tool for designers. Learn how it ensures accurate color reproduction across print and digital media with over 2,359 spot colors and 224 new shades.

Introduction

Color is at the heart of all visual design, influencing branding, packaging, marketing materials, and digital graphics. Maintaining color consistency across screens and printed materials can be challenging for creative professionals. The Pantone Color Bridge Set bridges this gap, providing a reliable reference for accurate color matching in both coated and uncoated paper applications.

With its comprehensive library, portable design, and technical precision, the Pantone Color Bridge Set has become a staple for designers, printers, and brand managers. In this guide, we’ll explore everything you need to know about this essential tool, including its features, usage, technical details, and creative applications.

What is the Pantone Color Bridge Set?

Purpose of the Color Bridge Set

The set helps designers maintain color accuracy from digital design to print output, ensuring that brand colors remain consistent across all media.

Who Uses It?

Graphic designers, brand managers, packaging professionals, and printing specialists all rely on the Pantone Color Bridge Set for accurate color representation.

Coated vs. Uncoated Paper

Coated (C) paper provides a glossy, vibrant finish, ideal for magazines and high-quality printed materials. Uncoated (U) paper absorbs ink, producing softer, matte results commonly used for stationery.

Transitioning from understanding the set’s purpose to its benefits highlights why it is indispensable for creative professionals.

Benefits of Using the Pantone Color Bridge Set

Accurate Color Reproduction

By providing both Pantone spot colors and CMYK equivalents, designers can confidently predict printed color results.

Streamlined Collaboration

The universal reference simplifies communication with clients, printers, and team members, reducing errors and revisions.

Expanded Creative Options

With 2,359 market-driven spot colors plus 224 new, on-trend colors, designers can explore a wide range of shades and achieve more creative freedom.

Portability and Convenience

Handheld fan deck design allows easy access to colors during client presentations, design reviews, and on-location work.

Best Product Overview

The Pantone Formula Guide | Coated & Uncoated (GP1601B) is a professional color-matching tool designed to help creatives maintain consistent color in their work.

Pantone Color Bridge Set

Product Specifications: Pantone Formula Guide GP1601B

SpecificationDetails
Product NamePantone Formula Guide
ModelGP1601B
BrandPantone
ColorNew Version – Formula Guide
Finish TypeGloss
Size1 Count (Pack of 1)
Item Volume480 Cubic Centimeters
Special FeatureFormula Guide
Unit Count1.0 Count
Paint TypePAINT
Specific Uses for ProductInterior/Exterior Design
Surface RecommendationPaper
Spot Colors Included2,359 Pantone Spot Colors + 224 new market-relevant colors
Paper Stock Weights100 lb (168 gsm) coated, 80 lb (118 gsm) uncoated
Portable Fan DeckYes, handheld for on-the-go reference
Lighting Indicator PageYes, for proper color evaluation
Replacement RecommendationEvery 12–18 months due to fading, smudging, or yellowing
Delta E Tolerance< 2.0 ∆E00 to Pantone master standard reference data

This tool ensures accurate color reproduction across branding, logos, marketing, packaging, and other design applications. Its fan deck format makes it portable, while printed samples on both coated and uncoated paper ensure reliable reference in any professional environment.

Key Features of the Pantone Color Bridge Set

Comprehensive Color Library

Includes 2,359 Pantone spot colors, 224 new market-relevant shades, and 5 new base inks for enhanced creative possibilities. The back index provides numeric locations for easy reference.

Coated and Uncoated References

Displays color on both coated and uncoated papers, allowing accurate visualization for different print applications.

Lighting Indicator Page

Ensures proper lighting for accurate color evaluation, essential for professional color matching.

Delta E (∆E00) Standard

Quantifies color differences between the selected color and the Pantone master reference. Lower Delta E indicates greater accuracy.

Durable and Portable Fan Deck

Compact design allows for portability, while durable pages maintain color integrity even with regular handling.

Transitioning from features, we now explore practical usage tips to maximize accuracy.

How to Use the Pantone Color Bridge Set

Selecting Colors

Use the numeric index to locate the desired Pantone color and compare it with the closest CMYK equivalent.

Matching Print Output

Ensure that the selected color will appear consistent in print, particularly for branding and packaging projects.

Communicating with Printers

Provide the exact Pantone reference number to your printer to ensure spot printing or CMYK approximations match your design intent.

Checking Lighting Conditions

Always verify your environment using the lighting indicator page for accurate color perception.

Replacing Guides

Pantone guides should be replaced every 12–18 months, as handling, light exposure, and ambient moisture can alter color accuracy over time.

Technical Insights

Spot Printing vs. Process Printing

Spot printing uses pre-mixed inks for exact color reproduction, ideal for bold, vibrant designs. Process printing uses CMYK to approximate the color, often necessary for mass production.

Delta E (∆E00) Measurement

Standardized measurement of color difference; lower values indicate a closer match to the Pantone master.

Coated vs. Uncoated Effects

Paper finish significantly affects color appearance; designers must select the right paper type for desired results.

Aging and Environmental Impact

Light, moisture, and handling can alter swatch colors over time, which is why periodic replacement is necessary.

Creative Applications

Branding and Logos

Ensures brand colors remain consistent across all platforms and print materials.

Packaging Design

Predicts color appearance on different materials, preventing surprises during production.

Marketing Materials

Maintains uniform color for brochures, flyers, and business cards, enhancing brand recognition.

Interior and Product Design

Supports color harmony in product finishes and interior design elements.

Trend-Driven Design

Incorporates the latest 224 market-relevant colors for modern, on-trend creative projects.

Conclusion

The Pantone Color Bridge Set (GP1601B) is a must-have tool for creative professionals. By providing accurate spot-to-CMYK color translation, it ensures brand consistency, reduces production errors, and expands creative possibilities. With portable fan decks, a comprehensive color library, and a Delta E accuracy standard, this set is indispensable for designers, printers, and brand managers who require reliable, professional-grade color matching.

Proper usage, care, and regular replacement keep your color selections precise, allowing your designs to consistently look exactly as intended across all media.

Also, check the recent article about the best laptop for graphic design here.


What is the Pantone Color Bridge Set?

The Pantone Color Bridge Set is a professional color-matching system that provides Pantone spot colors alongside their closest CMYK equivalents. It helps designers maintain consistent color from digital design to print.

Who should use the Pantone Formula Guide GP1601B?

Graphic designers, brand managers, packaging designers, and printers who require accurate color reproduction in their work will benefit from this tool.

What is the difference between coated and uncoated paper?

Coated paper (C) provides a glossy, vibrant finish, ideal for magazines and high-quality printed materials. Uncoated paper (U) absorbs ink, resulting in a softer, matte finish commonly used for stationery.

How often should I replace my Pantone guides?

Pantone guides should be replaced every 12–18 months. Handling, exposure to light, and ambient moisture can alter colors over time, reducing accuracy.

How many colors are included in the GP1601B Formula Guide?

The guide includes 2,359 Pantone spot colors plus 224 new market-relevant colors, giving designers a total of 2,390 solid colors for creative projects.

What is Delta E (∆E00) and why is it important?

Delta E (∆E00) measures the difference between two colors. A lower Delta E indicates a closer match to the Pantone master, ensuring color accuracy in print and design.

Can I use the Pantone Color Bridge Set for digital design?

Yes. The set helps designers approximate Pantone spot colors to CMYK equivalents, which is useful for both print and digital projects.

Is the Pantone fan deck portable?

Yes. The fan deck is handheld and portable, making it convenient for on-site client presentations and color evaluations.

Does the Pantone Formula Guide include lighting guidelines?

Yes. The guide includes a lighting indicator page to ensure accurate color evaluation under proper lighting conditions.

Graphic-Designer-Desk-Essentials-What-You-Actually-Need

Graphic Designer Desk Essentials: What You Actually Need

Discover the essential items every graphic designer needs on their desk. From tools to tech, organize your workspace with the right desk essentials for productivity and creativity.

Introduction

A well-organized workspace can dramatically impact a graphic designer’s productivity, creativity, and comfort. Knowing the desk essentials to include ensures you have everything at hand for smooth workflows, whether designing logos, editing images, or creating complex layouts.

In this guide, we’ll cover both the physical tools and digital necessities that make up the ultimate designer desk. You’ll learn which items truly matter, how to organize them effectively, and tips to maintain an inspiring and efficient workspace.

Why Desk Essentials Matter for Graphic Designers

Improves Productivity

Having all necessary tools within reach minimizes distractions and workflow interruptions.

Enhances Creativity

A clean, organized desk encourages free thinking and creative problem-solving.

Promotes Comfort

Proper placement of essentials, such as ergonomic chairs and monitor stands, reduces strain and fatigue.

Saves Time

Quick access to tools, stationery, and tech devices streamlines your design process.

Essential Hardware for a Designer Desk

High-Quality Monitor

A color-accurate monitor is crucial for design work, ensuring precise color representation.

Ergonomic Chair

Comfortable seating supports long hours of work and prevents back and neck pain.

Keyboard and Mouse

Ergonomic and responsive input devices reduce strain and increase efficiency.

Graphics Tablet

For illustrators and digital artists, a tablet is essential for precision and creative control.

External Hard Drives

Backup and storage solutions are critical to safeguard project files and assets.

Essential Desk Accessories

Desk Organizer

Keeps pens, pencils, sticky notes, and small tools neatly arranged.

Cable Management Tools

Velcro straps, clips, and trays reduce clutter and keep your workspace tidy.

Desk Lamp

A lamp with adjustable brightness prevents eye strain and enhances focus.

Notepads and Sketchbooks

For quick sketches, idea mapping, or jotting down notes during brainstorming sessions.

Mouse Pad with Wrist Support

Supports ergonomics during extended design sessions, reducing wrist fatigue.

Digital Desk Essentials

Design Software

Applications like Adobe Creative Cloud, Sketch, or Figma are indispensable.

Cloud Storage and Collaboration Tools

Services like Google Drive, Dropbox, and Slack ensure easy file sharing and team communication.

Color Calibration Tools

Hardware and software calibration tools maintain accurate monitor colors for print and digital work.

Reference Monitors or Secondary Screens

Extra screens improve multitasking and provide better workspace for tool panels.

Organization and Ergonomics Tips

Maintain a Clean Desk

Regularly declutter to keep only essential items on your desk.

Position Monitors Correctly

Place monitors at eye level to avoid neck strain and maximize productivity.

Use Vertical Storage

Shelves and racks save space while keeping tools within reach.

Group Similar Items Together

Organize stationery, gadgets, and tech tools in sections to streamline workflow.

Prioritize Accessibility

Frequently used items should be closest to your dominant hand for efficiency.

Mistakes to Avoid with Desk Essentials

Overcrowding Your Desk

Too many items create distraction and limit workspace functionality.

Ignoring Ergonomics

Improper monitor height, seating, or input devices can lead to discomfort and health issues.

Neglecting Backups

Failing to have external drives or cloud solutions can risk project loss.

Using Low-Quality Tools

Cheap accessories or devices may hinder workflow and cause frustration.

Forgetting Maintenance

Regular cleaning and organization are crucial to keep your desk functional and inspiring.

Conclusion

A graphic designer’s desk should reflect both functionality and creativity. With the right desk essentials, you can enhance productivity, maintain comfort, and foster a workspace that inspires creativity. From high-quality monitors and ergonomic chairs to digital tools and organization accessories, each item plays a vital role in ensuring smooth workflow and efficient design output.

By prioritizing essential hardware, desk accessories, and digital tools, and maintaining proper ergonomics and organization, you can build a designer desk that meets your professional needs while keeping your creativity flowing.

lso, check the recent article about the best laptop for graphic design here.


What are the most important desk essentials for graphic designers?

High-quality monitor, ergonomic chair, graphics tablet, organized stationery, and reliable storage solutions.

How can I organize my desk for maximum productivity?

Use organizers, cable management tools, vertical storage, and keep frequently used items within easy reach.

Are digital tools considered desk essentials?

Yes, design software, cloud storage, color calibration tools, and secondary screens are crucial for modern design workflows.

How often should I review my desk essentials?

Periodically, at least every few months, to remove unused items and update tools.

Can a minimalist desk be effective for designers?

Absolutely. Minimalism reduces distractions and emphasizes the most necessary tools for a clean, productive workspace.

Untitled-4

The Designer’s Guide to Choosing the Right Monitor Size

Learn how to choose the right monitor size for designers. Discover factors like resolution, ergonomics, screen space, and productivity to optimize your creative workspace.

Table of Contents

Introduction

For designers, the monitor is one of the most critical tools in the creative process. The right monitor size can influence how effectively you work, how comfortably you view details, and how efficiently you manage multiple applications. Choosing the wrong size can result in eye strain, poor productivity, and inefficient workspace layouts.

In this guide, we’ll explore the factors that determine the ideal monitor size for designers, discuss key technical considerations, and provide practical tips to help you select a monitor that fits both your creative needs and your workspace.

Why Monitor Size Matters for Designers

Design work requires attention to detail, multi-tasking, and an organized workspace. Monitor size plays a central role in all three.

Screen Real Estate

Larger monitors allow designers to spread out design software, toolbars, and multiple project windows. This reduces the need to constantly switch between applications.

Detail Visibility

The correct monitor size ensures you can see fine details in your work. This is particularly important for graphic design, photo editing, UI/UX design, and video production.

Ergonomics and Comfort

A monitor that is too small or too large for your workspace can cause neck strain, poor posture, and eye fatigue. Choosing the right size ensures a comfortable and healthy working environment.

Factors to Consider When Choosing the Right Monitor Size

Workspace Dimensions

Measure your desk space before purchasing a monitor. Oversized monitors can overwhelm small desks and hinder ergonomics.

Resolution and Pixel Density

The right monitor size should pair well with resolution. For example, a 27-inch screen with 4K resolution provides excellent clarity, while a 27-inch monitor with 1080p resolution may appear pixelated.

Viewing Distance

The distance between your eyes and the screen affects how comfortably you view content. Larger monitors may require more distance to prevent eye strain.

Aspect Ratio

Common aspect ratios like 16:9 or 16:10 affect workspace layout. Ultra-wide monitors offer more horizontal space for multitasking, which can be a big advantage for designers.

Panel Type and Color Accuracy

IPS panels are preferred for accurate color representation, crucial for creative work. Ensure the panel size and type support your workflow requirements.

24 to 27 Inches

Ideal for small desks or dual-monitor setups. Provides clarity without dominating the workspace.

28 to 32 Inches

Perfect for single-monitor setups, balancing screen real estate and desk space. Excellent for detailed design work.

Ultra-Wide Monitors (34 to 38 Inches)

Offers expansive horizontal workspace for multitasking. Ideal for video editors, UI/UX designers, and creative professionals handling multiple windows simultaneously.

40 Inches and Above

More suited for collaborative environments or digital signage. Not typically recommended for individual desks due to ergonomics.

Tips for Optimizing Your Monitor Setup

Adjust Monitor Height

The top of the monitor should be at or slightly below eye level to reduce neck strain.

Use Dual or Triple Monitor Setups

Multiple smaller monitors can provide flexibility and better multitasking without overwhelming a single screen.

Calibrate Your Monitor

Regular calibration ensures colors remain accurate and details are consistent across projects.

Minimize Glare

Position your monitor to avoid reflections from windows or lights. Use matte screens or monitor hoods if necessary.

Organize Workspace Efficiently

Ensure sufficient desk space and maintain proper cable management to complement your right monitor size setup.

Common Mistakes Designers Make

Choosing Size Without Considering Resolution

A large monitor with low resolution can reduce clarity, causing pixelation and discomfort.

Ignoring Ergonomics

Selecting a monitor too big or too small for your seating position can lead to neck and eye strain.

Overlooking Aspect Ratio Needs

Ultra-wide or 16:10 monitors offer productivity advantages, but some may not suit standard software layouts.

Forgetting Calibration

Color accuracy is critical; an uncalibrated monitor can misrepresent design work.

Neglecting Workspace Layout

Failing to plan for desk space and viewing distance can make even the perfect monitor size ineffective.

Conclusion

Choosing the right monitor size is crucial for any designer who wants to maximize productivity, comfort, and visual clarity. Consider your workspace dimensions, resolution, aspect ratio, and ergonomic setup before purchasing.

Whether you opt for a 27-inch IPS monitor, a 34-inch ultra-wide display, or a dual-monitor setup, ensuring the monitor fits your workflow will improve your efficiency and help you create high-quality designs. Remember, the perfect monitor isn’t just about size—it’s about creating a workspace that works for you.

READ MORE

Also, check the recent article about the best laptop for graphic design here.


What is the ideal monitor size for graphic designers?

Typically, 27 to 32 inches is ideal for single-monitor setups, providing balance between detail visibility and desk space.

Are ultra-wide monitors better for designers?

Yes, they provide more horizontal workspace, useful for multitasking and video or UI/UX design projects.

How far should I sit from a 32-inch monitor?

Approximately 24 to 36 inches from your eyes is recommended to reduce strain while maximizing clarity.

Does resolution matter more than size?

Both matter. High resolution on the right-sized monitor ensures clarity, while a large monitor with low resolution may appear pixelated.

Can dual monitors be better than one large monitor?

Yes, dual monitors offer flexibility and allow multiple applications to be visible simultaneously without overwhelming a single screen.

Cable Management

Cable Management Tips for a Clean Creative Space

Cable Management

Table of Contents

Discover the best cable management tips for a clean creative space. Organize your wires, reduce clutter, and boost productivity with simple yet effective strategies.

Introduction

A creative space should be inspiring, comfortable, and functional. However, nothing disrupts focus like tangled wires and cluttered cables running across your desk or floor. Effective cable management not only improves the look of your workspace but also enhances safety, efficiency, and productivity.

Whether you’re a graphic designer, video editor, gamer, or simply someone who values a neat environment, taking control of your cables is a must. This guide provides practical cable management tips to help you achieve a clean and organized creative space without unnecessary stress.

Why Cable Management Matters in a Creative Space

Before exploring specific techniques, it’s important to understand why cable management should be a priority.

Boosts Productivity

A clutter-free workspace allows you to concentrate on your projects without the distraction of messy cables.

Improves Safety

Loose wires can cause tripping hazards or damage to equipment if accidentally pulled.

Protects Equipment

Organized cables reduce wear and tear, preventing connection issues and extending the lifespan of your devices.

Enhances Aesthetics

Clean lines and hidden cables contribute to a professional and visually appealing creative environment.

Essential Tools for Cable Management

Having the right tools makes the process easier and more effective.

Cable Clips and Holders

These small accessories keep individual cables in place along desks or walls.

Velcro Straps and Zip Ties

Reusable Velcro straps or disposable zip ties bundle multiple wires together neatly.

Cable Sleeves

Fabric or plastic sleeves group cables into one streamlined channel, reducing visual clutter.

Cable Raceways and Trays

Mounted under desks or along walls, these structures hide and guide cables.

Desk Grommets

Installed in desktop surfaces, grommets allow cables to pass through while staying contained.

Best Finisher Wire Clamp to Keep Your Graphic Design Desk Organized

Practical Cable Management Tips

Now that you know the tools, let’s go through practical ways to manage your cables effectively.

Label Cables for Easy Identification

Use labels or colored tags to avoid confusion when unplugging or moving devices.

Route Cables Along Desk Edges

Attach cables to the underside or backside of desks to keep them out of sight.

Use a Power Strip with Surge Protection

Consolidating plugs into one power strip minimizes floor clutter while protecting equipment.

Keep Cable Lengths in Check

Avoid extra slack by using shorter cables or coiling excess length with Velcro ties.

Separate Power and Data Cables

Reducing interference ensures smoother performance for sensitive electronics.

Cable Management for Desks

Since desks are central to most creative spaces, they deserve special attention.

Install Under-Desk Cable Trays

These trays hide cables and keep them off the floor.

Mount Power Strips Under the Desk

This keeps plugs accessible yet invisible.

Use Desk Grommets for Clean Pass-Through

Directing cables through grommets reduces visible clutter.

Bundle Monitor and Peripheral Cables Together

Grouping related wires creates a streamlined setup.

Cable Management for Desks

Cable Management for Home Studios

For music producers, video editors, or podcasters, cable organization is even more critical.

Color-Code Audio Cables

Assign colors to different types of connections for quick recognition.

Use Rack Mounts and Panels

Studios benefit from structured cable routing systems that improve both function and appearance.

Secure Heavy Cables Separately

Power cords for amplifiers and mixers should be supported to prevent strain on connections.

Regularly Audit and Replace Old Cables

Over time, studio setups change, so eliminating unused cables prevents clutter.

Cable Management for Gaming and Streaming Setups

Gamers and streamers often deal with multiple devices, making cable management a challenge.

Wall-Mount or Desk-Mount Monitors

Freeing desk space reduces visible wires.

Hide Console Cables Behind Furniture

Position consoles and PCs near walls or racks to conceal connections.

Use RGB Cable Sleeves for Style

For those who enjoy visual flair, colorful sleeves add a unique touch without compromising neatness.

Invest in Wireless Accessories

Wireless keyboards, mice, and headsets reduce the number of cables to manage.

Mistakes to Avoid in Cable Management

Even with the best intentions, mistakes can happen. Here’s what to watch out for.

Over-Tightening Zip Ties

This can damage cables and reduce flexibility.

Ignoring Airflow

Bundling cables too tightly near vents can cause overheating in computers and consoles.

Forgetting Accessibility

Over-hiding cables may make future adjustments difficult.

Using Cheap Accessories

Low-quality clips and trays can break easily, leading to frustration.

Long-Term Maintenance of Cable Management

Cable management isn’t a one-time task; it requires ongoing care.

Revisit Setup Every Few Months

New devices often require adjustments in cable routing.

Clean Dust Around Cables

A clean environment prevents buildup and keeps cables safe.

Replace Worn-Out Organizers

Velcro and clips may lose grip over time, so keep replacements handy.

Stay Minimalist with Devices

The fewer gadgets and unnecessary cables you have, the easier your space is to manage.

Conclusion

A clean creative space begins with effective cable management. From using basic clips and Velcro ties to installing under-desk trays and sleeves, organizing your cables is both practical and aesthetically rewarding.

By keeping wires neat and hidden, you create an environment that fosters focus, reduces stress, and protects your valuable equipment. Whether you’re setting up a home studio, a gaming corner, or a professional creative desk, the right cable management strategy ensures your space looks and performs at its best.

Also, check the recent article about the best laptop for graphic design here.


Why is cable management important for creative spaces?

It improves productivity, safety, equipment longevity, and workspace aesthetics.

What are the easiest tools for cable management?

Cable clips, Velcro straps, sleeves, and trays are simple yet effective.

How can I manage cables on a small desk?

Use grommets, under-desk trays, and short cables to minimize clutter.

Is it worth investing in wireless devices?

Yes, wireless accessories reduce cable count, making management easier.

How often should I redo my cable management?

Check and adjust every few months or whenever adding new equipment.

Two laptops with the text ESSENTIAL AI TOOLS AND SUBSCRIPTIONS overlaid on the image.

Essential AI Tools and Subscriptions Every Graphic Designer Needs in 2025

Two laptops with the text ESSENTIAL AI TOOLS AND SUBSCRIPTIONS overlaid on the image.
Explore the essential AI tools and subscriptions that can boost your productivity and creativity.

Table of Contents

Introduction

Graphic design in 2025 is evolving faster than ever. With the rise of artificial intelligence, designers now have access to advanced tools that make creativity smoother, speed up workflow, and expand the boundaries of what’s possible. For any designer looking to stay competitive, investing in the right AI tools and subscriptions is no longer optional—it’s essential.

This guide explores the best AI tools and subscriptions every graphic designer needs in 2025. From image generation to smart editing, typography assistance, and project management, these solutions can transform how designers approach their work. Each section will explain the benefits, key features, and how designers can integrate these tools into daily projects.

Why AI Tools Matter for Graphic Designers in 2025

Before diving into the list of subscriptions and platforms, it’s important to understand why AI has become so crucial in design workflows. Designers face growing demands from clients, tighter deadlines, and increasing competition. AI tools bridge this gap by reducing repetitive tasks, enhancing creative freedom, and ensuring designs meet industry standards faster.

AI-Powered Design Platforms

AI-powered design platforms have transformed how graphic designers approach creative projects. These platforms integrate artificial intelligence into the design workflow, offering smart suggestions, automation, and collaboration features. They help designers save time, maintain consistency, and enhance creativity across projects.

Adobe Firefly

Adobe Firefly is one of the most powerful AI tools for graphic designers. It allows designers to generate images, textures, and backgrounds quickly. Its integration with Adobe Creative Cloud ensures seamless workflow, making it easy to adjust designs or experiment with multiple versions.

A screenshot of the Adobe Firefly website with the text Adobe Firefly. The ultimate creative AI solution.
Adobe Firefly is a leading creative AI solution for generating images, videos, audio, and vector graphics.

Verified site: Adobe Firefly

Canva AI

Canva AI has become a favorite among both beginners and professionals. It helps automate layouts, color palettes, and content generation, enabling designers to produce professional marketing materials in less time. Its user-friendly interface makes it accessible for fast design needs.

illustrator vs canva

Verified site: Canva AI

Figma AI

Figma AI focuses on collaborative design, especially for UI/UX projects. It can predict layouts, suggest improvements, and automate resizing across multiple devices. This AI integration is particularly useful for web and app design, improving both speed and accuracy.

 Figma AI website with the text Figma AI is your creative collaborator.
Figma AI is a creative collaboration tool that helps teams bring their best ideas to life.

Verified site: Figma AI

Comparison Table: AI-Powered Design Platforms

PlatformBest ForKey AI FeaturesPricing (2025)Ideal Use Case
Adobe FireflyProfessional designersImage generation, texture creation, versioning$20.99/month (Creative Cloud)High-quality image and branding projects
Canva AIBeginners & marketersLayout automation, color palette suggestions, templatesFree / $12.99 ProMarketing materials, social media graphics
Figma AIUI/UX & collaborative teamsLayout prediction, resizing automation, component suggestionsFree / $15 ProfessionalWeb, app, and interface design

AI-powered design platforms are essential for modern designers because they combine automation with creative flexibility. While Adobe Firefly excels in professional-quality visuals, Canva AI provides speed and ease for marketing materials, and Figma AI focuses on collaborative interface design.

By understanding the strengths of each platform, designers can select the right AI tools for their workflow, improving efficiency while maintaining high-quality outputs. Using these platforms strategically allows graphic designers to stay competitive and produce work that meets both client expectations and industry standards.

AI Tools for Image Generation and Editing

AI tools for image generation and editing are transforming how designers, marketers, and creators produce visuals. These tools save time, boost creativity, and allow for the rapid creation of high-quality graphics. From concept art to professional mockups, AI tools can handle almost any visual project.

MidJourney

MidJourney is a subscription-based AI tool ideal for concept art, brand illustrations, and mood boards. It generates highly detailed visuals from text prompts, helping designers explore creative ideas quickly and efficiently.

Midjourney AI website with text and three buttons for Sign Up, Log In, and Explore.
Midjourney is a powerful AI tool for generating images and art from text prompts.

Verified site: MidJourney

DALL·E 3

DALL·E 3 by OpenAI is an industry-standard AI tool for image generation. Integrated with multiple platforms, it allows designers to create unique graphics, artwork, and mockups with just a few sentences. Its realistic outputs make it perfect for professional workflows.

DALL·E 3 website with the DALL·E 3 logo and a button that says Try in ChatGPT.
DALL·E 3 is a powerful AI tool developed by OpenAI for generating images from text descriptions.

Verified site: DALL·E 3

Recraft.ai

Recraft.ai is an advanced AI tool for generating high-quality images. Designers can create illustrations, concept visuals, and detailed artwork from text prompts. Its AI ensures realistic textures and styles, offering flexibility for a wide range of design projects.

The word Recraft in a stylized, three-dimensional font on a purple background.
Recraft is a design AI tool for creating and editing vector art, images, and illustrations.

Verified site: Recraft.ai

Runway ML

Runway ML combines AI-powered image and video editing. It enables background removal, object replacement, and style transfer with ease. This tool is excellent for designers working on multimedia projects who need both image and video capabilities.

Verified site: Runway ML

Comparison Table: AI Tools for Image Generation

AI ToolKey FeaturesEase of UsePricingBest For
MidJourneyText-to-image, highly detailed visualsModeratePaidConcept art, mood boards
DALL·E 3Text-to-image, platform integrationEasyFree & PaidProfessional graphics, mockups
Recraft.aiRealistic textures, versatile stylesEasyFree & PaidIllustrations, concept visuals
Runway MLBackground removal, style transferModerateFree & PaidMultimedia projects

AI tools for image generation and editing allow designers to produce high-quality visuals faster than traditional methods. Choosing the right AI tool depends on your workflow, project type, and budget. MidJourney and DALL·E 3 excel in generating creative concepts, Recraft.ai provides versatile styles, and Runway ML bridges image and video editing needs. Using these tools strategically enhances productivity while maintaining professional design standards.

AI Tools for Typography and Fonts

Typography is one of the most critical elements of design. Choosing the right fonts can define a brand, set a mood, and improve readability. AI tools are now making typography easier, faster, and more precise for designers. These tools help find the perfect font, suggest font pairings, and maintain consistency across projects.

FontJoy

FontJoy uses AI to generate beautiful font pairings automatically. Designers can test different combinations and see real-time previews. This saves hours of trial and error, especially when creating websites, branding materials, or social media graphics. FontJoy’s interface is simple and intuitive, making it ideal for both beginners and professionals.

a website with the title Font pairing made simple, and an explanation of how it generates font combinations using deep learning.
Fontjoy is an AI tool that simplifies font pairing by generating font combinations with deep learning.

Verified site: FontJoy

DeepFont

DeepFont is an AI tool that scans designs and suggests fonts with similar styles. It is particularly useful for matching brand typography or recreating font styles seen in inspiration sources. DeepFont ensures design consistency by helping designers quickly find fonts that complement existing projects.

Verified site: DeepFont

Comparison Table: AI Tools for Typography

AI ToolKey FeaturesEase of UsePricingBest For
FontJoyAutomatic font pairing, real-time previewEasyFreeQuick font pair exploration
DeepFontFont recognition, style matchingEasyFree & PaidBrand consistency, font matching
Adobe Sensei Typography ToolsAI font suggestions, brand consistencyModeratePaid (Creative Cloud)Professional projects, design automation

AI tools for typography simplify the process of selecting and pairing fonts. FontJoy is great for experimenting with combinations, DeepFont helps match and maintain brand styles, and Adobe Sensei provides intelligent recommendations integrated into professional design software. By using these AI tools, designers can save time, enhance creativity, and ensure their typography choices are visually appealing and cohesive across all projects.

AI Tools for Color and Layouts

Colors and layouts are essential in design because they influence aesthetics, readability, and user engagement. Choosing the right combinations can elevate a project, while poor choices can reduce its impact. AI tools now assist designers by generating palettes, analyzing harmony, and suggesting effective layouts, saving time and improving design quality.

Khroma

Khroma is an AI-powered color tool that generates customized palettes based on your preferences. Designers can train the AI by liking or disliking color schemes, and Khroma learns their style over time. This makes it easy to find palettes that align with branding, marketing materials, or personal projects. Its intuitive interface allows designers to experiment quickly, reducing the time spent manually testing color combinations.

Khroma website with the text Design with colors you love.
Khroma is an AI tool that helps you discover and create limitless color palettes based on your preferences.

Verified site: Khroma

Colormind

Colormind uses AI to analyze data from websites, apps, and popular designs. It generates palettes that are trendy, balanced, and visually appealing. Designers can input specific colors, and Colormind will produce compatible palettes while maintaining harmony. This ensures that projects stay fresh and aligned with current design trends. Colormind is particularly useful for web design, UI/UX, and social media graphics where color consistency is key.

Verified site: Colormind

Canva AI Color Tools

Canva AI also includes intelligent color suggestions. It evaluates your design and recommends complementary colors, gradient schemes, and highlights. With AI-driven color suggestions integrated into its design editor, Canva simplifies layout and color choices for both beginners and professional designers.

Comparison Table: AI Tools for Color and Layouts

AI ToolKey FeaturesEase of UsePricingBest For
KhromaPersonalized palette generationEasyFreeBranding, creative projects
ColormindData-driven palettes, trend analysisEasyFreeUI/UX, web, social media
Canva AI Color ToolsComplementary colors, gradientsVery EasyFree & PaidQuick design and layout work

AI tools for color and layouts help designers create visually cohesive and appealing designs efficiently. Khroma personalizes palettes for consistent style, Colormind ensures trendy and effective combinations, and Canva AI simplifies color application within layouts. Using these tools strategically allows designers to focus on creativity while maintaining professional quality and visual harmony across projects.

AI Tools for Productivity and Workflow

Productivity and workflow management are critical for graphic designers. Balancing client requirements, project deadlines, and creative tasks can be challenging. AI tools now help streamline processes, reduce manual effort, and improve team collaboration. Using AI-powered productivity tools allows designers to focus more on creativity while keeping projects organized and efficient.

Notion AI

Notion AI is a versatile tool for organizing design projects. It helps designers keep track of client requirements, deadlines, and creative ideas. Its AI-powered writing assistant can generate notes, design briefs, and meeting summaries. Notion AI makes collaboration simple by allowing teams to share updates and documents in one centralized workspace.

Notion AI website with the text The AI workspace that works for you.
Notion is an all-in-one AI workspace for taking notes, searching apps, and building workflows.

Verified site: Notion AI

Jasper AI

Jasper AI is primarily known for content creation, but designers benefit from it in multiple ways. It can generate taglines, product descriptions, ad copy, and social media captions to complement visual designs. Using Jasper AI reduces time spent brainstorming text and ensures that content aligns with the visual design strategy.

Verified site: Jasper AI

Trello with Butler AI

Trello integrates AI through Butler automation, providing powerful workflow management features. Designers can create rules that automatically trigger task updates, reminders, or notifications. Butler AI streamlines repetitive tasks, such as moving cards between project stages or assigning deadlines, helping teams stay on track without constant manual input.

Verified site: Trello with Butler AI

Comparison Table: AI Tools for Productivity and Workflow

AI ToolKey FeaturesEase of UsePricingBest For
Notion AIProject organization, AI writing assistantEasyFree & PaidDesign projects, client tracking
Jasper AIContent generation, tagline and copy ideasEasyPaidMarketing, social media, product copy
Trello with Butler AIWorkflow automation, task managementModerateFree & PaidTeam collaboration, project efficiency

AI tools for productivity and workflow help designers manage projects efficiently while reducing repetitive tasks. Notion AI centralizes project organization, Jasper AI enhances creative content workflows, and Trello with Butler AI automates team processes. By using these tools strategically, designers can maintain high productivity, meet deadlines consistently, and focus more on producing high-quality, creative work.

AI Tools for Mockup Creation

Mockups are an essential part of a designer’s workflow. They allow clients to visualize products, packaging, or digital assets in real-world contexts. Traditionally, creating mockups can be time-consuming, but AI-powered tools now make this process faster, more efficient, and highly professional. These tools help designers generate realistic mockups for presentations, marketing, and client approvals without starting from scratch.

Pacdora

Pacdora focuses on packaging and product mockups. Its AI-driven templates and automated 3D rendering allow designers to quickly visualize labels, boxes, and other packaging designs. Pacdora is ideal for branding and product design projects, as it reduces the time needed for client approvals while maintaining realistic, high-quality outputs.

 Pacdora website with options for Mockup Generator, 3D Modeling Software, and Dieline Template Maker.
Pacdora is an AI tool for creating mockups and dieline templates for product packaging and design.

Verified site: Pacdora

Placeit

Placeit is a versatile platform for AI-driven product, apparel, and digital mockups. It offers thousands of customizable templates, enabling designers to generate visuals for websites, advertisements, and social media campaigns. Its AI tools simplify layout adjustments, lighting, and perspective, producing polished results with minimal effort.

Verified site: Placeit

MockupBro

MockupBro provides online AI mockup generation for packaging, posters, and branding visuals. Designers can export high-resolution images ready for client presentations or social media. Its simplicity makes it suitable for quick design projects without compromising quality.

Verified site: MockupBro

Vexels Mockup Generator

Vexels Mockup Generator offers AI-assisted mockup creation for apparel, packaging, and print designs, along with a library of customizable templates to streamline workflow. Both tools are excellent for designers looking to save time and improve the presentation of their work.

Verified site: Vexels

Comparison Table: AI Tools for Mockup Creation

AI ToolKey FeaturesEase of UsePricingBest For
PacdoraPackaging mockups, 3D renderingEasyPaidProduct & branding mockups
SmartmockupsDevices, apparel, packagingVery EasyFree & PaidSocial media & online stores
PlaceitThousands of templates, AI adjustmentsEasyPaidDigital & product mockups
MockupBroHigh-resolution exports, quick creationEasyFree & PaidPosters, branding visuals
ShotSnap3D mockups, automatic lighting/shadowsModeratePaidProfessional product presentations
Vexels Mockup GeneratorAI templates, apparel & print designsEasyFree & PaidWorkflow streamlining & branding

AI tools for mockup creation simplify the presentation process, save designers hours of work, and ensure polished, professional outputs. Pacdora, Smartmockups, and Placeit excel in speed and flexibility, while ShotSnap and Vexels provide high-quality, realistic visuals for professional-grade presentations.

AI Tools for Branding and Marketing Support

Graphic designers today are often expected to provide more than just visual design. Clients look for complete branding and marketing solutions, including logos, brand identity, and campaign content. AI tools now make it easier for designers to deliver full-service creative solutions. These tools streamline workflows, inspire ideas, and save time while maintaining high-quality outputs.

Looka

Looka is an AI-powered branding tool that generates logo concepts, branding kits, and visual identities. Designers can use it to quickly explore multiple logo options and brand variations. While it doesn’t replace professional creativity, Looka provides a strong starting point for brainstorming brand designs. Its AI also suggests complementary colors and font pairings, helping designers maintain cohesive visual identities.

Verified site: Looka

Copy.ai

Copy.ai specializes in generating advertising text, product descriptions, and social media content. Designers can pair these AI-generated copy outputs with visuals to deliver complete marketing campaigns. Using Copy.ai reduces the time spent brainstorming taglines and content, ensuring consistency across a brand’s messaging. It’s especially useful for social media campaigns, e-commerce product launches, and promotional materials.

Verified site: Copy.ai

Brandmark

Brandmark offers comprehensive AI-driven branding solutions. It generates logo variations, color palettes, and typography suggestions, creating a cohesive brand kit. Designers working with startups or small businesses find Brandmark invaluable for producing professional brand identities quickly. It helps maintain a consistent look and feel across all marketing materials and online platforms.

Verified site: Brandmark

Comparison Table: AI Tools for Branding and Marketing Support

AI ToolKey FeaturesEase of UsePricingBest For
LookaLogo concepts, branding kits, visual identityEasyPaidLogo design and brand brainstorming
Copy.aiAdvertising copy, product descriptions, social media contentVery EasyPaidMarketing campaigns, e-commerce
BrandmarkLogo variations, color palettes, typography suggestionsEasyPaidStartups, small business branding

AI tools for branding and marketing support help designers deliver full-service creative solutions. Looka provides initial logo and brand ideas, Copy.ai ensures marketing copy aligns with visuals, and Brandmark creates cohesive brand kits. By integrating these AI tools into their workflow, designers can enhance efficiency, maintain brand consistency, and offer clients professional, end-to-end creative solutions.

How to Choose the Right AI Tools for Your Design Workflow

With so many AI subscriptions available in 2025, choosing the right ones depends on a designer’s focus area. Some designers work mostly in branding, while others specialize in UI, print, or motion graphics. Selecting the right combination ensures that tools enhance creativity rather than overwhelm the process.

Evaluate Your Needs

Start by identifying areas where you spend the most time. If image generation is a frequent task, MidJourney or DALL·E 3 may be worth the investment.

Consider Budget and Subscription Models

Some Ai tools offer free plans, but professional designers often need premium subscriptions for higher-quality results. Balancing costs with features ensures long-term value.

Test Integration with Existing Software

The best AI tools are those that fit seamlessly into your existing workflow. If you use Adobe Creative Cloud, for instance, Firefly and Sensei tools will integrate better than standalone platforms.

Future of AI in Graphic Design

The role of AI in graphic design will continue to grow. In the next few years, tools will become more predictive, personalized, and collaborative. Designers who embrace AI now will stay ahead of trends and create more impactful work for clients.

Conclusion

AI tools and subscriptions have transformed the design industry in 2025. From Adobe Firefly and MidJourney to productivity apps like Notion AI, these solutions empower graphic designers to work faster, smarter, and more creatively. While AI cannot replace the human touch, it acts as a powerful partner in producing high-quality, original designs.

For any graphic designer, adopting the right Ai tools is an investment in both efficiency and creativity. By using these technologies strategically, designers will not only meet client demands but also push the boundaries of what’s possible in the world of modern design.

Also, check the recent article about the best laptop for graphic design here.


What are AI tools for graphic design?

AI tools for graphic design are software or platforms that use artificial intelligence to automate, assist, or enhance design tasks. They can generate images, suggest colors, pair fonts, create mockups, or even help with branding and marketing content.

Are AI design tools suitable for beginners?

Yes. Many AI tools, such as Canva AI, FontJoy, and Pacdora, are user-friendly and do not require advanced design skills. Beginners can quickly generate visuals, experiment with fonts and colors, and produce professional-looking mockups.

Can AI replace professional graphic designers?

AI tools cannot fully replace designers. They assist with repetitive tasks, inspiration, and efficiency, but creative decision-making, storytelling, and brand strategy still require human expertise. AI is best used as a complement to professional skills.

Which AI tool is best for image generation?

Tools like MidJourney, DALL·E 3, and Recraft.ai are excellent for image generation. They convert text prompts into detailed visuals, concept art, or mockups, making them ideal for designers seeking creative flexibility.

Which AI tool is best for mockups?

Pacdora, Smartmockups, Placeit, and ShotSnap are top choices for mockup creation. They provide realistic, high-quality previews for packaging, products, apparel, and digital designs, saving time for client presentations.

Are AI tools for typography and color reliable?

Yes. Tools like FontJoy, DeepFont, Khroma, and Colormind provide accurate font pairings and color palettes. They save time and ensure consistency across design projects, although final decisions should align with brand guidelines and creative intent.

Do AI productivity tools really save time?

Absolutely. Notion AI, Jasper AI, and Trello with Butler automation help organize tasks, generate copy, and automate workflows. Designers can focus more on creative work rather than repetitive administrative tasks.

Are AI tools expensive?

Pricing varies. Some tools are free with limited features (e.g., FontJoy, Khroma, Colormind), while others require subscriptions (e.g., MidJourney, Adobe Firefly, Pacdora). Most paid tools offer advanced features that save significant time and improve workflow quality.

A flat lay image of a keyboard, mouse, and other design tools with the text BEST KEYBOARD AND MOUSE COMBINATION FOR GRAPHIC DESIGNER overlayed.

Best Keyboard and Mouse Combination for Graphic Designer

A flat lay image of a keyboard, mouse, and other design tools with the text BEST KEYBOARD AND MOUSE COMBINATION FOR GRAPHIC DESIGNER overlayed.
Discover the ideal keyboard and mouse for your design work.

Table of Contents

Introduction

As a graphic designer, having the right tools is essential for efficiency, comfort, and precision. While high-end software and monitors often get the spotlight, the keyboard and mouse combo you use daily plays an equally critical role. A poorly designed keyboard can strain your wrists, while an unresponsive mouse can slow down your workflow and affect accuracy in detailed design work. Choosing a reliable keyboard and mouse combination ensures seamless navigation, enhanced productivity, and long hours of comfortable work. In this guide, we explore some of the best wireless options that combine ergonomics, performance, and style—perfect for designers at every level.

Why the Right Keyboard and Mouse Matter for Graphic Designers

Before exploring specific recommendations, it’s important to understand why choosing the right Keyboard and Mouse can transform a graphic designer’s workflow.

Enhances comfort during long design sessions
Spending hours working on intricate design projects means your hands, wrists, and shoulders are constantly in use. The right ergonomic tools can minimize strain and prevent repetitive stress injuries.

Boosts precision and control
Graphic design often involves pixel-perfect adjustments. A responsive mouse and a stable, well-designed keyboard can improve accuracy when editing images or manipulating shapes.

Improves workflow efficiency
Shortcut keys, customizable buttons, and adjustable sensitivity settings help you work faster, allowing you to focus more on creativity than navigation.

Key Features to Look for in a Keyboard for Graphic Design

A keyboard is more than just a typing tool—it’s a creative instrument for designers who rely on shortcuts and smooth key response.

Ergonomic layout
A split or curved keyboard can reduce strain, especially during extended work periods.

Mechanical or scissor switches
Mechanical keyboards offer tactile feedback, while scissor switches provide quiet and smooth keystrokes—both beneficial depending on preference.

Programmable keys
Dedicated keys for custom shortcuts can save significant time in applications like Photoshop, Illustrator, or Figma.

Backlighting
Backlit keys improve visibility in low-light work environments and add a professional aesthetic to your workspace.

Build quality
Durable materials, such as aluminum frames and high-quality keycaps, ensure longevity for heavy daily use.

Key Features to Look for in a Mouse for Graphic Design

Transitional: If a keyboard is your main input tool, a mouse is your precision instrument—especially in graphic editing.

Adjustable DPI
Being able to switch sensitivity helps when moving between detailed editing and broader navigation.

Ergonomic shape
A well-contoured mouse supports your hand’s natural position, reducing fatigue.

Programmable buttons
Extra buttons allow quick access to commands like zoom, undo, or switching tools.

High polling rate
A high polling rate ensures faster response times and smoother cursor movement.

Wireless or wired options
Wireless mice reduce desk clutter, while wired models avoid latency and battery concerns.

BEST OPTION :Wireless Keyboard and Mouse Combo – Full-Sized 2.4GHz Wireless Keyboard with Comfortable Palm Rest and Optical Wireless Mouse – Compatible with Windows, Mac OS, PC, Desktops, Computers, and Laptops

1. Black

Upgrade your workspace with this Black Wireless Keyboard and Mouse Combo. Designed for comfort and productivity, the full-sized keyboard features an ergonomic palm rest and folding holder to reduce wrist strain. The optical mouse provides smooth, accurate tracking with a symmetrical design for both right- and left-handed users. With a 2.4GHz stable wireless connection and plug-and-play USB receiver, you can work seamlessly up to 33 feet away. Perfect for home or office use

A detailed image of a black wireless keyboard and mouse combination, highlighting features like adjustable DPI, anti-slip roller, USB receiver, and battery compartment.
A sleek and functional wireless keyboard and mouse set.
FeatureDetails
ColorBlack
Price$17.50
Keyboard FeaturesFull-sized, ergonomic with palm rest and folding holder
Mouse FeaturesOptical wireless, symmetrical design, smooth movement
Connectivity2.4GHz wireless, shared USB receiver, plug & play
CompatibilityWindows XP/Vista/7/8/10/X, Mac, desktops, laptops, Chromebooks
Special FeaturesAuto power-saving, ergonomic, wrist protection
Battery RequirementsKeyboard: 2 × AAA, Mouse: 1 × AA (not included)
DPI Levels800 / 1600 / 2400
Warranty12 months
ProsAffordable, lightweight, ergonomic wrist support, stable wireless connection
RecommendationIdeal for entry-level designers or home use who need a reliable, budget-friendly combo.

2. Carbon Black

The Carbon Black Wireless Keyboard and Mouse Combo is built for productivity. Full-size keyboard with ergonomic wrist rest and 12 shortcut keys enhances efficiency, while the low-profile mouse offers quiet, precise clicks. A single 2.4GHz USB receiver supports both devices, providing a reliable wireless connection up to 33 feet. Ideal for designers needing shortcut keys and long typing comfort.

A detailed infographic of a black ergonomic keyboard and a six-button silent mouse, highlighting features, dimensions, and ergonomic design.
A quiet and comfortable keyboard and mouse combination for enhanced productivity.
FeatureDetails
ColorCarbon Black
Price$21.59
Keyboard FeaturesFull-size, ergonomic wrist rest, adjustable tilt feet, 12 shortcut keys, 7 multimedia keys
Mouse FeaturesContoured design, clicky but 95% quieter, forward/backward buttons
Connectivity2.4GHz wireless, single USB receiver
CompatibilityWindows XP/Vista/7/8/10/X, Mac, desktops, laptops, Chromebooks
Special FeaturesAuto power-saving (15 min keyboard, 10 min mouse), low-profile scissor keys
Battery RequirementsKeyboard: 2 × AAA, Mouse: 1 × AA (not included)
DPI Levels800 / 1600 / 2400
Warranty24 months
ProsMultimedia keys for productivity, ergonomic wrist rest, quiet typing, adjustable tilt
RecommendationPerfect for designers who need extra shortcuts and quiet typing for long work sessions.

3. Dark Gray

Experience precision and comfort with the Dark Gray Wireless Keyboard and Mouse Combo. This full-size keyboard comes with 12 multimedia hotkeys and an ergonomic wrist rest, while the optical mouse offers adjustable DPI (1000/1200/1600) for smooth and accurate cursor control. The 2.4GHz wireless connection ensures reliable performance up to 33 feet. Ideal for professional designers seeking both efficiency and comfort.

A split-screen image showing a dark grey wireless keyboard and mouse combination from two different angles, highlighting its ergonomic design and long-range connectivity with a single USB receiver.
A sleek and efficient dark grey wireless setup for your workspace.
FeatureDetails
ColorDark Gray
Price$33.99
Keyboard FeaturesFull-size, wrist rest, adjustable tilt legs, 12 multimedia hotkeys
Mouse FeaturesOptical mouse with adjustable DPI (1000/1200/1600), forward/backward buttons
Connectivity2.4GHz wireless, single USB receiver
CompatibilityWindows XP/Vista/7/8/10/11, Mac, desktops, laptops, Chromebooks
Special FeaturesAuto power-saving (30 min keyboard, 10 min mouse)
Battery RequirementsKeyboard: 2 × AAA, Mouse: 1 × AA (not included)
DPI Levels1000 / 1200 / 1600
Warranty12 months
ProsAdjustable DPI for precise control, multimedia hotkeys, ergonomic design
RecommendationRecommended for professional designers who need precise mouse control and shortcut keys.

4.Full Pink (Women’s Best Choice)

Add style and comfort to your workspace with the Full Pink Wireless Keyboard and Mouse Combo. Ergonomic keyboard with palm rest protects wrists, while the optical mouse provides smooth movement for both hands. The shared 2.4GHz USB receiver offers stable wireless performance up to 33 feet. Perfect for designers who want both functionality and a visually appealing setup

A pink wireless keyboard and mouse combination with a small USB receiver plugged into a laptop, with two additional panels showing how to activate the devices by pressing a key or clicking a button.
A stylish and functional pink wireless keyboard and mouse set.
FeatureDetails
ColorFull Pink
Price$24.00
Keyboard FeaturesFull-size, palm rest, folding holder
Mouse FeaturesOptical wireless, symmetrical design, smooth movement
Connectivity2.4GHz wireless, shared USB receiver
CompatibilityWindows XP/Vista/7/8/10/X, Mac, desktops, laptops, Chromebooks
Special FeaturesAuto power-saving, ergonomic, wrist protection
Battery RequirementsKeyboard: 2 × AAA, Mouse: 1 × AA (not included)
DPI Levels800 / 1600 / 2400
Warranty12 months
ProsStylish color, ergonomic wrist support, reliable wireless connection
RecommendationGreat for designers who want a visually appealing setup without sacrificing comfort.

5.Starry Blue

The Starry Blue Wireless Keyboard and Mouse Combo combines comfort, style, and reliability. The full-size keyboard with palm rest reduces wrist fatigue, while the optical mouse ensures smooth, accurate tracking. The 2.4GHz wireless connection with shared USB receiver delivers seamless performance up to 33 feet. Ideal for designers who want a standout color along with ergonomic support.

A dark grey wireless keyboard and mouse set shown in a split-screen image, with an infographic highlighting a long battery life, a USB receiver, and auto-sleep features.
A reliable and long-lasting wireless keyboard and mouse combo.
FeatureDetails
ColorStarry Blue
Price$35.99
Keyboard FeaturesFull-size, palm rest, folding holder
Mouse FeaturesOptical wireless, symmetrical design, smooth movement
Connectivity2.4GHz wireless, shared USB receiver
CompatibilityWindows XP/Vista/7/8/10/X, Mac, desktops, laptops, Chromebooks
Special FeaturesAuto power-saving, ergonomic, wrist protection
Battery RequirementsKeyboard: 2 × AAA, Mouse: 1 × AA (not included)
DPI Levels800 / 1600 / 2400
Warranty12 months
ProsUnique color, ergonomic wrist support, reliable 2.4GHz connection
RecommendationIdeal for designers who want a premium, eye-catching setup with comfortable use.

Conclusion

Selecting the right keyboard and mouse combo can make a noticeable difference in your design workflow. From ergonomic palm rests and low-profile keys to adjustable DPI settings and stable wireless connections, the options outlined here cater to both comfort and performance. Whether you prefer a budget-friendly solution like the Black combo or a stylish, feature-rich choice like Starry Blue, investing in a quality keyboard and mouse setup ensures smoother, more productive design sessions. Prioritizing ergonomics, precision, and reliable connectivity will help you work efficiently while protecting your wrists during long creative hours.

Also, check the recent article about the best laptop for graphic design here.


Why do I need a special keyboard and mouse for graphic design?

Graphic design involves long hours of work and precise movements. A good keyboard and mouse combo reduces wrist strain, improves accuracy, and helps you work faster. Ergonomic features and adjustable mouse DPI make your workflow smoother.

What is DPI, and why does it matter for designers?

DPI stands for dots per inch. It measures mouse sensitivity. A higher DPI means the cursor moves faster. Designers often use adjustable DPI to control precision when editing images or drawing fine details.

Can a wireless keyboard and mouse be as reliable as a wired one?

Yes. Modern wireless devices use 2.4GHz connections that are fast and stable. You get freedom of movement without lag, which is perfect for both laptops and desktops.

How does an ergonomic keyboard help?

Ergonomic keyboards are designed to reduce wrist strain. Features like palm rests, low-profile keys, and adjustable tilt help you type comfortably for long sessions without pain.

Are these keyboards and mice compatible with all computers?

Most combos work with Windows, Mac, Chromebooks, and PCs. Check the product description for any specific system requirements. The included USB receiver makes setup easy—just plug and play.

How long do the batteries last?

Many models include an auto power-saving feature. The keyboard and mouse go to sleep after inactivity to save battery. Depending on usage, batteries can last several months.

Is setup difficult for beginners?

Not at all. These combos are plug-and-play. Insert the USB receiver into your computer, and you’re ready to go—no extra software is needed.

A visual guide showing 10 Logo Presentation Mockup PSDs Every Graphic Designer Needs with examples of different logo mockups.

10 Logo Presentation Mockup PSDs Every Graphic Designer Needs

A visual guide showing 10 Logo Presentation Mockup PSDs Every Graphic Designer Needs with examples of different logo mockups.
Elevate your logo designs with these essential mockup PSDs.

Table of Contents

Why Use Logo Presentation Mockup PSDs?

Transitional: Before we dive into specific mockups, let’s explore why designers love Logo presentation Mockup PSDs and what makes them indispensable.

Logo presentation mockups let designers:

  • Visualize branding in context — from metallic foil on paper to industrial wall displays.
  • Save time — edit smart object layers instead of building scenes from scratch.
  • Impress clients with clean, professional visuals that feel real.

These mockups give logos depth, style, and room to breathe—essential for portfolio pieces, social media, pitch decks, and more. Now, here are the 10 must-have mockup types.

Modern 3D Logo Wall Display Mockup

Starting strong with a crowd-pleaser—the Modern 3D Logo Wall Display.

Features of this mockup

  • Hyper-realistic 3D depth and shadow
  • Wall texture that adds authenticity
  • Smart objects for easy logo placement

Why it matters
Perfect for showcasing tech brands, startups, or interior design logos. The depth engages viewers and highlights how your design interacts with space.

Technology Logo Mockup PSD

From 3D walls to sleek and metallic designs.

Key highlights

  • Metallic finish ideal for tech brand identities
  • Clean background to keep the focus on your logo
  • Professional-grade lighting effects

Ideal use cases
Use this template for electronic brands, IT services, or app startups. It adds a high-tech polish, positioning logos as cutting-edge.

Engineering and Infrastructure Logo Mockup PSD

Up next: designs built for heavy-duty industries.

Mockup details

  • Industrial aesthetic with concrete or steel textures
  • Rugged shadows and realistic material depth
  • Adjustable layers to personalize hardness

When to use it
Ideal for architects, construction firms, and engineering consultants. It reinforces strength, precision, and technical skill.

A blank, four-panel collage featuring different textures and tones, often used as a background for a Logo Presentation Mockup PSD.
Discover diverse textures and lighting for your mockup needs.

Construction Logo Mockup PSD

Related to engineering but tailored for construction aesthetics.

Core qualities

  • Hard hat, machinery, or blueprint-inspired settings
  • Texture-rich backgrounds like steel or brick
  • Large-scale logo display—great visibility

Perfect contexts
Use this mockup when pitching to contractors or real estate developers. Its gritty realism reflects workmanship and stability.

Metallic Foil Logo Mockup on White Textured Paper

Shifting focus from industrial grit to high-end paper branding.

Highlights

  • Elegant metallic foil effect
  • Subtle paper grain texture
  • Natural light for a luxe finish

Best use scenarios
Ideal for boutique brands—think wedding planners, luxury goods, and craft businesses. Adds tactile sophistication and upscale feel.

Metallic Logo Mockup (Various Styles)

From paper foils to versatile metallic options.

Mockup features

  • Versatile finishes: gold, silver, bronze
  • Clean backgrounds, glossy or matte options
  • Editable smart object layers

Design scenarios
Great for packaging labels, corporate identity, and premium product launches. Metallic sheen adds perceived value.

A four-panel abstract collage with various textures, including a dark gray surface, a white textured paper corner, a light gray line drawing of scaffolding, and a dark blue blurred background, used for a Logo Presentation Mockup PSD.
Find the perfect backdrop for your logo designs.

Office Interior Logo Mockup PSD

Let’s bring logos into real-world office settings.

What to expect

  • Boardroom walls or reception areas
  • Natural and artificial ambient lighting
  • Portable signboards or mounted logo plaques

Why it’s great
This mockup shows how a logo lives in a workspace—excellent for corporate clients, co-working spaces, or professional service brands.

Additional Logo Presentation Mockup PSDs You Can’t Miss

Transitional: Here are a few more versatile mockups that belong in every designer’s toolkit.

3D Floating Logo Mockup

  • Soft shadows and floating effect
  • Neutral studio lighting
  • Flexible color and background controls

Minimal Embossed Logo Mockup

  • Embossed effect on paper or cardstock
  • Elegant and understated design
  • Works well for letterhead or business cards

App Icon-style Logo Mockup

  • Rounded square or circular presentation
  • Screen glare and device reflection
  • Perfect for app or digital brands

How to Choose the Right Logo Presentation Mockup PSDs

With these types in your toolkit, selecting the right one matters most.

Match mockup to brand personality

  • Industrial → engineering, construction
  • Luxe metallic → premium goods
  • Office interior → corporate services
  • Minimal emboss → stationery, subtle elegance

Consider the presentation medium

  • Web portfolio/social posts → brighter, glossy mockups
  • Print → textured paper and embossing
  • Proposals → professional interior or wall-mounted scenes

Check file quality

  • Full smart-object functionality
  • High resolution (3000 × 2000+ px)
  • Organized layers and documentation

Tips for Working with Logo Presentation Mockup PSDs

To make your mockups shine, keep these tips in mind:

1. Name and organize your assets
Clear layer names avoid confusion when working with multiple mockups.

2. Match your logo’s perspective and lighting
Adjust shadows and highlights to blend seamlessly.

3. Tweak colors and textures
Subtle changes in foil, wall color, or background can dramatically shift mood.

4. Add ambient shadows
Let logos ‘sit’ in scenes—drop shadows or ground reflections lend realism.

5. Export correctly
For web: export at 72 dpi RGB JPEG/PNG. For print: use 300 dpi CMYK TIFF or high-quality PDF.

Conclusion

By integrating these top 10 Logo presentation Mockup PSDs—ranging from 3D walls to metallic foils—you’ll elevate every logo presentation. They add realism, polish, and context to help both you and your clients visualize the final brand and make an emotional connection. Matching mockup style to brand personality and medium ensures each presentation feels intentional and professional.

Adopting smart templates also speeds up your workflow, freeing time to focus on creativity and client needs. So regularly expand your collection, label layers smartly, and don’t be afraid to customize each mockup for maximum impact.

Also, check the recent article about the best laptop for graphic design here.


What is a Logo presentation Mockup PSD?

A Logo presentation Mockup PSD is a Photoshop file that allows you to insert your logo design into a realistic or stylized scene. It uses smart object layers so you can replace placeholder graphics with your own artwork in seconds. This helps designers present their work in professional, context-rich settings without having to build scenes from scratch.A four-panel abstract collage with various textures, including a dark gray surface, a white textured paper corner, a light gray line drawing of scaffolding, and a dark blue blurred background, used for a Logo Presentation Mockup PSD.

Why should I use Logo presentation Mockup PSDs instead of plain logo images?

Mockups add depth, texture, and realism to a logo presentation. They show how your design might look on paper, walls, packaging, or even in a corporate office space. This makes your portfolio more appealing and gives clients a better understanding of how their branding will appear in the real world.

Do Logo presentation Mockup PSDs require advanced Photoshop skills?

Not at all. Most mockups are designed for easy use, even for beginners. You simply open the PSD file in Photoshop, locate the smart object layer, insert your logo, save, and watch it update automatically within the mockup scene.

Can I customize the backgrounds and textures in a mockup?

Yes, most high-quality Logo presentation Mockup PSDs offer editable background layers. You can change colors, textures, and lighting effects to better match the brand identity you’re showcasing.

What resolution should I look for in a Logo presentation Mockup PSD?

For professional results, choose PSDs with a resolution of at least 3000 × 2000 pixels. This ensures your presentation looks sharp both online and in print.

Can I use the same mockup for different clients?

Yes, but it’s best to customize colors, lighting, and backgrounds each time. This keeps presentations unique and prevents your work from looking repetitive.

Where can I find high-quality Logo presentation Mockup PSDs?

Websites like PSD Free Mockup offer a variety of professional-grade mockups, free for use. These are curated for quality, ease of use, and creative versatility.

An office desk with a pile of documents, a pen, and text overlay that reads WHICH IS MORE COST-EFFECTIVE FOR TEAMS: A FIGMA SUBSCRIPTION OR ADOBE CREATIVE CLOUD? There are also colorful shapes and a partial Adobe Creative Cloud logo in the background.

Which Is More Cost-Effective for Teams: A Figma Subscription or Adobe Creative Cloud?

An office desk with a pile of documents, a pen, and text overlay that reads WHICH IS MORE COST-EFFECTIVE FOR TEAMS: A FIGMA SUBSCRIPTION OR ADOBE CREATIVE CLOUD? There are also colorful shapes and a partial Adobe Creative Cloud logo in the background.
Compare the cost-effectiveness of a Figma subscription versus an Adobe Creative Cloud subscription for design teams.

Explore a detailed comparison of Figma subscriptions and Adobe Creative Cloud for teams. Understand features, pricing, collaboration tools, and overall value

Introduction

Choosing the right design software for a team can significantly affect productivity, creativity, and budget management. Two popular options in the design industry are Figma and Adobe Creative Cloud. Both platforms offer powerful tools but differ in pricing models, features, and collaboration capabilities.

This blog post compares Figma subscription or Adobe Creative Cloud to help teams decide which service is more cost-effective based on their unique needs. By examining pricing plans, collaboration features, integrations, and scalability, you’ll gain clarity on which platform provides the best value for your team’s investment.

Understanding Figma Subscription for Teams

Verified site: Figma

Pricing Structure of Figma

Figma offers tiered pricing plans, including a free version with basic tools and paid subscriptions for professional and organizational use. Team plans are priced per editor per month, with discounts for annual billing. The pricing is straightforward, focusing on design collaboration with unlimited cloud storage.

Collaboration Features in Figma

One of Figma’s standout features is real-time collaboration. Multiple team members can design, prototype, and comment simultaneously within the browser or desktop app. This eliminates version control issues and speeds up feedback loops.

Platform Accessibility

Figma operates primarily through the web, allowing users on different operating systems (Windows, macOS, Linux) to access the same design files seamlessly. This cross-platform flexibility is a major advantage for distributed teams.

Feature/AspectDetails
Pricing (Annual)$660/year (Full Seat: $55.00/month billed annually)
Free PlanYes — limited projects, features, and version history
Primary FocusUI/UX design, prototyping, collaborative web/app design
Platform AccessWeb-based (Windows, macOS, Linux)
Offline CapabilityLimited — primarily online use
CollaborationReal-time multi-user collaboration and commenting
Cloud StorageUnlimited cloud storage
Ease of LearningBeginner-friendly, intuitive
IntegrationSlack, Jira, GitHub, and project management tools
Best ForIndividual UI/UX designers and freelancers needing collaboration tools

Exclusive Business Features

  • Centralized Admin Controls – Manage users, assign seats, and control access across multiple teams from a single, intuitive admin dashboard.
  • Role-Based Seats – Choose from Collab Seats, Dev Seats, and Full Seats to allocate the right tools and permissions for each team member.
  • Advanced Security & Compliance – Includes features like SSO (Single Sign-On), audit logs, and granular permissions to meet enterprise security standards.
  • Organization-Wide Design Systems – Maintain brand consistency with shared libraries and component governance across the company.
  • Version Control & Audit Trails – Access detailed edit history to track design changes and roll back if needed.

Included Collaboration & Integration Tools

  • Real-Time Coediting – Multiple team members can work on the same file simultaneously with instant updates.
  • Cross-Platform Access – Work seamlessly on Windows, macOS, Linux, and directly in the browser.
  • Developer Handoff Tools – Allow developers to inspect designs, export assets, and access specs without disrupting the design flow.
  • Integrated Plugins & Widgets – Extend functionality with a growing marketplace of third-party tools.
  • Unlimited Cloud Storage – Keep all design files, prototypes, and assets accessible from anywhere.
A graphic comparing Figma and Adobe Creative Cloud with a cost-effectiveness icon in the center. The image features the Figma logo on the left, an orange square with an icon representing cost or subscription in the middle, and the Adobe Creative Cloud logo on the right. The text reads Figma Subscription and Adobe Creative Cloud.
A visual comparison of a Figma subscription and Adobe Creative Cloud subscription for design teams.

Adobe Creative Cloud Subscription for Teams

Verified site: Adobe Creative Cloud

Pricing and Plans for Teams

Adobe Creative Cloud offers several plans, including individual app subscriptions and a full suite plan that includes Photoshop, Illustrator, Premiere Pro, and more. Team plans typically include volume licensing with centralized administration, priced per user per month.

Features and Tools Included

Adobe Creative Cloud provides a comprehensive set of creative tools for design, video editing, web development, and more. The suite offers desktop applications with powerful capabilities, offline access, and integration across apps.

Collaboration Capabilities

While Adobe has enhanced collaboration through cloud documents and Adobe Creative Cloud Libraries, real-time multi-user editing is limited compared to Figma. Adobe relies more on version control and file sharing workflows.

Feature/AspectDetails
Pricing (Annual)All Apps: $1199/year ($99.99/month)
Free PlanNo free plan; 7-day trial available
Primary FocusComprehensive creative suite for photo, video, illustration, and design
Platform AccessDesktop apps (Windows, macOS)
Offline CapabilityFull offline use
CollaborationCloud syncing; limited real-time collaboration
Cloud Storage1TB with All Apps
Ease of LearningSteeper learning curve, professional-grade tools
IntegrationAdobe Fonts, Adobe Stock, Behance, and full Adobe ecosystem
Best ForProfessionals requiring a broad range of design, editing, and media tools

Exclusive Business Features

  • Admin Console for License Management – Centralized control for adding, reassigning, and managing team licenses, making scaling simple and efficient.
  • Advanced 24/7 Technical Support – Around-the-clock assistance to resolve issues quickly, ensuring minimal downtime.
  • Two 1:1 Expert Sessions per User per Year – Personalized guidance from Adobe-certified experts to help users master tools or workflows.
  • 180-Day Version History – Access to an extended archive of file versions, providing peace of mind for projects that evolve over time.
  • Unlimited Job Posts via Adobe Talent – Connect with global creative talent by posting unlimited job opportunities through Adobe’s hiring platform.

Included Cloud Services

  • Unlimited Standard Creative AI Image Features – Harness AI-driven creativity for faster design generation without usage caps.
  • 4,000 Monthly Generative Credits – Access premium AI-powered video and audio creation tools.
  • Adobe Fonts – A vast library of high-quality, licensed fonts to elevate designs.
  • Step-by-Step Tutorials – Built-in learning resources to enhance skills at any level.
  • Behance – Showcase work and discover global creative inspiration.
  • Creative Cloud Libraries – Store, share, and access assets seamlessly across teams.
  • 1TB Cloud Storage – Secure, high-capacity cloud storage for easy access to projects anywhere.

By combining powerful creative applications with enterprise-level support and cloud capabilities, Adobe Creative Cloud Pro positions itself as a comprehensive solution for teams that require both flexibility and performance.

Figma Organization Plan vs. Adobe Creative Cloud Pro – Team Comparison

Feature / CriteriaFigma Organization PlanAdobe Creative Cloud Pro
Pricing ModelBilled annually, per seat typeAnnual commitment, billed monthly per license
Seat/Licensing TypesCollab Seat – $5/mo ($60/yr) Dev Seat – $25/mo ($300/yr) Full Seat – $55/mo ($660/yr)Standard Pro – $1199/year ($99.99/month) per license
Primary Use CaseUI/UX design, prototyping, collaborative design workflowsGraphic design, video editing, photography, digital art
CollaborationReal-time coediting, cross-platform browser accessCloud file sharing, version control, library syncing
Admin & SecurityCentralized admin console, role-based permissions, SSOAdmin Console, license management, enterprise security
Version HistoryUnlimited version history with detailed audit logs180-day version history
StorageUnlimited cloud storage1TB cloud storage per user
AI & AutomationPlugin marketplace, widgets, automation via APIGenerative AI for images, video, and audio (4000 credits/mo)
Extra PerksIntegrated developer handoff tools, shared design librariesUnlimited Adobe Talent job posts, Adobe Fonts, Behance
Learning SupportCommunity-driven resources, plugin documentationStep-by-step tutorials, 1:1 expert sessions
Best ForTeams focused on product design, development collaborationTeams needing diverse creative tools for multiple media formats

Comparing Cost-Effectiveness for Teams

Upfront and Recurring Costs

Figma’s subscription model is simpler and often less expensive for teams focused mainly on UI/UX and web design. Adobe’s full suite subscription is costlier but provides more diverse creative tools, which may be necessary depending on team requirements.

Impact on Productivity

Figma’s browser-based, real-time collaboration reduces delays and miscommunication, potentially increasing productivity. Adobe’s rich feature set suits teams requiring advanced image and video editing but may introduce complexity and steeper learning curves.

Scalability and Flexibility

Figma easily scales with team size due to its per-editor pricing and flexible access. Adobe Creative Cloud’s volume licensing supports large enterprises but might be more rigid for small or medium-sized teams.

Factors Beyond Pricing to Consider

Integration with Existing Workflows

Consider how each platform fits with your team’s existing software. Adobe integrates well with other Adobe apps and services, while Figma offers robust plugins and APIs for popular project management and development tools.

User Experience and Learning Curve

Figma’s interface is generally intuitive and designed for quick onboarding, especially for teams focused on design and prototyping. Adobe’s tools, while powerful, may require more training for less experienced users.

Customer Support and Community

Both platforms provide customer support and active communities. Adobe’s longer presence means extensive resources and tutorials, but Figma’s growing user base offers strong community support tailored to modern design workflows.

Making the Decision: Which Is Right for Your Team?

Deciding between a Figma subscription or Adobe Creative Cloud for your team can significantly impact your workflow efficiency and budget. Both platforms offer excellent tools but cater to different creative needs and team dynamics. Understanding these differences alongside updated pricing can help you make an informed choice that best fits your team’s requirements.

At $1,199 per year per license, Adobe Creative Cloud Pro Standard provides a comprehensive creative suite. This suite includes flagship apps like Photoshop, Illustrator, Premiere Pro, and After Effects, offering a robust toolkit for graphic design, video editing, photography, motion graphics, and more. For teams working across diverse media, Adobe’s all-encompassing approach supports nearly every creative project type. Along with powerful offline desktop applications, Adobe offers enterprise-grade features such as centralized license management, advanced 24/7 technical support, and access to Adobe Talent for unlimited job postings. The platform also includes cloud services with 1TB of storage per user and AI-powered creative tools, enabling innovation at scale.

Conversely, the Figma Organization Plan Full Seat costs $660 annually per user, nearly half the price of Adobe’s subscription. Figma shines in collaborative UI/UX design and prototyping, built around real-time coediting and browser-based accessibility. Its flexibility allows teams to assign different seat types—Collab, Dev, or Full—tailored to each member’s role, which can optimize costs further. Figma’s cloud-native design enables seamless remote collaboration, instant feedback loops, and easy developer handoffs, making it a top choice for product design teams focused on agility and streamlined workflows. Additionally, Figma includes unlimited cloud storage, robust version control, and enterprise-grade security features.

Cost-wise, Figma is more budget-friendly, especially for teams prioritizing design collaboration rather than a broad spectrum of creative tools. The difference in pricing becomes substantial when scaled across large teams. For example, a team of 10 full-seat users would spend $6,600 annually on Figma but $11,990 on Adobe Creative Cloud Pro.

However, price alone shouldn’t drive your decision. Consider the nature of your projects. If your team requires heavy-duty video editing, 3D animation, or print-ready graphic design, Adobe’s extensive app ecosystem is unmatched. On the other hand, if your workflow centers on interface design, prototyping, and cross-functional collaboration, Figma’s specialized tools and real-time collaboration capabilities offer distinct advantages.

Another factor is platform accessibility. Figma’s web-based platform works across Windows, macOS, and Linux without the need for software installation, supporting hybrid and remote teams effortlessly. Adobe relies on powerful desktop applications with offline functionality, suitable for users needing high-performance tools but potentially limiting flexibility for remote collaboration.

Conclusion

Ultimately, the choice between a Figma subscription or Adobe Creative Cloud depends on your team’s workflow, creative needs, and budget priorities. Many teams find value in using both, leveraging Figma for rapid design and prototyping while employing Adobe tools for final production and multimedia work.

Carefully analyze your team’s current and future project requirements, the percentage of users needing full design access, and collaboration style. This clarity will help you select the solution that maximizes productivity, creativity, and cost-effectiveness for your team’s success.

Also, check the recent article about the best laptop for graphic design here.


An office desk with a small fan, a laptop, and some books, with text overlay that reads COOLING & VENTILATION TIPS FOR LONG DESIGN WORK. The image is a thumbnail for an article.

Cooling & Ventilation Tips for Long Design Work Sessions

An office desk with a small fan, a laptop, and some books, with text overlay that reads COOLING & VENTILATION TIPS FOR LONG DESIGN WORK. The image is a thumbnail for an article.
Stay comfortable and productive during long design work sessions with these essential cooling and ventilation tips.

Table of Contents

Discover practical cooling & ventilation tips to keep your workspace comfortable and productive during long design work sessions. Learn how airflow, temperature control, and ergonomic adjustments can enhance your creativity and focus.

Introduction

Long design work sessions can be incredibly rewarding, but they often come with a hidden challenge—maintaining a comfortable and well-ventilated environment. Whether you’re crafting detailed illustrations, building intricate UI layouts, or editing high-resolution images, heat and poor air circulation can quickly sap your energy and hinder productivity.

The good news is that with the right approach to cooling and ventilation, you can keep your workspace fresh, your body comfortable, and your mind focused. This guide explores a range of cooling & ventilation tips tailored for designers, ensuring you work efficiently without feeling overheated or sluggish.

Understanding the Importance of Cooling & Ventilation for Designers

Why Comfort Matters in Creative Work

Design work requires sustained focus, precision, and creativity. When your environment is too warm or stuffy, your cognitive abilities decline, and even simple tasks start to feel difficult.

Studies show that working in excessively warm spaces can lead to slower reaction times and more mistakes. For designers working on client projects, this can affect output quality and deadlines.

Health Benefits of Proper Airflow

Good airflow not only prevents heat buildup but also reduces indoor pollutants, helping you avoid headaches, fatigue, and eye strain during long design sessions.

Assessing Your Workspace for Cooling Improvements

Identifying Heat Sources

Before improving cooling, pinpoint the sources of heat in your workspace. Computers, monitors, and desk lamps can contribute significantly to rising room temperature.

Evaluating Air Circulation

Check whether your room has natural airflow through windows or if it relies solely on mechanical ventilation. Poor circulation often leads to stale air and discomfort.

Measuring Room Temperature and Humidity

A small digital thermometer with a humidity reader can give you real-time insight into your workspace climate, helping you make targeted adjustments.

Effective Cooling & Ventilation Tips for Designers

Optimizing Airflow with Fans

Fans are among the most accessible and cost-effective ways to improve airflow in your workspace. A desk fan can create a steady stream of air to keep you comfortable during long hours without dramatically altering the room’s temperature. For best results, position your fan to circulate air across your workspace instead of aiming it directly at your face. This prevents issues like dry eyes or irritation. If your workspace is larger, consider a tower fan that can oscillate and move air more evenly across the room.

Using an Air Conditioner Wisely

An air conditioner can be a game changer for temperature control, but it’s important to set it wisely. Keeping the temperature between 22°C and 24°C creates a comfortable environment without making it too cold. Overcooling may lead to stiff fingers and hands, which is especially problematic for designers working with fine tools, styluses, or keyboards. Using the AC’s energy-saving mode can help maintain a steady temperature without sudden temperature swings.

Harnessing Natural Ventilation

Whenever possible, take advantage of natural ventilation. Opening windows for even short periods during cooler hours of the day can help refresh the air and reduce stuffiness. The most effective technique is cross-ventilation—opening two windows on opposite sides of the space so air can flow through naturally. This helps push stale air out and draw fresh air in, giving you a healthier work environment.

Layering Ventilation Methods

Relying on a single cooling method isn’t always enough. Combining tools—such as running a fan while keeping a window slightly open—can make a significant difference. This layered approach ensures both air movement and temperature control, which is essential during long work sessions when electronic devices are generating extra heat.

Considering Portable Cooling Solutions

If you work in a shared space or can’t make permanent changes, portable cooling units can be an excellent investment. Mini evaporative coolers or portable air conditioners allow you to target cooling right where you need it. Look for models with adjustable fan speeds and timers so you can adapt them to your work patterns.

Monitoring and Adjusting Regularly

Cooling and ventilation needs can change throughout the day as outside temperatures shift and your equipment generates heat. Make it a habit to check the room’s temperature and airflow periodically. Small, consistent adjustments will keep your workspace comfortable and your focus sharp throughout your design sessions.

Desk Setup Adjustments for Better Cooling

Minimizing Heat-Generating Equipment

Many design workspaces have multiple devices running at once—monitors, laptops, external drives, printers, and even decorative lighting. Each of these produces heat that can raise the overall room temperature. Whenever possible, turn off or unplug devices you’re not actively using. Switching to energy-efficient LED desk lamps and low-heat electronics can also make a noticeable difference in keeping the temperature comfortable.

Common Sources of Heat in a PC

  • High-performance CPUs and GPUs: These generate the most heat under heavy use.
  • Power supplies: Older or low-efficiency PSUs can produce a lot of heat.
  • Mechanical hard drives: They generate some heat but less than CPUs and GPUs.
  • Poor airflow and cable clutter: Blocked fans and cramped spaces trap heat inside the case.
A tidy and well-ventilated desk setup for a designer, featuring a mesh office chair, a monitor displaying an illuminated PC case, a keyboard, a mouse on a pad, a speaker, a desk lamp, and a small potted plant.
Maximize comfort and focus during long design sessions with these cooling and ventilation tips for your desk setup.

Organizing Cables for Better Airflow

Cables might not seem like a factor in cooling, but when they’re tangled and bunched together, they can restrict airflow around your equipment. Poor airflow leads to more trapped heat near your desk. Using cable ties, clips, or under-desk organizers keeps them tidy and ensures heat from devices dissipates more effectively. This small adjustment can have a surprising impact on keeping both your gear and your workspace cooler.

Choosing Breathable Chair Materials

Your seating choice affects more than just ergonomics—it can also influence body temperature during long design sessions. Chairs with mesh backs allow for better ventilation, preventing the buildup of heat against your back. This is especially useful in warm climates or during summer months when prolonged sitting can lead to discomfort. If replacing your chair isn’t an option, consider a breathable seat cover to improve airflow.

Adjusting Desk Placement for Cooler Airflow

The location of your desk in the room plays a big role in cooling efficiency. Placing it closer to windows, air vents, or fans allows you to benefit directly from air movement. Avoid positioning your desk in enclosed corners where air tends to stagnate. Even a slight shift in desk placement can improve cooling and make your workspace feel fresher during long design work sessions.

Personal Cooling Strategies for Long Work Sessions

Staying Hydrated

Drinking cool water throughout the day helps regulate body temperature and prevents dehydration, which can worsen fatigue.

Wearing Breathable Clothing

Lightweight, moisture-wicking fabrics keep you comfortable even if the room gets warmer during the day.

Taking Cooling Breaks

Every hour, step away from your desk for a few minutes to stretch in a cooler area or near a fan.

Advanced Cooling Solutions for Design Studios

Installing Ceiling Fans

Ceiling fans are an excellent way to improve air circulation throughout a design studio without relying solely on air conditioning. Unlike desk fans, ceiling fans create a more even airflow that can help reduce the perceived temperature in the entire room. When set to rotate counterclockwise during warmer months, ceiling fans push air downward, creating a cooling breeze that evaporates sweat and keeps you comfortable during long work sessions. This option is energy-efficient and works well in studios with higher ceilings.

Using Air Purifiers with Cooling Features

Air purifiers designed with built-in fans or ventilation capabilities serve dual purposes in a design studio. Not only do they improve air quality by filtering dust, allergens, and VOCs often found around electronics and art supplies, but they also help circulate air, enhancing cooling effects. Some models come with adjustable fan speeds, allowing you to customize airflow according to your needs. Cleaner air can reduce eye strain and headaches, common issues for designers working extended hours.

Recommended model: Dirt Devil Air Purifier

An image showing a black and red Dirt Devil air purifier on the left, and on the right, an exploded view of the same air purifier revealing its internal components and multi-stage filtration system, including a pre-filter, HEPA filter, and active carbon filter, with blue air being released from the top.
Discover the Dirt Devil Air Purifier, engineered to improve your indoor air quality with its multi-stage filtration system.

Incorporating Smart Climate Control

Smart thermostats and climate control systems bring convenience and precision to studio cooling. These devices learn your schedule and preferences to adjust temperatures automatically, ensuring your workspace is cool and comfortable when you need it most. They can be controlled remotely via smartphone apps, allowing you to pre-cool the studio before your work session begins. Many smart systems also integrate with other smart home devices, such as window sensors and fans, creating a fully automated ventilation setup that optimizes both comfort and energy efficiency.

Investing in Zoned Cooling Systems

For larger design studios or shared workspaces, zoned cooling systems offer the ability to cool specific areas independently. This prevents energy waste and ensures that only occupied zones receive cooling. Zoned systems often pair with smart controls, allowing multiple designers to adjust settings according to their preferences without affecting others. This flexibility supports productivity and comfort, particularly in collaborative environments with varied temperature needs.

Maintaining Ventilation Equipment

Cleaning Fan Blades and Filters

Dust buildup can reduce the efficiency of fans and AC units. Clean them regularly to maintain optimal airflow.

Checking for Air Leaks

If using an AC, ensure windows and doors seal properly to prevent cool air from escaping.

Scheduling Professional Maintenance

Annual servicing of air conditioners and ventilation systems ensures they operate efficiently and avoid sudden breakdowns.

Ergonomics and Cooling: Working Together

Positioning Your Desk Near Ventilation Sources

The placement of your desk can significantly influence both your comfort and productivity. Positioning your workspace close to windows, air vents, or fans allows you to take full advantage of natural and mechanical airflow. This proximity helps keep you cooler without having to rely on running air conditioners or fans at full power. It also ensures you receive fresh air throughout your work session, reducing the buildup of stale air and preventing discomfort caused by overheating.

Avoiding Direct Cold Air

While cooling is essential, exposure to direct cold air can cause discomfort and health issues, especially during long design sessions. Direct airflow on your hands, neck, or back may lead to stiffness, muscle cramps, or chills, which can negatively affect your ability to work precisely. Using adjustable vents or fans that can be redirected helps maintain a comfortable environment. Position fans or vents so the air circulates around you gently rather than blasting directly at your body.

Balancing Lighting and Temperature

Lighting choices play a crucial role in managing your workspace temperature. Traditional incandescent bulbs generate a lot of heat, contributing to a warmer environment. Switching to LED lights reduces heat output significantly, helping keep your workspace cooler. Additionally, LED lights often offer adjustable color temperatures, which can help reduce eye strain during long design hours.

Supporting Posture to Aid Temperature Regulation

Good ergonomic posture not only prevents strain and injury but also helps your body regulate temperature more effectively. Sitting upright with proper back support allows better blood circulation, which can reduce feelings of sluggishness or overheating. Ergonomic chairs with breathable materials further enhance comfort by allowing airflow around your body, preventing heat buildup during extended sitting periods.

A man sitting at a wooden desk with a computer and a desk lamp, demonstrating a well-ventilated and ergonomically sound workspace. Text overlays point to elements like adjusting desk placement for cooler airflow, balancing lighting and temperature, positioning the desk near ventilation sources, and supporting posture.
Optimize your workspace for comfort and productivity with these cooling and ventilation tips for long design sessions.

Seasonal Cooling & Ventilation Tips and Adjustments for Designers

Summer Strategies

Use blackout curtains to block sunlight during the hottest parts of the day. This prevents heat buildup in your workspace.

Winter Considerations

Even in colder months, proper ventilation is essential to prevent stuffiness. Slightly crack a window to maintain fresh air circulation without losing too much heat.

Adapting to Transitional Seasons

During spring and autumn, take advantage of mild weather by relying more on natural ventilation and less on mechanical cooling.

Combining Cooling & Productivity Practices

Structuring Work Around Cooler Times of Day

Schedule your most demanding tasks in the morning or evening when temperatures are naturally lower.

Integrating Breaks into Your Workflow

Short breaks every hour give your cooling systems a chance to keep up and help your body recover from prolonged sitting.

Monitoring Your Environment with Smart Devices

Smart sensors can track temperature, humidity, and air quality, sending alerts when adjustments are needed.

Common Mistakes to Avoid in Cooling & Ventilation

Overcooling the Workspace

Excessively low temperatures can cause muscle stiffness and discomfort, especially for tasks requiring fine motor control.

Ignoring Humidity Levels

Too much humidity can make a room feel hotter, while too little can cause dry skin and eye irritation. Aim for a balanced 40–60% humidity level.

Blocking Air Vents

Furniture or storage boxes placed in front of vents can significantly reduce airflow efficiency.

Conclusion

Maintaining comfort during long design work sessions isn’t just about personal preference—it directly impacts your creativity, efficiency, and well-being. By applying these cooling & ventilation tips, you can create a workspace that supports your best work without the distraction of heat and stale air.

From simple solutions like using desk fans and wearing breathable fabrics to advanced upgrades like smart climate control, each adjustment contributes to a more pleasant and productive environment. With a thoughtful approach to cooling and ventilation, you’ll not only protect your health but also elevate the quality of your design work for years to come.

Also, check the recent article about the best laptop for graphic design here.


What are the best ways to keep a design workspace cool during long work sessions?

The best ways include using desk fans or ceiling fans to improve airflow, setting air conditioners to moderate temperatures, opening windows for natural ventilation, and minimizing heat-producing equipment. Proper desk placement near vents and wearing breathable clothing also help maintain comfort.

How does ventilation affect productivity during design work?

Good ventilation improves air quality and temperature control, reducing fatigue, headaches, and eye strain. This helps designers stay focused and creative for longer periods, boosting overall productivity.

Can natural ventilation alone keep a design studio cool?

Natural ventilation can be very effective, especially with cross-ventilation where windows on opposite sides are open. However, in hot or humid climates, it’s often best combined with fans or air conditioning for consistent comfort.

What temperature is ideal for a design workspace?

A temperature between 22°C and 24°C (72°F to 75°F) is generally comfortable for most people. This range keeps the body cool without causing stiffness or discomfort, especially important for tasks requiring fine motor skills.

How often should I clean my cooling and ventilation equipment?

Regular maintenance is key. Clean fan blades and air filters every few weeks to prevent dust buildup that can reduce efficiency. Annual professional servicing for air conditioners is recommended to maintain optimal performance.

Does the choice of office chair affect cooling during work?

Yes, chairs with breathable mesh backs improve airflow and help prevent heat buildup on your body, making long sitting periods more comfortable in warm conditions.

A monitor displaying a color calibration chart, with the text Why Every Graphic Designer Needs a Calibrated Display overlaid on the image.

Why Every Graphic Designer Needs a Calibrated Display

A monitor displaying a color calibration chart, with the text Why Every Graphic Designer Needs a Calibrated Display overlaid on the image.
Learn why a Calibrated Display is critical for accurate color representation in design work.

Table of Contents

Discover why a calibrated display is essential for every graphic designer. Learn how color accuracy improves design quality, client satisfaction, and workflow efficiency.

Understanding What a Calibrated Display Is

What Does Calibration Mean?

Calibration is the process of adjusting your monitor’s settings to display colors as accurately and consistently as possible. It aligns the output of your screen with established color standards. Without calibration, colors can look different on various devices, causing confusion and errors in design.

Why Is Calibration Necessary for Graphic Designers?

Graphic designers rely heavily on color to communicate messages, evoke emotions, and create visually compelling work. If the colors on your screen are off, your designs may look different when printed or viewed on other devices. This can cause rework, client dissatisfaction, and even loss of credibility.

Benefits of Using a Calibrated Display in Graphic Design

Improved Color Accuracy

A calibrated display ensures the colors you see are true to life. This means what you design on your screen will closely match the final product, whether it’s a printed brochure, website, or app interface. Accurate colors reduce the guesswork and revisions during project delivery.

Consistency Across Devices

With calibration, your monitor matches industry color profiles like sRGB or Adobe RGB. This consistency means your designs will look similar across different screens, from client monitors to smartphones. It creates a professional workflow that minimizes surprises.

Enhanced Detail and Clarity

Calibration helps bring out subtle differences in shades and gradients. This makes it easier to spot errors, fix color banding, and refine your work to a higher standard. Better detail means your designs will have depth and polish.

Saves Time and Reduces Costs

When colors are accurate, you avoid multiple rounds of corrections. This speeds up your workflow, reduces frustration, and lowers the costs related to printing errors or digital mishaps. In the long run, a calibrated display is a smart investment.

How to Calibrate Your Display Effectively

Using Hardware Calibration Tools

Hardware calibrators, like the X-Rite i1Display or Datacolor Spyder, measure your screen’s output and automatically adjust settings. These devices provide the most precise calibration, tailored to your specific monitor.

Software Calibration Methods

Some monitors and operating systems include built-in calibration tools. While less precise than hardware calibrators, software options can still improve color accuracy. Tools like DisplayCAL or the calibration wizards in Windows and macOS are good starting points.

Setting the Right Brightness and Contrast

Calibration isn’t only about color but also brightness and contrast. Correctly setting these parameters ensures your screen isn’t too dark or washed out, providing an accurate viewing environment. This step is vital for precise color work.

Calibrate Regularly for Best Results

Monitors change over time, affecting color accuracy. Regular calibration, ideally every month or two, helps maintain consistent output. Keeping a calibration schedule ensures your display remains reliable throughout your design projects.

2024 Datacolor Spyder Photo/Video Kit: The Best Hardware Calibrator for True Color Accuracy

If you’re a photographer, videographer, or graphic designer, precise color accuracy is crucial for your work. The 2024 Datacolor Spyder Photo/Video Kit is a leading hardware calibrator designed to deliver professional-grade monitor calibration and color management from capture to editing. This all-in-one solution ensures your colors are vibrant, consistent, and true-to-life across devices and media.

Why Choose the Spyder Photo/Video Kit?

Color accuracy is non-negotiable for creative professionals. The Spyder Kit combines multiple tools — including the SpyderPro colorimeter, SpyderCUBE, and Spyder Checkr color charts — to provide comprehensive calibration for your monitors and cameras. This means fewer revisions, confident client approvals, and a streamlined workflow.

Key Features of the 2024 Spyder Photo/Video Kit

  • Precise Monitor Calibration: The SpyderPro device measures your display’s color output up to 2000 nits brightness, supporting OLED, LED, and mini-LED screens.
  • White Balance and Exposure Reference: The SpyderCUBE helps you set perfect white balance and exposure in RAW images, saving editing time.
  • Accurate Color Correction Tools: Spyder Checkr Photo and Video charts aid in consistent color matching across cameras and lighting setups.
  • User-Friendly Software: Guided calibration with ambient light measurement ensures your screen adapts to your workspace conditions.
  • Portable and Durable: All tools come in a protective metal case for studio or on-location use.
A dual-panel image showing a Datacolor SpyderCube for white balance and a Datacolor Spyder Photo/Video Kit, emphasizing tools for a calibrated display.
Essential tools for a professional calibrated display and accurate color management.

Who Should Use This Hardware Calibrator?

This monitor calibration tool is ideal for photographers, video editors, graphic designers, and digital artists who want to maintain color fidelity throughout their creative process. Whether you work in a professional studio or on the go, the Spyder Photo/Video Kit guarantees that your colors stay accurate from capture to final output.

How Does Calibration Improve Your Work?

By calibrating your monitor with this hardware calibrator, you ensure that the colors you see on screen match the printed or published version. This eliminates guesswork, reduces costly mistakes, and improves your client’s trust in your work. Accurate colors also enhance your portfolio by showing your true creative vision.

System Compatibility and Setup

Compatible with Windows 10, 11 and macOS Mojave through Sonoma, the Spyder Photo/Video Kit integrates seamlessly into your existing workflow. The intuitive Datacolor software walks you through calibration in minutes, making it accessible even for beginners.

Get the Best Hardware Calibrator for Color Accuracy

For the best color calibration results in 2024, the Datacolor Spyder Photo/Video Kit stands out as a complete and reliable solution. Elevate your creative work with precise color control and consistency, ensuring every project looks exactly as you envision it.

Technical Details: 2024 Datacolor Spyder Photo/Video Kit

FeatureSpecification / Description
Included DevicesSpyderPro Colorimeter, SpyderCUBE, Spyder Checkr Video, Spyder Checkr Photo
Calibration TargetSupports monitor calibration and color correction for photography and video workflows
Colorimeter BrightnessMeasures brightness up to 2000 nits
Supported DisplaysLCD, LED, OLED, Mini-LED monitors
Color Gamut SupportCalibrates to standard color spaces such as sRGB, Adobe RGB, DCI-P3
Color DepthSupports 8-bit and 10-bit color displays
Calibration SoftwareDatacolor Spyder software with ambient light monitoring, custom profiles, and calibration reminders
White Balance ToolSpyderCUBE for setting white balance and exposure reference in RAW image editing
Color Reference ChartsSpyder Checkr Video (for video color correction), Spyder Checkr Photo (62 color patches for photography)
PortabilityAll tools stored in a durable metal case, easy for field and studio use
ConnectivityUSB interface for all devices
Supported Operating SystemsWindows 10 and 11 (32/64-bit), macOS 10.14 (Mojave) through macOS 14 (Sonoma)
Calibration FrequencyRecommended monthly or as needed
Software FeaturesAmbient light sensing, multiple calibration targets, intuitive step-by-step process
Physical DimensionsColorimeter approx. 2.5 x 2.5 x 1.5 inches (varies slightly)
WeightApprox. 150 grams per device
A dual-panel image showing a Datacolor SpyderCube on a pool table and a Datacolor SpyderX calibration tool on a laptop, demonstrating the use of a Datacolor Spyder Photo/Video Kit for a calibrated display.
Ensure color accuracy across all your screens with the powerful Datacolor Spyder Photo/Video Kit.

Choosing the Right Monitor for Calibration

Look for Professional-Grade Monitors

Not all monitors are made equal. For graphic design, invest in displays that support wide color gamuts like Adobe RGB and have 10-bit color depth. Brands like Eizo, BenQ, and Dell offer models designed for color-critical work.

Consider Panel Technology

IPS panels provide better color accuracy and viewing angles compared to TN or VA panels. This is crucial for design, where even small color shifts can impact your work.

Resolution and Screen Size Matter

Higher resolution screens (like 4K) allow for finer detail and more workspace. Screen size should match your work habits and desk space but aim for at least 24 inches for comfort and clarity.

The Impact of a Calibrated Display on Client Relationships

Builds Trust Through Accurate Presentation

When your designs match client expectations, it builds confidence in your professionalism. Accurate color representation reassures clients that you deliver high-quality work.

Reduces Miscommunication and Disputes

Color inconsistencies often cause disagreements between designers and clients. A calibrated display minimizes these issues by showing the correct colors from the start.

Enhances Portfolio and Brand Image

Consistent and vibrant designs improve your portfolio’s appeal. It reflects your attention to detail and dedication to quality, making you stand out in a competitive market.

Common Challenges and How to Overcome Them

Dealing with Multiple Devices and Color Profiles

Working with clients using different devices can be tricky. Understanding color profiles and managing them during the design process helps maintain accuracy across platforms.

Environmental Factors Affecting Calibration

Ambient light, screen reflections, and room color temperature affect how colors appear. Creating a controlled workspace with neutral lighting supports your calibrated display’s performance.

Budget Constraints for Calibration Tools

Hardware calibrators can be costly. For beginners or freelancers, starting with software calibration and upgrading later is a practical approach.

Tips for Maintaining Your Calibrated Display

Avoid Changing Monitor Settings Frequently

Once calibrated, avoid altering brightness, contrast, or color settings unless necessary. Frequent changes can throw off calibration accuracy.

Keep Your Workspace Consistent

Maintain consistent lighting and avoid glare to preserve color perception. Using curtains or blinds and positioning your monitor away from direct light sources helps.

Use Color Management in Your Design Software

Programs like Adobe Photoshop and Illustrator allow you to embed color profiles and preview colors accurately. Pairing a calibrated display with proper software settings maximizes results.

Final Thoughts on the Importance of a Calibrated Display for Graphic Designers

A calibrated display is not just a nice-to-have; it is an essential tool for every graphic designer committed to excellence. It elevates your design quality, streamlines your workflow, and strengthens client relationships. Investing time and resources into calibration pays off through more accurate colors, fewer revisions, and a more professional output.

By understanding how to calibrate your display, choosing the right monitor, and maintaining your setup, you ensure that your creative vision translates perfectly from screen to final product. In today’s competitive design world, a calibrated display sets you apart and supports your success.

lso, check the recent article about the best laptop for graphic design here.


What is a calibrated display?

A calibrated display is a monitor adjusted to show colors as accurately and consistently as possible, matching industry color standards. This ensures the colors you see while designing are true to life.

Why do graphic designers need a calibrated display?

Graphic designers need calibrated displays to ensure their designs have accurate colors that will look consistent across devices and in print. It reduces errors, revisions, and client dissatisfaction.

How often should I calibrate my monitor?

It’s recommended to calibrate your monitor every month or two to maintain accurate color display, as monitors tend to drift in color accuracy over time.

Can I calibrate my display without special tools?

While some basic software calibration tools exist, hardware calibrators like the Datacolor Spyder offer far superior accuracy and reliability for professional design work.

Does ambient light affect monitor calibration?

Yes, ambient lighting impacts how colors appear on your screen. Proper calibration tools measure room light and adjust your display accordingly for the most accurate color representation.

A graphic overlaying an image of a designer working at a large monitor, with the text The Designer's Guide to Choosing the Right Monitor Size.

The Designer’s Guide to Choosing the Right Monitor Size

A graphic overlaying an image of a designer working at a large monitor, with the text The Designer's Guide to Choosing the Right Monitor Size.
An essential guide for designers on how to select the optimal monitor size for their creative work.

Table of Contents

Struggling to pick the right monitor size for design? Learn what pros use, why screen size matters, and how to upgrade your creative setup in 2025.

Understanding the Importance of Monitor Size for Designers

A monitor is more than just a screen for a designer—it’s a canvas that directly impacts creativity, efficiency, and eye comfort. Choosing the right monitor size isn’t just about picking the biggest display you can afford. It’s about balancing resolution, workspace needs, ergonomics, and your design workflow.

Selecting the wrong size could mean constant eye strain, difficulty fitting your work on the screen, or wasted desk space. On the other hand, the right choice can significantly improve productivity and precision in your design projects.

Factors to Consider When Choosing a Monitor Size

Before you invest in a monitor, you need to understand the key factors that influence size choice. Each consideration plays a role in determining whether the monitor will suit your design workflow.

Screen Resolution and Clarity

Resolution refers to the number of pixels displayed on the screen. Higher resolutions like 4K or 5K deliver sharper visuals, making it easier to work on high-detail projects. For large monitors, higher resolution is essential to avoid pixelation.

Workspace Dimensions

Your available desk space will determine the maximum monitor size you can comfortably use. Oversized screens can overwhelm smaller desks and lead to poor posture. Always measure your workspace before purchasing.

Viewing Distance and Ergonomics

The ideal viewing distance changes with monitor size. A 27-inch monitor is best viewed from about two feet away, while ultrawide monitors may require a slightly greater distance. Poor ergonomics can cause neck and eye strain.

Type of Design Work

Different design fields have different requirements. A video editor might prefer a 34-inch ultrawide for timeline visibility, while a graphic designer might opt for a 27-inch 4K display for precision work.

Aspect Ratio Preferences

Aspect ratio impacts the layout of your workspace. While the standard 16:9 ratio works well for most designers, 21:9 ultrawide monitors offer extra horizontal space for multitasking.

The right monitor size can transform your workflow, especially in the design world where detail, color, and workspace management matter as much as creativity. While there’s no universal answer that works for every designer, understanding how different monitor sizes suit different types of design work will help you make an informed choice. Below is a detailed guide on the most common creative fields and the ideal monitor sizes for each, along with specific use cases, pros, and potential drawbacks.

For Graphic Design and Illustration

Illustrators and logo designers often work on highly detailed graphics that require pixel-level precision. While large monitors are popular for multitasking, a 24-inch 4K right monitor size offers several advantages for these creatives.

The compact size keeps all elements within your natural field of vision, reducing the need to move your head or shift focus constantly. This can lead to less eye strain during long illustration sessions. With a 4K resolution, even on a smaller screen, the pixel density is extremely high, ensuring crisp lines and accurate curves when zoomed in.

For example, if you’re refining a logo in Adobe Illustrator, a 24-inch screen allows you to keep your artboard in view while having your essential toolbars at the edges without crowding the design. It’s also more space-efficient for smaller studios or home workstations.

Recommended model: ViewSonic VP2456A

A dual-panel image showing the back of a monitor with its flexible connectivity ports and a front view with dimensions of a 24-inch screen, illustrating its specifications.
Discover the perfect balance of size and resolution with this 24-inch 4K monitor.

For Video Editing

Video editors have unique needs compared to other designers. They work with complex timelines, multiple video tracks, and a range of visual effects panels. A 32-inch 4K monitor offers the space needed to view your entire editing timeline without excessive scrolling.

If you prefer an even broader view, a 34-inch ultrawide monitor with a 21:9 aspect ratio can be a game-changer. The extended horizontal space allows you to see longer portions of your timeline at once, which is especially helpful when editing documentaries or multi-scene commercial videos. The extra width also means you can keep your preview window, effects panel, and file browser all visible at the same time, reducing the need for constant window switching.

An example would be working in Adobe Premiere Pro—on a standard monitor, your timeline might require constant left-right scrolling. On an ultrawide, you can see the entire sequence in one glance, which makes cutting and syncing clips much faster.

Recommended model: ViewSonic VP3456A 34 Inch Ultrawide

Two curved ultrawide monitors, one displaying a vibrant burst of colorful powder and the other showing data analytics, highlighting the immersive experience of a 34-inch ultrawide monitor with a 21:9 aspect ratio.
Experience a panoramic view with the 34-inch ultrawide monitor, perfect for both work and play.

For 3D Modeling and Animation

3D artists and animators benefit from large monitors because their workflows often involve multiple viewports—front, side, and perspective—displayed simultaneously. A 32-inch 4K monitor is ideal for this kind of work.

With a large display, you can dedicate separate areas to modeling, texture painting, and animation timelines without overlapping windows. This reduces the need to zoom in and out constantly. For instance, if you’re sculpting a character in Blender, you can have your sculpting viewport take up half the screen while your material editor and reference images remain visible.

Some animators even prefer dual-monitor setups—one large main display for the 3D workspace and a secondary vertical monitor for scripts, notes, or real-time previews.

Recommended model: LG 32UN650-W Monitor 

An LG UltraFine Display monitor showing a vibrant, colorful image of paint splashes, with a large, abstract colorful pattern to its left.
Experience true-to-life colors and stunning detail with the LG 32UN650-W monitor.

For Web and UI Design

Web and UI designers need to see their projects as end users would experience them. This means testing designs across multiple resolutions, from small mobile screens to large desktop displays. A 27-inch QHD or 4K right monitor size works well for this purpose.

The benefit of this size is that it offers enough room to view full-page designs while still keeping your developer console, style guides, and design tools visible. For responsive design testing, having an ultrawide monitor lets you open multiple browser windows side by side—simulating how the design will look on different devices.

Imagine you’re designing a landing page in Figma—you could keep the desktop layout on one side of the screen while previewing the mobile layout on the other, all without switching tabs. This setup speeds up testing and reduces context switching.

Recommended model: BenQ MA270U 27

A BenQ MA270U 27-inch monitor is shown from the back with its ports, and its adjustable features are highlighted including a 90-degree pivot, swivel, tilt, and height adjustment.
Experience a flexible and comfortable viewing experience with the ergonomic BenQ MA270U monitor.

For Photography and Photo Editing

Photographers require high-resolution monitors with excellent color accuracy to ensure their edits match the intended look across print and digital platforms. A 27-inch or 32-inch 4K monitor with a wide color gamut (such as AdobeRGB or DCI-P3 coverage) is the go-to choice for most professionals.

A 27-inch display allows you to view high-resolution photos in full detail without excessive zooming. The larger 32-inch variant offers even more room for editing panels, side-by-side image comparisons, and reference shots. For example, in Adobe Lightroom, you can have the histogram, tone curve, and adjustment sliders all open without covering your image.

If you regularly work on print projects, a 5K display can be an even better option, as it offers extremely sharp detail and extra workspace for large-format editing.

Recommended model: LG 32UN650-W Monitor 

For Motion Graphics and VFX

Motion graphics artists and VFX professionals deal with layered compositions, particle effects, and real-time rendering. A 32-inch 4K monitor or 34-inch ultrawide provides the necessary space for multiple panels and high-resolution previews.

Programs like After Effects can be very panel-heavy, and a large display means you can keep the timeline, effects controls, and preview window open without compromising on visibility. An ultrawide setup also helps when scrubbing through long animation sequences, reducing the need for constant zooming and scrolling.

Recommended model: LG 34WP65C-B UltraWide Computer Monitor 

For Print and Layout Design

Layout designers working with newspapers, magazines, or catalogs need to see entire spreads at once. A 27-inch QHD or 4K monitor is often sufficient, but for very large projects, a 32-inch display offers the extra space to view multiple pages side by side.

This makes it easier to ensure visual consistency across spreads and reduces the need for zooming in and out. For example, in Adobe InDesign, you could view a two-page magazine spread at full size while keeping your layers, styles, and swatches panels visible.

Recommended model: LG 32UN650-W Monitor 

For Multi-Discipline Design Work

Some designers work across multiple fields—switching between photo editing, web design, and occasional video projects. In this case, versatility is more important than size alone. A 24-inch 4K monitor is often a smart choice for multi-discipline designers who value balanced desk space, portability, and affordability.

At 24 inches, the display offers enough room for most creative applications while remaining compact enough for tight workspaces or multi-monitor setups. For example, you could pair a 24-inch main display with a second monitor or a drawing tablet without feeling crowded.

This size also encourages better posture since you don’t have to move your head as much when switching between panels or applications, which is useful for long work sessions that jump between design tasks.

Recommended model: ViewSonic VP2456A

How Resolution Impacts Your Monitor Size Choice

When choosing the right monitor size, resolution is one of the most important factors to consider. Resolution defines how many pixels make up the display, directly affecting image sharpness, clarity, and the amount of workspace you have on the screen. Understanding the relationship between resolution and monitor size will help you pick a screen that fits your design needs perfectly.

What Is Resolution?

Resolution is expressed as width × height in pixels, such as 1920×1080 or 3840×2160. More pixels mean more detail, resulting in clearer images and sharper text. The most common resolutions for design monitors include Full HD (1080p), Quad HD (1440p), and Ultra HD (4K). Higher-end displays can even have 5K or 6K resolutions, providing exceptional clarity.

Why Resolution Matters for Different Monitor Sizes

Choosing a large monitor without adequate resolution often leads to a poor experience. For example, a 32-inch monitor with 1080p resolution can look pixelated because the pixels are stretched over a larger area. This reduces sharpness and makes detailed design work difficult. Conversely, a small monitor with very high resolution may render text and icons too small, straining your eyes.

Common Resolutions and Their Best Uses

1080p (Full HD)
Full HD displays have 1920 pixels horizontally and 1080 vertically. They are ideal for smaller monitors, generally under 24 inches. At this size, pixel density remains high enough for clear visuals. However, at sizes above 24 inches, 1080p starts to look less sharp because the same number of pixels spreads out over a larger area. This can make precise design work challenging.

1440p (Quad HD)
Also called QHD, 2560×1440 pixels is a popular middle ground. It offers higher pixel density than Full HD, making it a great choice for 27-inch monitors. QHD provides more workspace, letting you fit more windows and design elements on screen without losing clarity. Many designers find this resolution balances cost, performance, and image quality well.

4K (Ultra HD)
4K resolution is 3840×2160 pixels, offering four times the pixels of Full HD. This is perfect for monitors 27 inches and larger. The pixel density on a 27-inch 4K display results in extremely sharp images, ideal for detailed graphic design, photo editing, and video production. However, 4K requires more powerful computers to run smoothly and may need scaling settings to keep interface elements readable.

5K and Higher
Some monitors go beyond 4K to 5K (5120×2880) or 6K resolutions, mostly used by professionals requiring the highest clarity. These are found on larger screens—27 inches or more—and provide unmatched detail, essential for print designers and photographers working with large-format files.

Pixel Density: The Key Metric

Pixel density, measured in pixels per inch (PPI), combines screen size and resolution to describe how sharp the display appears. Higher PPI means more pixels packed in a smaller area, producing crisper images. For example, a 24-inch 4K monitor has a higher PPI than a 32-inch 4K monitor, making it look sharper even though they share the same resolution.

Balancing Resolution and Workspace

Higher resolution increases workspace, allowing you to fit more design windows, toolbars, and reference materials on the screen. But too high a resolution on a small monitor can make UI elements tiny and hard to read without scaling. Proper scaling settings in your operating system can help make interface elements comfortable, but not all software scales well.

Practical Tips

  • Match your monitor size with the right resolution to maintain a sharp, clear image.
  • For 24 inches and smaller, 1080p or 1440p is usually sufficient.
  • For 27 inches and above, opt for 4K resolution for the best clarity.
  • Always consider your computer’s graphics capability to handle higher resolutions smoothly.
  • Check if your design software supports scaling well to avoid tiny or blurry UI elements.

Understanding how resolution impacts your monitor size choice ensures you pick a display that makes your design work easier, more accurate, and more enjoyable. Balancing size, resolution, and pixel density will help you create a workstation tailored to your creative needs.

Also, check the recent article about the best laptop for graphic design here.


A collage of images related to graphic design workstation essentials. One image shows a desk with a laptop and a pen holder, with the text Clean Workstation Essentials Every Graphic Designer Should Own. Other images depict a wire clamp for cable management, a wireless mouse with a Noiseless Click and a keyboard, and a comparison of an ergonomic vs. a non-ergonomic chair. Another image provides Ergonomic Tips for a Healthier Graphic Design Workflow.

Clean Workstation Essentials Every Graphic Designer Should Own

A collage of images related to graphic design workstation essentials. One image shows a desk with a laptop and a pen holder, with the text Clean Workstation Essentials Every Graphic Designer Should Own. Other images depict a wire clamp for cable management, a wireless mouse with a Noiseless Click and a keyboard, and a comparison of an ergonomic vs. a non-ergonomic chair. Another image provides Ergonomic Tips for a Healthier Graphic Design Workflow.
Creating a clean and organized workstation is crucial for every graphic designer’s workflow. Essentials include proper cable management using a best finisher wire clamp to keep your desk tidy, as well as ergonomic tools to support a healthier work environment. A quiet, wireless keyboard and a mouse with a noiseless click can help you concentrate and maintain focus on your projects.

Explore the top clean workstation essentials every graphic designer should own. From desk mats and dust blowers to ergonomic tools and storage, boost creativity and productivity with the perfect setup.

Why a Clean Workstation Matters for Graphic Designers

Graphic designers thrive in creative, focused environments. But clutter, dust, and disorganization can quickly break that flow. That’s why setting up a clean, optimized workstation is more than just a visual upgrade—it’s a productivity tool.

In this guide, we’ll explore the must-have clean workstation essentials every graphic designer should own. These tools and habits can transform your workspace into a place of clarity, comfort, and creative energy.

Clean Desk Surfaces with the Right Accessories

A clean desk isn’t just about minimalism—it’s about intentional design, long-term maintenance, and the tools that help you stay productive and focused. For graphic designers, whose workflow relies on both digital and physical tools, the desk surface is a crucial part of the creative process.

Whether you’re retouching images, illustrating, or editing layouts, the surface you work on needs to stay clean, protected, and well-arranged. Below is a comprehensive guide to the Clean Workstation Essentials that every graphic designer should consider. These tools don’t just organize your space—they elevate your entire design experience.

Desk Mat for Surface Protection

Start with the foundation. A desk mat is one of the most basic yet powerful Clean Workstation Essentials. One of the most valuable clean desk investments is a high-quality desk mat. It serves as a foundation for your entire workspace.

A desk mat protects the surface of your desk from scratches, spills, and heat damage caused by laptops or coffee mugs. It also improves mouse tracking, which is essential for precise design work. Choose a mat that fits your desk size and personal aesthetic—faux leather, felt, and eco-friendly silicone are all excellent options.

Recommended model: TECKNET Large Gaming Mouse Pad

A collage of two images highlighting a black desk mat. One image shows a full desk setup with a title text Best Desk Mat for Graphic Designer. The other image focuses on the TECKNET brand mat, showcasing its durable, stitched edges and smooth surface texture, illustrating why it is the ideal choice for designers.
Enhance your creative workspace with a best desk mat for graphic designer. A quality mat like the TECKNET brand shown provides a durable surface with stitched edges for a clean look, protects your desk from scratches, and offers a smooth, consistent surface for your mouse, making it an essential accessory for any creative professional. The mat has a dimension of 900mm by 400mm, providing ample space for a keyboard and mouse.

Beeswax Wood Polish for Desk Maintenance

Maintaining wood desktops is easier with beeswax polish, a lesser-known but vital member of your Clean Workstation Essentials. If you’re working with a wooden desk, regular cleaning isn’t enough—you’ll need to maintain its finish and luster over time. Enter beeswax wood polish.

Beeswax acts as a natural conditioner and sealant for wood. Applying it once a month helps repel dust, resist stains, and maintain the smoothness of your desk surface. It’s especially beneficial if your desk is made from oak, walnut, bamboo, or reclaimed wood.

To apply:

  • Clean the surface first with a damp cloth.
  • Rub the wax in with a microfiber pad or soft sponge.
  • Buff with a dry cloth until smooth and shiny.

This small habit protects your investment and keeps your desk looking studio-fresh.

Recommended model: Howard Products Beeswax

A before-and-after comparison showing a wooden floor restored with polish. On the right, three bottles of Howard Feed-N-Wax Wood Polish & Conditioner are displayed, showcasing a valuable Beeswax Polish for Graphic and web Design Agency Setup Accessories.
Keep the wooden surfaces in your creative workspace looking their best with this Beeswax Polish for Graphic and web Design Agency Setup Accessories. It’s perfect for restoring and protecting wood desks and furniture, as shown by the impressive before-and-after results.

Desk Vacuum Cleaner

Quick, easy cleanup is key to maintaining your Clean Workstation Essentials. A mini desk vacuum is the ideal solution. A desk vacuum cleaner is more than a novelty—it’s a functional tool that makes daily maintenance quick and enjoyable.

Choose a compact, USB-rechargeable model that can suck up eraser bits, snack crumbs, pencil shavings, and even dust from your keyboard. Some models come with brush attachments that let you clean delicate areas like monitor bezels or speaker grilles.

The key benefit? You don’t have to move everything off your desk to use it. Quick, quiet, and efficient—an ideal tool for fast cleanups between client calls or deep work sessions.

Recommended model: GTSTEG New Model Cordless Vacuum Cleaner

White handheld wireless vacuum cleaner with attachments and a filter, shown in multiple views for cleaning workstations.
Powerful and portable vacuum for keeping your workspace tidy.

Compressed Air Dust Blower

Another favorite in the realm of Clean Workstation Essentials, the compressed air blower targets all the nooks and crannies.

A compressed air dust blower targets tight spaces that brushes and vacuums can’t reach. Use it to clear:

  • Keyboard gaps
  • Vents in your PC or laptop
  • Pen tablet edges
  • Monitor ports
  • USB hubs

A few strong bursts once a week help prevent overheating, electrical inefficiencies, and general grime buildup. Choose a reusable electric blower over disposable cans to reduce environmental waste.

Recommended model: VASSON Compressed Air Duster

A multi-purpose air duster with three nozzles, being used for various tasks including cleaning a car, a PC, a keyboard, and blowing leaves.
Versatile air duster with three nozzles for a variety of cleaning tasks.

Screen Cleaning Kit

Clear visuals are non-negotiable. That’s why a screen cleaning kit earns its place among your top Clean Workstation Essentials.

A screen cleaning kit typically includes:

  • A bottle of non-alcoholic cleaning solution (safe for matte and glossy screens)
  • One or two microfiber cloths
  • Optional brush or air blower

Use light, circular motions when cleaning and never spray directly on the screen. A clean display reduces eye strain and allows you to view your projects more accurately.

Recommended model: XPERTCHEMY Screen Cleaner Spray and Wipe

A split image showing the effectiveness of a screen cleaner. The left side shows a before-and-after comparison on a monitor and a list of compatible devices. The right side shows the cleaner being sprayed and wiped on a laptop screen, highlighting it as a crucial Screen Cleaner Spray and Wipe for Graphic and web Design Agency Setup Accessories.
Maintain pristine display quality with a Screen Cleaner Spray and Wipe for Graphic and web Design Agency Setup Accessories. This versatile product is essential for keeping monitors, laptops, and other devices free of dust and smudges, ensuring accurate color and sharp details for all your creative work.

Brush Sets for Desktop Crevices

Small, soft-bristle brush sets are ideal for removing dust from keyboard switches, audio interfaces, and stylus buttons.

Use multiple sizes:

  • A large brush for clearing desk mats and general surfaces
  • A small precision brush for your keyboard and stylus
  • A flat edge brush for monitor and tablet edges

Brushes are reusable, quiet, and safer than harsh chemicals or paper wipes. Keep them in a desk drawer or on a magnetic wall mount for quick access.

Recommended model: Brand: APBFH, Small Portable Nylon Anti Static Brushes

Set of cleaning brushes being used to clean a computer keyboard, a CPU heatsink, and a graphics card.
Specialized brush set for thoroughly cleaning computers and electronics.

Under-Desk Hook for Headphones or Bags

Headphones are essential for focus and client calls. But leaving them on your desk clutters the surface and invites dust.

Install an under-desk hook to hang:

  • Headphones
  • Laptop bags
  • Camera straps
  • Lanyards

This keeps these daily-use items off your desk and within arm’s reach. Bonus: It also protects your gear from accidental spills or damage.

Anti-Static Cleaning Gloves

For delicate gear, anti-static gloves are key Clean Workstation Essentials. If you’re handling expensive gear like color calibration tools, pro-grade lenses, or new monitors, anti-static gloves are worth having on hand.

They:

  • Prevent fingerprints on sensitive glass or screens
  • Reduce the chance of static discharge damaging electronics
  • Allow safe handling of internal PC components or printed materials

Keep a pair in your drawer for high-touch or high-detail cleaning.

Aroma Diffuser or Desktop Air Purifier

Clean air is part of a clean desk. That’s why a small diffuser or air purifier makes our list of Clean Workstation Essentials. While not directly cleaning tools, clean air is part of a clean environment. A small aroma diffuser or HEPA filter purifier can make your desk more pleasant and health-supportive.

Choose one with a minimalist design and set it to a light scent—lavender or citrus are ideal for focus. Clean filters or refill water every week as part of your workstation upkeep routine.

Recommended model:  XspideM Waterless Scent Diffuser Starter Kit

Black and silver scent diffusers with a remote control and essential oil bottles, displayed on a desk and in their packaging.
Sleek, waterless aroma diffuser with a remote control, perfect for a workstation.

Wireless Charging Mouse Pads

Wireless charging mouse pads combine two Clean Workstation Essentials into one: surface protection and device charging. Some desk mats now include embedded wireless charging zones. This innovation eliminates the need for tangled charging cables on your desk altogether.

A 2-in-1 charging mat lets you:

  • Charge your phone, earbuds, or stylus
  • Maintain a clean look without extra accessories
  • Work comfortably with a large, soft surface

Make sure your devices support Qi charging to take full advantage.

Glass or Acrylic Desk Cover

For designers who sketch or take notes directly on their desk, a transparent acrylic or glass desk cover protects the surface while keeping it stylish and clean.

It’s easy to wipe down and often used to display inspiration, schedules, or cheat sheets beneath. It also pairs well with under-mat lighting for a premium desk look.

Cleaning Schedule Checklist (Optional Add-On)

No list of Clean Workstation Essentials is complete without a strategy to keep everything in check. Use a weekly cleaning checklist to stay on top of maintenance.

Daily:

  • Wipe your desk mat
  • Return items to their trays or organizers

Weekly:

  • Vacuum and dust your surface
  • Clean your screen and polish wood (if applicable)

Monthly:

  • Reorganize trays
  • Purge unused tools or gear
  • Reset your layout for better flow

Consistency is what keeps your space clean long after the tools are bought.

Daily and Weekly Habits to Maintain Cleanliness

Buying the right tools is only half the battle. Consistent maintenance habits are what keep your workstation clean in the long run.

Clean as You Go

After each project or design session, take two minutes to reset your space. Close tabs, put away tools, and wipe surfaces.

Weekly Wipe Down

Set aside time once a week to clean your monitor, vacuum your keyboard, and dust corners. It prevents buildup and keeps your space fresh.

Review What’s Not Used

Remove anything from your desk that you haven’t touched in a week. You’ll be surprised how many items just take up space.

Digital Declutter Sessions

Once a month, organize your desktop, back up your files, and delete unnecessary assets. A clean digital space mirrors a clean physical one.

Common Mistakes That Break Your Clean Desk Setup

Even the most organized people can fall into traps that make a clean workstation messy again. Be aware of these to avoid backsliding.

Overusing the Desk as Storage

Your desk is a workspace, not a shelf. Avoid piling up deliveries, books, or extra gadgets that don’t serve daily purposes.

Letting Cables Run Wild

A common visual issue is unmanaged cables. Spend time labeling, bundling, or clipping them so they don’t dominate your space.

Ignoring Dust Buildup

Dust collects fast—especially on electronics. Make use of your blower or vacuum regularly to avoid buildup that can affect your equipment.

Using the Entire Desk Surface

Create boundaries. Don’t spread out just because you have the room. A focused workspace leads to focused work.

Conclusion: Curate Your Space with Intention

A clean workstation is an investment in your craft, your mental clarity, and your professional growth. Each essential mentioned here helps reduce friction in your daily workflow, keeps your environment inspiring, and supports your physical health.

With the right essentials and a few habits, you’ll create a workspace where your creativity can thrive—one clean surface at a time.

Also, check the recent article about the best laptop for graphic design here.


What are Clean Workstation Essentials for graphic designers?

Clean Workstation Essentials for graphic designers include desk mats, compressed air dust blowers, screen cleaning kits, mini vacuum cleaners, microfiber cloths, and beeswax polish. These tools help maintain a tidy, efficient, and inspiring creative workspace.

Why are Clean Workstation Essentials important?

Clean Workstation Essentials promote productivity, minimize distractions, and extend the lifespan of expensive tools like tablets, monitors, and peripherals. A clean workspace also contributes to better focus and creative flow.

How often should I use Clean Workstation Essentials like dust blowers and screen cleaners?

You should use Clean Workstation Essentials like dust blowers and screen cleaners at least once a week. Regular maintenance prevents buildup of dust, grime, and allergens, keeping your workstation functional and hygienic.

Can Clean Workstation Essentials improve my workflow?

Yes, Clean Workstation Essentials can drastically improve your workflow. A clean desk with defined zones, smooth mouse movement, and spotless screens ensures you can work without unnecessary friction or interruptions.

Are there eco-friendly Clean Workstation Essentials available?

Absolutely. Eco-conscious designers can opt for reusable microfiber cloths, beeswax-based polish for wooden surfaces, and rechargeable mini vacuums. These Clean Workstation Essentials align with sustainable work habits.

Is a desk mat really part of Clean Workstation Essentials?

Definitely. A desk mat not only protects surfaces but also organizes your space visually and functionally. It’s one of the most underrated Clean Workstation Essentials for everyday use.

Do Clean Workstation Essentials differ for digital vs. traditional graphic designers?

While both benefit from a clean workspace, traditional designers may add tools like brush cleaners or cutting mat scrubbers to their Clean Workstation Essentials, whereas digital designers may prioritize screen wipes and stylus sanitizers.

Are Clean Workstation Essentials expensive?

Not at all. Many Clean Workstation Essentials like microfiber cloths, dust blowers, and desk mats are affordable and long-lasting. Investing in these small items can prevent damage to your high-cost equipment.

A collage of three images focused on ergonomics for graphic designers. One image shows a workspace with an ergonomic chair and a computer, with the text Ergonomic Tips for a Healthier Graphic Design Workflow. A second image features a monitor arm with the text Best Monitor Arm for Graphic Designers. The third image shows an adjustable armrest, detailing its dimensions, material (ABS sponge pad surface), and installation method.

Ergonomic Tips for a Healthier Graphic Design Workflow

A collage of three images focused on ergonomics for graphic designers. One image shows a workspace with an ergonomic chair and a computer, with the text Ergonomic Tips for a Healthier Graphic Design Workflow. A second image features a monitor arm with the text Best Monitor Arm for Graphic Designers. The third image shows an adjustable armrest, detailing its dimensions, material (ABS sponge pad surface), and installation method.
To maintain a healthier graphic design workflow, consider implementing ergonomic tips into your workspace. Tools like a monitor arm can help position your screen at an ideal height and angle. Additionally, an adjustable armrest can provide crucial support, with its ABS sponge pad surface offering comfort during long work sessions.

Why Ergonomics Matter in Your Graphic Design Workflow

Designers often focus on creative output while unintentionally ignoring the physical toll that long hours in front of a screen can cause. A poorly arranged workstation, repetitive hand movements, and prolonged sitting can lead to discomfort, fatigue, or even long-term injuries. That’s why ergonomics is critical for a healthy and sustainable graphic design workflow.

Optimize Your Workspace for Comfort and Efficiency

Creating an ergonomic workspace is the foundation of a healthy routine. It helps minimize strain and promotes better focus during creative sessions.

Position your monitor at eye level
Your monitor should be directly in front of you, with the top third of the screen at or just below eye level. This reduces neck strain and encourages a neutral posture.

Adjust your chair height and lumbar support
Your feet should rest flat on the floor, with knees at a 90-degree angle. Use a chair with built-in lumbar support or add a cushion to maintain the spine’s natural curve.

Place frequently used tools within reach
Keep your tablet, mouse, keyboard, and sketchpads close to avoid constant stretching. Use shelves or desk organizers to create an accessible layout.

Incorporate Movement into Your Graphic Design Workflow

Remaining still for hours isn’t sustainable, even in a well-designed space. Movement is essential to combat stiffness and fatigue.

Take scheduled microbreaks
Every 30–45 minutes, stand up and stretch for 1–2 minutes. This brief movement reduces muscle stiffness and refreshes your focus.

Use a sit-stand desk if possible
Alternating between sitting and standing helps you engage different muscle groups. A sit-stand desk adds flexibility to your daily routine without interrupting your creative flow.

Perform wrist and hand stretches
Graphic designers rely heavily on their hands. Simple wrist circles, finger stretches, and tendon glides can prevent repetitive strain injuries like carpal tunnel syndrome.

A collage of images related to a graphic design workflow, showing ergonomic tips, desk organization tools, and charts on AI's impact on efficiency and income.
Optimizing a graphic design workflow involves a mix of ergonomics, desk organization, and modern tools. Utilizing tools like monitor arms and wire clamps improves a workspace’s health and tidiness. AI can further enhance the workflow, leading to faster design processes and increased monthly income despite the value vs volume paradox.

Choose Ergonomic Tools to Support a Healthier Workflow

If you’re serious about improving your graphic design workflow, investing in ergonomic tools is a must. Below are the most impactful tools you should consider.

Ergonomic Chair with Lumbar Support

A quality ergonomic chair supports the spine’s natural curve, reducing lower back stress. Look for adjustable height, armrests, and lumbar support to customize your seating.

Top pick: ETasker Ergonomic Office Chair or GM Seating Ergobilt High-Back Ergonomic Office Chair

Adjustable Sit-Stand Desk

Standing desks allow you to switch between sitting and standing. This reduces fatigue and helps improve circulation throughout the day.

Recommended model: Monomi Electric Standing Desk

Vertical Mouse and Ergonomic Keyboard

Traditional mice and keyboards can strain your wrists. A vertical mouse keeps your hand in a neutral position, while split ergonomic keyboards reduce ulnar deviation.

A collage of images related to a graphic design workflow, showing ergonomic tips, desk organization tools, and charts on AI's impact on efficiency and income.
Optimizing a graphic design workflow involves a mix of ergonomics, desk organization, and modern tools. Utilizing tools like monitor arms and wire clamps improves a workspace’s health and tidiness. AI can further enhance the workflow, leading to faster design processes and increased monthly income despite the value vs volume paradox.

Best ergonomic combo: TECKNET Ergonomic Mouse+ TECKNET Ergonomic Wireless Keyboard

Large Monitor or Dual Monitor Setup

Using one small screen for complex design work increases eye strain. Dual monitors or a single ultrawide display improve workflow efficiency and posture.

Top tools: LG UltraFine or BenQ MA320U 32

Monitor Arm Mounts

Monitor arms allow precise height and angle adjustments, aligning screens with your eye level to reduce neck and shoulder strain.

Ergonomic winner: HUANUO Dual Monitor Stand

Footrests and Anti-Fatigue Mats

Footrests help maintain a 90-degree knee angle, while standing desk users can benefit from anti-fatigue mats to reduce leg tension.

Popular choices: Cloud Ergonomic Foam Foot Rest

Blue Light Glasses and Screen Filters

Prolonged screen exposure leads to digital eye strain. Blue light glasses or screen filters reduce glare and block harmful light.

Effective options: GUNNAR – Premium Computer Eye Protection Glass

Lighting and Visual Ergonomics in Design Environments

Your eyes work hard during every design project. Proper lighting and screen setup are crucial for visual comfort.

Reduce glare and blue light exposure
Use anti-glare screens or position your monitor away from direct sunlight. Blue light filters or glasses can minimize eye fatigue caused by long hours of digital work.

Set the right screen brightness and contrast
Your monitor should not be significantly brighter or dimmer than your surroundings. Balanced settings reduce eye strain and make colors easier to perceive accurately.

Follow the 20-20-20 rule
Every 20 minutes, look at something 20 feet away for at least 20 seconds. This gives your eyes a break and helps prevent digital eye strain.

Organize Your Graphic Design Workflow for Physical and Mental Health

Ergonomics isn’t only about posture—it’s about working smarter and managing your energy.

Declutter your desk to improve focus
A clean workspace reduces visual noise and allows your brain to stay focused on the task. Less clutter also means fewer distractions and more comfort.

Establish a task routine
Work in structured time blocks with defined breaks. This keeps your workflow organized and helps prevent burnout from constant multitasking.

Use project management tools
Trello, Asana, and other tools reduce mental strain by organizing your tasks. This supports productivity while keeping you mentally relaxed.

Posture Awareness During Creative Work

Even the best chair or setup won’t help if your posture remains poor. Posture plays a key role in preventing fatigue and discomfort.

Keep your back aligned
Sit back fully in your chair with your back supported. Avoid slouching or leaning forward toward the screen. This helps distribute body weight evenly.

Relax your shoulders and elbows
Your elbows should stay close to your body at a 90-degree angle. Keep your shoulders relaxed—not hunched—to reduce tension in your upper body.

Maintain a neutral wrist position
While typing or drawing, your wrists should stay flat—not bent up or down. A wrist rest can help maintain this neutral position.

Ergonomic Apps and Tools for Graphic Designers

Digital tools can help you track your posture, break times, and physical activity during work.

Posture reminder apps
Apps like “Upright” or “Posture Reminder” send alerts if you’re slouching or have been sitting too long. This keeps you mindful of your posture.

Break scheduling tools
Programs like “Stretchly” or “Time Out” remind you to step away from the screen at regular intervals. It’s easy to lose track of time while designing—these apps fix that.

A collage of images related to graphic design, showing the debate on AI's impact, ergonomic tips for a healthier workflow, and tools for desk organization.
The graphic design profession is evolving, with AI presenting opportunities for faster workflows while also raising questions about the future of the industry. To succeed, a healthier workflow is essential, which can be achieved with ergonomic tools like adjustable armrests and monitor arms. An organized workspace with desk mats and wire clamps also contributes to productivity.

Effective options: Ticktime Pomodoro Timer Cube

Productivity timers with movement breaks
Pomodoro-style timers like “Focus Booster” allow you to build in microbreaks and full breaks throughout your day to optimize your graphic design workflow.

Signs Your Current Setup May Be Hurting Your Health

Recognizing early warning signs of poor ergonomics can help you take action before pain or fatigue becomes chronic.

Frequent wrist or finger pain
If your hands hurt after every session, it could be due to an uncomfortable mouse or tablet setup.

Back or neck tension after work
These symptoms often come from incorrect monitor height or lack of lumbar support in your chair.

Constant headaches or blurred vision
This may signal eye strain caused by improper lighting or excessive screen time without breaks.

Conclusion: Prioritize Ergonomics to Elevate Your Graphic Design Workflow

Improving your graphic design workflow isn’t just about software or speed—it’s also about how you treat your body. With the right ergonomic practices, tools, and routines, you can design more comfortably, reduce fatigue, and protect your health for the long haul. Small changes, like adjusting your screen or taking regular breaks, add up to big improvements in both creativity and well-being. Start today by evaluating your setup and making one ergonomic improvement at a time.

Also, check the recent article about the best laptop for graphic design here.


How can I tell if my posture is correct while designing?

Your feet should be flat on the floor, back fully supported, shoulders relaxed, and wrists in a straight line with your hands. If you feel strain after just 30 minutes, something in your setup likely needs adjustment.

What’s the best chair height for a graphic designer?

Adjust your chair so your knees are at a 90-degree angle, and your thighs are parallel to the floor. Your arms should rest comfortably on your desk without needing to hunch.

How often should I take breaks during design work?

Try taking a short break every 30–45 minutes, even just to stand or stretch. This helps prevent stiffness and improves circulation, keeping your energy steady.

Do ergonomic tools really make a difference in long-term health?

Yes. Over time, ergonomic chairs, keyboards, and desk setups help prevent repetitive stress injuries and posture-related pain, supporting a sustainable graphic design workflow.

Can standing desks improve productivity for designers?

Many designers find standing desks helpful. Alternating between sitting and standing keeps you more alert and reduces discomfort during long design sessions.

The image shows a desk with a keyboard and a black cord. Overlaying the image is the text BEST FINISHER WIRE CLAMP TO KEEP YOUR GRAPHIC DESIGN DESK CABLE MANAGEMENT. The Branjdesign bd logo is in the top-left corner.

Best Finisher Wire Clamp to Keep Your Graphic Design Desk Organized

The image shows a desk with a keyboard and a black cord. Overlaying the image is the text BEST FINISHER WIRE CLAMP TO KEEP YOUR GRAPHIC DESIGN DESK CABLE MANAGEMENT. The Branjdesign bd logo is in the top-left corner.
Keep your workspace clean and clutter-free with the Best Finisher Wire Clamp for effective graphic design desk cable management. A well-organized desk improves workflow and reduces visual noise, allowing you to focus on your creative work.

Table of Contents

Explore the best finisher wire clamp options to manage cables on your graphic design desk. Learn about key features, benefits, and top-rated products that keep your workspace neat, organized, and distraction-free.

Why cable management matters for graphic designers

Graphic designers rely heavily on multiple devices, including monitors, tablets, external drives, keyboards, and more. Without proper cable management, wires can easily become tangled, cluttered, and even dangerous. This not only disrupts productivity but can also harm your equipment or pose a safety risk.

Reduced distractions and enhanced focus
A clean desk promotes a clear mind. When cables are neatly tucked away, there’s less visual noise, allowing you to focus better on your creative tasks.

Protection for equipment
Proper cable management reduces wear and tear on ports and cables, preventing disconnections or damage over time. Finisher wire clamps help maintain consistent tension and prevent accidental snags.

Optimized use of space
Tidy cables mean more usable workspace for drawing tablets, sketchbooks, or other creative tools. This allows for smoother workflows and improved comfort.

What is a finisher wire clamp?

A finisher wire clamp is a small but powerful accessory used to secure cables on or under your desk. It keeps wires in place, prevents tangling, and supports better organization.

Purpose-built for cable routing
These clamps are specifically designed to hold power cords, USB cables, Ethernet lines, and HDMI cords in place. They’re ideal for keeping essential tools connected without creating messes.

Compact and versatile
Most finisher wire clamps are small in size, making them discreet and easy to place in various locations. Some models are adhesive-backed for easy mounting, while others use screws for added stability.

Durable and flexible
Made of plastic, rubber, or silicone, they can accommodate different cable diameters and configurations, helping designers customize their desk layout to match their workflow.

How to properly install and use wire clamps

A great clamp won’t help much if not installed correctly. Here are some tips for getting the most from your wire clamps.

Clean the mounting surface
Ensure the area where the clamp will be placed is free from dust or oils. Adhesive won’t stick well to dirty surfaces, reducing clamp effectiveness.

Measure cable lengths before clamping
Allow enough slack so devices can move as needed without straining the cables. Plan the clamp placement to secure wires without pinching or bending them sharply.

Group similar cables together
It’s easier to troubleshoot or rearrange wires when they’re grouped by type (e.g., power cords, USB devices). Label them if necessary.

Check for interference
Avoid placing power and signal cables too close to each other. Finisher wire clamps help by allowing you to route each type separately, reducing interference and crosstalk.

Tired of Tangled Cables? These Cable Clips Are the Solution

Every graphic designer knows how frustrating cluttered cables can be. Whether you’re dealing with chargers, HDMI cords, monitor wires, or lighting setups, cable chaos is a common struggle. That’s where this 120 PCS Cable Clip Set from JinRui-T comes in—designed to eliminate mess and make your workspace sleek and functional.

A close-up of a transparent finisher wire clamp holding a black cable. The image highlights its features, including ultra-strong 3M adhesive pads and offset hooks for cable retention, making it a key accessory for Finisher Wire Clamp for Graphic Design Agency Setup Accessories.
Achieve a clean and organized workspace with this Finisher Wire Clamp for Graphic Design Agency Setup Accessories. The transparent, easy-to-use clamps feature a strong 3M adhesive to securely manage cables and keep your desk clutter-free.

Why These Cable Clips Stand Out

Durable Build Quality

The clips are made from high-grade plastic that withstands daily use without breaking or losing grip. They work well for both small and large cables, making them incredibly versatile.

Two Sizes for Flexibility

This set includes both small and large clips, so you’re not stuck with one size that doesn’t suit all your needs. From tiny charging cables to thicker monitor and TV cords, everything can be properly secured.

Powerful Adhesive Backing

With their strong adhesive, these clips can stick to most surfaces—walls, desks, wood panels, plastic, and even glass. They’re especially useful for setting up cable management behind your monitor or TV without using screws.

Ideal for Indoor and Outdoor Use

These aren’t just for your office. You can use them outside as light clips for your garden lights or patio decorations. The adhesive holds up well in varied environments.

Perfect for a Range of Devices

These cable clips are great for managing cords from:

  • Desktop PCs and laptops
  • Monitors and drawing tablets
  • TVs and sound systems
  • Studio lighting and ring lights
  • Outdoor holiday lights or string lights
  • Wi-Fi cables and internet routers

How They Improve Your Creative Workspace

Enhance Productivity

Clean space equals clear mind. By reducing visual clutter, these clips allow designers to focus better on their creative tasks.

Prevent Cable Damage

Tangled or twisted wires are more prone to damage. Using these clips keeps cables in place and extends their lifespan.

Simple Installation

Peel, stick, and clip—there’s no drilling or extra hardware required. The setup takes minutes and delivers long-term results.

A collage of two images related to cable management. One image shows transparent 3M adhesive wire clips for holding cables, highlighting their ultra-strong 3M 4950 adhesive pads and easy peel and stick application. The other image demonstrates how to use the clips for cable management, recommending to place a clip every 8 inches/20 cm to secure cords along a wall and under a desk.
Organize your workspace with a finisher wire clamp, a simple yet effective solution for cable management. These clamps often feature ultra-strong 3M 4950 adhesive pads for a secure hold and an easy peel and stick application. To ensure your cables are neatly secured, a good practice is to place a clip every 8 inches/20 cm.

Who Should Use These Clips?

These clips are perfect for:

  • Graphic designers
  • Gamers
  • Home office users
  • Content creators
  • Tech enthusiasts
  • Anyone looking for better Finisher Wire Clamp solutions

Real-World Use Case

Imagine you’re a digital illustrator with dual monitors, a tablet, and a DSLR webcam. You also use LED strip lights and have multiple chargers plugged in. Instead of dealing with tangled messes and misaligned cables every day, you can apply these clips to the back of your desk, walls, or even the underside of your workspace for clean routing.

Final Thoughts

The 120 PCS Cable Clip Set from JinRui-T is more than just a cable organizer—it’s an essential workspace upgrade. With flexible sizes, a firm adhesive grip, and compatibility for both indoor and outdoor use, this product delivers value, simplicity, and a cleaner workspace for anyone who takes cable management seriously.

How finisher wire clamps compare to other cable management tools

While there are many ways to manage cables—such as sleeves, boxes, and zip ties—finisher wire clamps offer a unique combination of flexibility and precision.

Vs. cable sleeves
Sleeves are great for bundling, but they lack placement control. Clamps let you route individual cables exactly where you want them.

Vs. cable boxes
Boxes hide messes but don’t offer much for active workstations where cables are in use. Clamps work better for desks that require frequent access.

Vs. zip ties or Velcro straps
While these bundle cables well, they aren’t easy to adjust. Wire clamps let you reconfigure quickly without cutting or unstrapping anything.

Conclusion

Finisher wire clamps may be small, but they play a significant role in building an efficient and inspiring workspace for graphic designers. From managing cords and protecting your gear to improving aesthetics and productivity, these simple tools make a noticeable difference. By selecting the right clamps, installing them properly, and maintaining good cable habits, you can create a desk setup that supports your creative process while staying clean and professional.

Take the next step toward a clutter-free, ergonomic, and beautiful workstation. Invest in finisher wire clamps tailored to your needs and experience the difference in both comfort and productivity.

Also, check the recent article about the best laptop for graphic design here.


What is a finisher wire clamp?

A finisher wire clamp is a compact, often adhesive-backed device used to secure and organize wires or cables. It helps prevent tangling and clutter around workstations, entertainment centers, and other setups.

Can these cable clips hold thicker cords like HDMI or power cables?

Yes, the set includes both small and large clips. The large ones are ideal for bulkier cables such as HDMI, power cords, and even thicker Wi-Fi router cables.

Are they reusable?

While these clips use strong adhesive for a long-lasting hold, they are generally designed for one-time placement. Removing them may reduce their ability to stick again.

Will the adhesive damage walls or furniture?

The adhesive is strong but safe for most smooth surfaces like plastic, wood, glass, and metal. However, it’s best to test on a small area first, especially for painted or delicate finishes.

Can I use these outdoors?

Absolutely. These cable clips are also great for outdoor setups like hanging string lights or organizing garden lighting wires.

How many clips are included?

The package includes 120 pieces in total—both small and large sizes—to suit different cable types and uses.

A collage of images showcasing monitor arms. One image shows a single monitor arm in a graphic designer's workstation, with text that labels it the best monitor arm for graphic designers. Another image highlights how a single arm creates more desk space, while a third illustrates a dual arm setup, compatible with both dual horizontal and dual vertical mounting.

Best Monitor Arm for Graphic Designers

A collage of images showcasing monitor arms. One image shows a single monitor arm in a graphic designer's workstation, with text that labels it the best monitor arm for graphic designers. Another image highlights how a single arm creates more desk space, while a third illustrates a dual arm setup, compatible with both dual horizontal and dual vertical mounting.
Enhance your creative workstation with the best monitor arm for graphic designers to create a more ergonomic and spacious environment. A monitor arm helps you save desk space and offers wide compatibility for various devices. Whether you prefer a single or a dual horizontal or dual vertical setup, these arms support monitors from 13 to 32 inches with a max load of 19.8 lbs per arm.

Table of Contents

Introduction

A good monitor arm can dramatically improve a graphic designer’s workspace by enhancing ergonomics, freeing up desk space, and allowing precise adjustments for comfortable viewing. Whether you work on a single display or multiple screens, investing in the right monitor arm can boost your productivity and reduce physical strain. In this blog post, we will explore the essential features of monitor arms suitable for graphic designers, review popular models, and share tips for choosing the right one to meet your needs.

Why Graphic Designers Need a Monitor Arm

A monitor arm is not just a simple accessory; it is a crucial tool that can transform your entire workstation. Graphic design requires long hours of detailed work, and maintaining proper posture is essential to avoid neck, back, and eye strain.

Improved Ergonomics
Monitor arms allow you to position your screen at eye level and adjust the distance to reduce neck bending and eye fatigue. This ergonomic setup prevents discomfort that could affect your focus and creativity during extended work sessions.

Optimized Desk Space
Using a monitor arm lifts the display off the desk, giving you more room for drawing tablets, sketchbooks, keyboards, and other creative tools. A clutter-free workspace encourages a clear mind and better workflow.

Flexible Viewing Angles
Graphic designers often need to view their work from different angles to check colors, lines, and details accurately. A monitor arm offers tilt, swivel, and rotation options, making it easy to adjust your screen to the perfect position quickly.

Types of Monitor Arms for Designers

Single Monitor Arms

Single monitor arms like the HUANUO Single Mount are perfect for minimalist setups. They’re ideal if you use one large screen and want a clean, organized workspace.

HUANUO Single Monitor Mount: Flexible Ergonomic Support for Designers

The HUANUO Single Monitor Mount is designed for professionals who work primarily with one screen but want the benefits of adjustability and desk organization. Supporting monitors from 13 to 32 inches and weights between 4.4 and 19.8 pounds, this arm offers a smooth, gas-spring mechanism for effortless height and angle adjustments.

Why Choose a Single Monitor Mount?

For graphic designers who use one primary monitor or those working in smaller spaces, a single monitor arm helps maximize desk space and improve ergonomics without unnecessary bulk. This mount elevates your screen, reduces neck strain, and frees up surface area for tablets, drawing pads, or other creative tools.

Full Range of Motion for Comfortable Viewing

The arm provides versatile movements including:

  • Tilt: Adjust the screen angle from -30° to +85° to reduce glare and improve visibility
  • Swivel: Rotate the monitor up to 90° left or right for better alignment
  • Rotation: Flip between landscape and portrait mode with 360° rotation
  • Height Adjustment: Gas spring technology makes lifting or lowering the screen easy and smooth

These features allow you to position your monitor perfectly, promoting healthier posture and reducing eye and neck fatigue.

Durability and Stability

The mount supports monitors weighing between 4.4 and 19.8 lbs, suitable for most LED, LCD, and curved monitors within the 13–32 inch range. It’s made from sturdy steel and aluminum alloys, ensuring your screen remains secure and stable even during frequent adjustments.

Simple and Secure Mounting Options

You can choose between two mounting methods:

  • C-Clamp: Attaches firmly to the edge of your desk without drilling
  • Grommet Base: Mounts through a pre-existing desk hole for a more permanent setup

Both options are designed to save desk space and keep your workstation neat.

Integrated Cable Management

The arm features built-in clips that organize cables neatly along the arm, reducing clutter and preventing tangles for a clean, professional workspace.

VESA Compatibility

The mount fits monitors with 75x75mm and 100x100mm VESA mounting holes. This wide compatibility ensures it works with popular brands such as Dell, ASUS, HP, Acer, and more.

Ideal for Creative Professionals

Whether you’re focused on digital illustration, video editing, or coding, the HUANUO Single Monitor Mount enhances your workspace with ergonomic comfort and space efficiency. It’s especially useful in home offices or studios with limited desk space.

A split image showing a single monitor stand in use. The left side highlights how it creates MORE DESK SPACE for a monitor and laptop setup. The right side emphasizes its WIDE COMPATIBILITY with different monitors, showcasing it as a Single Monitor Stand for Graphic Design Agency Setup Accessories.
Maximize your workspace and improve your workflow with a Single Monitor Stand for Graphic Design Agency Setup Accessories. This stand helps you clear desk clutter and adjust your monitor for optimal ergonomic positioning.

Technical Specifications

FeatureDetails
Monitor Size Support13″ to 32″
Weight Capacity4.4 lbs to 19.8 lbs
Tilt Range-30° to +85°
Swivel Range±90°
Rotation360° (landscape or portrait)
Mounting OptionsC-Clamp or Grommet
VESA Compatibility75x75mm, 100x100mm
MaterialSteel, aluminum, plastic
Cable ManagementBuilt-in cable clips
ColorBlack

Final Thoughts

The HUANUO Single Monitor Mount is an excellent ergonomic upgrade for graphic designers who want precise control over their primary screen’s position. It helps reduce strain, frees up desk space, and complements any creative setup with its sleek design and reliable build. Whether you’re creating detailed artwork or managing complex design software, this monitor arm offers comfort and flexibility for long hours of productive work.

Dual Monitor Arms

Dual monitor arms provide even more flexibility. The HUANUO Dual Mount is designed for designers using two displays, such as a drawing tablet and a main monitor. These setups help multitask efficiently without switching tabs constantly

HUANUO Dual Monitor Stand: A Professional Setup for Creative Workspaces

The HUANUO Dual Monitor Stand is a must-have for designers, editors, and multitaskers who use two screens. With flexible adjustability and robust support, it helps improve your desk ergonomics and productivity.

Why Graphic Designers Need Dual Monitor Mounts

Creative professionals often juggle multiple programs, reference files, or live previews. A dual monitor mount lets you view more, reduce eye strain, and keep your desk clutter-free. The HUANUO Dual Monitor Stand is specifically built for users who require a smooth, flexible, and steady dual-screen setup.

Full Motion Flexibility for Maximum Comfort

The HUANUO mount allows each arm to move independently. You can:

  • Tilt each monitor from -30° to +85° to reduce glare
  • Swivel them 90° left or right to match your posture
  • Rotate screens 360° for horizontal or vertical use
  • Lift or lower each screen using a gas spring arm

These options give you freedom to align your displays at eye level, which promotes better posture and comfort during long hours of work.

Durability You Can Count On

Each arm can hold between 4.4 and 19.8 lbs, making it suitable for most 13″ to 32″ screens. Whether you’re using a lightweight LED or a heavier design monitor, this stand offers long-lasting support and excellent balance.

Easy Mounting Options

Two installation methods are included:

  • C-Clamp: Attaches to the edge of your desk
  • Grommet Mount: Installs through a desk hole for greater stability

Both mounting styles save space and ensure the stand remains secure during screen adjustments.

Clean Cable Management

Built-in cable clips along the arms help organize power cords and display cables. This reduces desk clutter and prevents tangled wires from interfering with your work.

VESA Compatibility

It supports VESA 75x75mm and 100x100mm patterns, making it compatible with nearly all standard monitors, including brands like:

  • Dell
  • HP
  • ASUS
  • Acer
  • LG
  • Samsung

Ideal for Creative Professionals

Whether you’re editing photos, creating illustrations, coding, or running simulations, the HUANUO Dual Monitor Stand gives you the ergonomic control and screen real estate you need. Its full adjustability and modern design make it ideal for design studios, home offices, and agency setups.

A dual monitor stand with articulated arms and a clamp mount. The image also shows diagrams of both a dual horizontal and a dual vertical monitor setup, highlighting its versatility as a Dual Monitor Stand for Graphic Design Agency Setup Accessories.
Enhance your creative workflow with this versatile Dual Monitor Stand for Graphic Design Agency Setup Accessories. It provides flexible positioning for your screens, allowing for both horizontal and vertical setups to maximize screen real estate and improve ergonomics.

Technical Specifications

FeatureDetails
Monitor Size Support13″ to 32″
Weight Capacity (Per Arm)4.4 lbs to 19.8 lbs
Tilt Range-30° to +85°
Swivel Range±90°
Rotation360° (landscape or portrait)
Mounting OptionsC-Clamp or Grommet
VESA Compatibility75x75mm, 100x100mm
MaterialSteel, aluminum, plastic
Cable ManagementBuilt-in cable clips
ColorBlack

Final Thoughts

The HUANUO Dual Monitor Stand offers everything a graphic designer needs—adjustability, strength, compatibility, and an organized setup. It transforms a crowded desk into a clean, functional workstation while allowing seamless multitasking across two screens. Whether you’re building a new creative workspace or upgrading your current setup, this monitor arm is a solid, reliable choice.

Tips to Maximize Your Monitor Arm Setup

Once you have your monitor arm, here are ways to optimize your setup:

Position Your Monitor at Eye Level
Your eyes should naturally meet the top third of the screen. This helps maintain a neutral neck position and prevents strain.

Maintain Proper Distance
Keep the monitor about an arm’s length away to avoid eye fatigue while ensuring you can comfortably see details.

Use Portrait Mode for Vertical Projects
Switch your monitor to portrait orientation when working on vertical designs like posters or websites to maximize screen space.

Keep Your Desk Clear
Use the freed-up desk space for essential tools and maintain a clutter-free zone that fosters creativity.

Regularly Adjust as Needed
Don’t hesitate to reposition your monitor during the day. Movement helps reduce muscle stiffness and keeps you comfortable.

Conclusion

For graphic designers, a quality monitor arm is more than an accessory — it’s a vital part of a productive and ergonomic workstation. By selecting the right monitor arm that supports your monitor’s size and weight, offers flexible adjustment, and fits your desk setup, you can enhance your comfort, workflow, and creative output. Whether you choose a budget-friendly model or a premium option, the benefits of improved ergonomics and desk organization are undeniable. Invest in a monitor arm today to elevate your design experience and maintain your health during long hours of creative work.

Also, check the recent article about the best laptop for graphic design here.


A person sits at a desk with a laptop, while a humanoid robot stands beside them. The image poses the question of whether AI will replace graphic designers by 2030 and discusses the real impact on the creative industry.

Will AI Replace Graphic Designers by 2030? The Real Impact on the Creative Industry

A person sits at a desk with a laptop, while a humanoid robot stands beside them. The image poses the question of whether AI will replace graphic designers by 2030 and discusses the real impact on the creative industry.
The future of graphic design is explored in this image, which asks if AI will replace graphic designers by 2030 and considers the real impact of artificial intelligence on the creative industry. This thought-provoking visual from Branjdesign bd prompts a discussion on this evolving topic.

Introduction

Artificial Intelligence is transforming industries across the globe, and the creative sector is no exception. As tools like Midjourney, recraft.ai, DALL·E, and Adobe Firefly rise in popularity, many are asking: Will AI replace graphic designers by 2030? While the automation of some design tasks is already happening, the future of human creativity remains a powerful force that AI can’t easily replicate. In this blog, we’ll examine how AI is impacting the graphic design field and whether designers should prepare for a seismic career shift or a creative collaboration with machines.

Understanding the Rise of AI in Graphic Design

As AI capabilities evolve, they’re entering the core workflows of designers worldwide. From automated layouts to generative image creation, these tools offer significant time savings—but also stir concern about job security.

AI tools are becoming more user-friendly and accessible

Platforms like Canva and Adobe Express now include AI-based features that generate templates, resize designs, and offer design suggestions, making it easier for non-designers to create content.

AI-generated artwork is entering the commercial space

With tools like , recraft.ai, DALL·E and Midjourney creating stunning visuals in seconds, businesses are beginning to use AI art in marketing campaigns, social media, and even branding.

Automation is accelerating repetitive design tasks

Designers often spend hours resizing assets, aligning objects, or creating variations. AI now handles these tasks efficiently, freeing up time for more strategic work.

How Graphic Designers Are Adapting to AI Tools

Rather than fearing replacement, many designers are embracing AI as a collaborative assistant—one that enhances their workflows rather than competes with them.

AI accelerates brainstorming and ideation

Tools like ChatGPT and Firefly can quickly generate mood boards, color palettes, or layout ideas, providing a springboard for creative projects.

Designers are learning prompt engineering

Crafting effective prompts for AI tools has become a new skill. Designers who understand how to guide AI get better results and faster turnaround times.

Integration into software is seamless

Adobe’s Creative Cloud now includes generative fill and AI-based object removal, empowering designers to do complex edits without needing separate apps or plugins.

Designers complete projects much faster with AI assistance

What used to take several hours—like building complex mockups, creating visual variations, or rendering illustrations—can now be completed in minutes using AI. This allows designers to handle more projects in less time.

Faster results may lead to lower perceived value

However, because AI makes the process quicker, clients sometimes undervalue the final product. Despite delivering high-quality work, designers often face pressure to charge less simply because the project took less time. This creates a pricing paradox: greater efficiency leads to lower compensation unless the designer clearly communicates the strategic and creative thinking behind the work.

This combined chart illustrates the paradox of AI in design work:As time spent per project decreases, the number of projects completed per week increases (green line).Despite maintaining high actual value (blue line), both client-perceived value (orange) and designer compensation (red) decline.
The paradox of AI in design work is evident in how it impacts the creative industry. While AI can increase efficiency and the number of projects completed per week, it also leads to a decrease in client perceived value and designer compensation as the time spent per project decreases. This trend raises the question of whether AI will replace graphic designers by 2030, a topic explored by Brandesignbd.

This combined chart illustrates the paradox of AI in design work:

  • As time spent per project decreases, the number of projects completed per week increases (green line).
  • Despite maintaining high actual value (blue line), both client-perceived value (orange) and designer compensation (red) decline.

Will AI Replace Graphic Designers by 2030? A Forecast

Despite the dramatic changes AI is causing, the reality is nuanced. Jobs may shift, roles may evolve, but complete replacement is unlikely.

Entry-level tasks may be automated

Simple projects like resizing banners, creating social media graphics, or generating icons may increasingly be handled by AI, reducing the need for junior designers.

The role of a designer will become more strategic

By 2030, graphic designers will likely spend less time executing and more time directing—offering brand insights, creative leadership, and client strategy.

New roles will emerge in AI-driven design

Expect to see job titles like “AI Design Strategist,” “Prompt Engineer,” or “Generative Art Curator” emerge as hybrid roles combining creativity with technical fluency.

The rise of AI in design has not only changed workflows—it has also impacted how much designers earn. While some designers are increasing their output and reaching more clients, others are experiencing pricing pressure due to misconceptions about AI’s role in their work.

Designers can deliver work faster with AI

With AI handling repetitive or time-consuming tasks, designers can now complete projects that once took several hours in just minutes. Tasks like mockup creation, background removal, or visual variations can be streamlined significantly. This allows designers to take on more jobs or meet tighter deadlines without sacrificing quality.

Faster delivery doesn’t always mean higher pay

Clients often judge pricing based on time spent. If a designer delivers a high-quality logo in an hour with AI assistance, some clients may question why it should cost the same as a design that once took a full day. As a result, many designers face downward pressure on pricing—despite the creativity, skill, and decision-making that still goes into the work.

Freelancers and agencies are adapting their pricing strategies

To adjust, many designers are shifting to value-based pricing, where they charge based on the outcome and impact of the design—not the time it took to create. This approach helps communicate the true worth of their creative input, strategy, and brand expertise.

AI has created both opportunity and competition

AI has opened doors for more designers to work globally, but it has also lowered the barrier for non-designers to enter the market using AI tools. This can lead to oversupply, lower average prices on freelance platforms, and increased competition—especially for entry-level designers.

High-level creative thinkers still earn more

Designers who combine technical skill with strategy, branding, and communication continue to earn well—especially in roles where human creativity and collaboration matter most. Senior designers, creative directors, and brand consultants are less affected by automation and often earn above-average income.

A collage of three images: one shows a person with a robot and the question of whether AI will replace graphic designers. Another is a graph showing the paradox of AI design efficiency. The third image explicitly compares graphic designer income before and after the age of AI.
While some question if AI will replace graphic designers, data shows it can increase monthly income. By using AI, a designer can decrease project time from 48 to 12 hours and increase projects per month from 6 to 15. This shift, despite a lower price per project, can result in a higher monthly income.
What AI Can DoWhat AI Cannot Do
Generate quick design draftsUnderstand emotional context
Automate repetitive tasks (e.g., resizing, alignment)Interpret brand identity in depth
Create images, graphics, and layouts based on promptsMake subjective creative decisions
Offer design suggestions and templatesConnect visual elements to human experiences
Speed up design workflows significantlyReplace human intuition and cultural awareness
Produce massive variations instantlyDevelop long-term brand strategy
Assist with typography and layout selectionCommunicate with clients and receive feedback with empathy
Perform image editing with tools like Generative FillCreate original ideas without influence from training data

Opportunities AI Brings to the Creative Industry

AI doesn’t only take away—it also creates space for innovation, experimentation, and democratization of design tools.

More people can participate in the design process

Non-designers can use AI tools to express ideas and experiment with branding, creating a more inclusive creative environment.

Faster prototyping and A/B testing

Designers can now test multiple visual styles or layouts instantly, helping marketers choose the most effective option through real-time feedback and analytics.

Innovation in mixed-media and motion design

With AI evolving into video, 3D rendering, and animation, designers are no longer limited to static imagery and can expand into immersive digital experiences.

A collage shows a list of opportunities AI brings to the creative industry, a graph of design efficiency, and a chart comparing graphic designer income before and after AI.
AI brings numerous opportunities to the creative industry, including faster workflows, personalized content, and new roles. While some debate its full impact, AI can increase a graphic designer’s monthly income by improving efficiency, despite a potential paradox in the perceived value of individual projects.

Challenges Facing Designers in an AI-Driven Future

The transition into a partially automated creative industry comes with hurdles that both professionals and educators must address.

Ethical concerns around originality and ownership

AI often learns from existing work, raising questions about plagiarism and copyright. Who owns an AI-generated design? The user, the software, or the original artist?

The threat of oversaturation and design fatigue

As AI makes it easy to churn out visual content, the internet may become flooded with generic or repetitive designs, making it harder for brands to stand out.

Skill gaps and educational reform

Design education will need to shift focus from technical skills to conceptual thinking, storytelling, and adaptability to stay relevant in a tech-driven future.

Tips for Designers to Stay Ahead in an AI World

Staying relevant doesn’t mean becoming a coder—it means developing the right mindset and toolset to evolve with the industry.

Master AI tools as part of your skillset

Treat AI like you would Photoshop or Illustrator. Know what it can do, what it can’t, and how to use it efficiently in your workflow.

Focus on creative thinking and communication

Skills like problem-solving, concept development, and storytelling will remain invaluable—because AI still struggles with original thought.

Build a personal brand rooted in human creativity

Clients don’t just hire technical skills—they hire a designer’s voice, experience, and understanding. Your unique perspective is your competitive edge.

Common Misconceptions About AI and Design

Hype often clouds reality when it comes to AI’s capabilities. Let’s break down some myths.

“AI will take all design jobs”

While some tasks are being automated, most roles are evolving, not disappearing. Designers are becoming creative directors of AI workflows.

“AI-generated art is always original”

AI models are trained on millions of images, raising ethical and legal questions. Without human oversight, originality is not guaranteed.

“Using AI means you’re not a real designer”

Using technology to enhance creativity is a hallmark of every design era—from printing presses to Photoshop to AI. It’s how you use the tool that counts.

Conclusion

So, will AI replace graphic designers by 2030? The answer is not a simple yes or no. While AI is changing how we approach design—automating some tasks and streamlining others—it is not replacing the core value that human designers bring: creativity, empathy, cultural awareness, and storytelling. Instead of fearing the rise of AI, designers should embrace it as a partner in the creative process. By 2030, the most successful graphic designers will be those who understand how to wield both creativity and technology with confidence, flexibility, and vision.

Ai Driven Currency Found here: Signup now: Binance, Kucoin, Paxful.

Also, check the recent article about the best laptop for graphic design here.


Will AI replace graphic designers completely by 2030?

No. While AI is expected to automate certain tasks like resizing, generating layouts, or creating design drafts, it lacks human creativity, cultural understanding, and emotional intelligence. Designers will still be essential for strategic thinking, branding, and creative direction.

Will AI replace entry-level and mid-level designers by 2030?

AI is more likely to impact entry-level and mid-level positions than senior roles. Tasks such as basic layout creation, image editing, or template-based design can now be done quickly using AI tools. As a result, companies may hire fewer junior designers for production work. However, mid-level designers who develop strong creative thinking, communication, and AI tool integration skills will remain highly valuable. Rather than being replaced, their roles may shift toward more strategic and collaborative responsibilities.

Can AI improve the productivity of graphic designers?

Yes. AI tools help designers complete projects faster. What once took hours can now be done in minutes using AI for mockups, image editing, or ideation. This boosts productivity but may also lower the perceived value of the work.

Will AI replace graphic designers completely by 2030?

No. AI is unlikely to fully replace graphic designers by 2030. While it can automate repetitive or technical tasks, it cannot replace human creativity, cultural understanding, or emotional intelligence. Designers will still play a critical role in brand storytelling, concept development, and client communication.

Will designers earn less because of AI?

Some designers may face lower payments as clients assume fast work should cost less. However, those who shift to value-based pricing and emphasize their creative thinking can continue to earn well.

Should graphic designers learn AI tools?

Absolutely. Designers who understand AI tools like Firefly, Midjourney, or ChatGPT can work more efficiently and stay competitive. Learning prompt crafting and tool integration is a valuable skill in the modern design world.

Is AI a threat or an opportunity for designers?

It’s both. AI will change how work is done, but designers who adapt and use it creatively will thrive—not be replaced.

A collage of two images highlighting a black desk mat. One image shows a full desk setup with a title text Best Desk Mat for Graphic Designer. The other image focuses on the TECKNET brand mat, showcasing its durable, stitched edges and smooth surface texture, illustrating why it is the ideal choice for designers.

Best Desk Mat for Graphic Designers

A collage of two images highlighting a black desk mat. One image shows a full desk setup with a title text Best Desk Mat for Graphic Designer. The other image focuses on the TECKNET brand mat, showcasing its durable, stitched edges and smooth surface texture, illustrating why it is the ideal choice for designers.
Enhance your creative workspace with a best desk mat for graphic designer. A quality desk mat, such as the TECKNET brand shown, provides a durable surface with stitched edges for a clean look, protects your desk from scratches, and offers a smooth, consistent surface for your mouse, making it an essential accessory for any creative professional.

Table of Contents

Explore the best desk mat for graphic designers with a detailed review of the TECKNET Large Gaming Mouse Pad. Learn how this extended mat enhances comfort, precision, and workflow in your creative space.

Introduction

Best Desk Mat for Graphic Designers- Finding the perfect desk mat for a graphic designer is more than just picking something that looks good on your workstation. Your workspace directly impacts your productivity, comfort, and creative flow. Whether you’re sketching, editing, or managing layers in Photoshop, you need a surface that supports precision and ease. That’s where the TECKNET Large Gaming Mouse Pad comes in—designed to meet the needs of gamers and creative professionals alike.

This extended mouse pad is not only sleek but also functional. It provides enough room for a keyboard, mouse, and drawing tablet, giving your hands the space they need to move freely. With a smooth micro-weave cloth surface, water resistance, and a non-slip base, it’s built to support long hours of creative work.

Why Every Graphic Designer Needs a Quality Desk Mat

Protecting Your Workspace

A premium desk mat does more than just look good—it acts as a protective layer against scratches, spills, and heat damage.

Enhancing Mouse Performance

Precision is essential in graphic design. A high-quality desk mat like the TECKNET model ensures smooth tracking and minimal resistance, which is vital when working with detailed designs.

Improving Ergonomics

Desk mats cushion your wrists and arms, reducing strain during long creative sessions.

Organizing the Workspace

An extended mat creates defined space for your keyboard, mouse, and accessories, helping maintain a clutter-free environment.

A collage of two images highlighting a black desk mat. One image shows a full desk setup with a title text Best Desk Mat for Graphic Designer. The other image focuses on the TECKNET brand mat, showcasing its durable, stitched edges and smooth surface texture, illustrating why it is the ideal choice for designers.
Enhance your creative workspace with a best desk mat for graphic designer. A quality mat like the TECKNET brand shown provides a durable surface with stitched edges for a clean look, protects your desk from scratches, and offers a smooth, consistent surface for your mouse, making it an essential accessory for any creative professional. The mat has a dimension of 900mm by 400mm, providing ample space for a keyboard and mouse.

Comparison with Other Desk Mats

Many desk mats on the market offer size or texture but fail in balance. Here’s how TECKNET compares:

FeatureTECKNET Large Gaming Mouse PadGeneric Mouse PadsLeather Desk Mats
Surface MaterialMicro-Weave ClothBasic clothPU Leather
Size35.4 x 15.8 in10 x 8 in31 x 14 in
Water ResistanceYesLimitedModerate
Non-Slip BaseYesOften missingYes
Edge StitchingReinforcedNoneSometimes
Designed for CreativesYesNoPartial
Price RangeAffordableCheapMid to High

TECKNET Large Gaming Mouse Pad: A Closer Look

Generous Surface Area

Measuring 35.4 x 15.8 inches, it offers ample space for a full-size keyboard, mouse, and even a sketchpad or tablet.

Superior Micro-Weave Cloth

The smooth cloth surface provides effortless mouse gliding and reduces hand fatigue during precision work.

Non-Slip Rubber Base

The anti-slip base ensures the mat stays in place no matter how intensely you work or game.

Water-Resistant Coating

Spills happen. Fortunately, this mat resists water and stains, making it easy to wipe clean without damaging your desk.

Durable Stitched Edges

Reinforced edges prevent fraying over time, maintaining the mat’s sleek look and long-lasting performance.

A large TECKNET desk mat is shown with its dimensions of 900mm by 400mm. It features a water-resistant surface and durable stitched edges, making it ideal for a graphic designer's workspace.
This large desk mat with durable stitched edges and a water-resistant surface is an essential accessory for any graphic designer. Its ample size of 900mm by 400mm provides a smooth workspace for a keyboard and mouse.

How the TECKNET Mouse Pad Benefits Graphic Designers

Seamless Workflow

With all essential tools placed on a single mat, designers can move quickly between devices.

Aesthetic Compatibility

The minimalist black design fits with modern desk setups, especially in studios or remote workspaces.

Portability and Flexibility

It’s lightweight and easy to roll, making it a great option for traveling designers.

Technical Specifications Table

FeatureSpecification
Dimensions35.4 x 15.8 inches
Surface MaterialMicro-weave cloth
Base MaterialNon-slip rubber
Edge StitchingReinforced, anti-fray
Water ResistanceYes
ColorBlack
CompatibilityPC, Mac, tablets

Tips for Maintaining Your Desk Mat

Clean Regularly

Use a damp cloth with mild soap to clean the surface monthly.

Avoid Direct Sunlight

Keep your mat away from direct UV exposure to prevent fading.

Flat Storage

When not in use, store it flat or gently rolled to avoid permanent creases.

A split image showing a black TECKNET brand Mouse and keyboard Pad. The left side highlights its durable stitched edges and textured surface, while the right shows the large pad laid out on a desk with a keyboard and mouse.
Upgrade your workspace with this spacious and durable Mouse and keyboard Pad. The TECKNET brand pad features a smooth surface for precise mouse control and stitched edges to prevent fraying, making it a long-lasting and essential accessory for any desk setup.

Common Mistakes to Avoid When Choosing a Desk Mat

Ignoring Surface Texture

Not all mats are created equal. Designers need a smooth, consistent surface for uninterrupted workflow.

Choosing Inadequate Size

A mat that’s too small can lead to a cramped, inefficient workspace.

Overlooking Edge Stitching

Lack of reinforced edges can lead to fraying, reducing lifespan.

Conclusion

The TECKNET Large Gaming Mouse Pad delivers on every front a graphic designer needs—precision, protection, and comfort. Its generous size allows for a clutter-free setup, while the high-quality cloth and stitched edges ensure lasting use. With its water-resistant surface and non-slip base, it’s a great fit for both beginners and professionals.

If you’re looking to enhance your creative workflow and take care of your wrists and equipment, this desk mat is a solid investment. Whether you’re illustrating, editing, or designing layouts, the TECKNET pad supports your creativity every step of the way.

Also, check the recent article about the best laptop for graphic design here.


What makes a desk mat ideal for graphic designers?

A good desk mat for graphic designers should offer a smooth surface for precise mouse movement, be large enough to fit a keyboard and tablet, and include a non-slip base. It also helps if the mat is water-resistant and easy to clean.

Is the TECKNET mouse pad only for gaming?

No. While it’s designed with gamers in mind, the TECKNET Large Gaming Mouse Pad is perfect for designers too. Its smooth surface ensures accurate cursor movement, which is vital for design work.

Does the mat support all types of mice?

Yes. The micro-weave cloth surface supports both optical and laser mice, ensuring excellent tracking and responsiveness across various design applications.

Can I use this desk mat with my drawing tablet?

Absolutely. Many graphic designers use it alongside tablets. It provides a stable base that enhances drawing precision and reduces wrist fatigue.

Is this desk mat durable?

Yes. The stitched edges prevent fraying, and the thick material ensures long-lasting use, even with heavy daily tasks.

A collage of two images related to adjustable armrests. The first shows a close-up of a chair armrest, highlighting it as the best adjustable armrest for a graphic designer. The second image shows a clamp-on armrest that rotates 180°, demonstrating a specialized accessory for ergonomic support.

Best Adjustable Armrest for Graphic Designer

A collage of two images related to adjustable armrests. The first shows a close-up of a chair armrest, highlighting it as the best adjustable armrest for a graphic designer. The second image shows a clamp-on armrest that rotates 180°, demonstrating a specialized accessory for ergonomic support.
Create a more ergonomic and comfortable workspace with the Best Adjustable Armrests for Graphic Designer. Whether built into an office chair or a specialized clamp-on version that offers a full 180° rotation for flexible support, a good armrest is essential for reducing strain during long creative sessions.

Discover the best adjustable armrest for graphic designers that enhance comfort, prevent strain, and improve posture. Find ergonomic solutions tailored for long creative sessions.

Why Adjustable Armrests Matter for Graphic Designers

Graphic designers spend hours at their desks perfecting every pixel, line, and layout. Long sitting sessions and repetitive hand movements can cause discomfort if the workstation isn’t ergonomically optimized. Adjustable armrest are often overlooked, yet they play a crucial role in supporting the arms, reducing shoulder tension, and improving posture during prolonged work.

In this article, we’ll explore why adjustable armrest is essential, what features to look for, and which models stand out as the best choices for design professionals.

Key Benefits of Adjustable Armrest for Designers

Reduce Shoulder and Neck Strain
Designers who spend long periods using a mouse and keyboard often experience tightness in their shoulders and neck. Adjustable armrests support the arms in a relaxed position, helping to prevent muscle fatigue and tension.

Encourage Proper Posture
Without armrests, users may tend to slump forward or lift their shoulders, leading to poor posture. An adjustable armrest promote better alignment of the spine and arms.

Support Long Hours of Work
Comfort leads to productivity. When your arms are supported at the correct height and angle, it reduces pressure on the joints and muscles, making it easier to focus on design tasks for longer periods.

Reduce Risk of Repetitive Strain Injuries (RSIs)
Ergonomically adjusted armrests can lower the chances of carpal tunnel syndrome, tennis elbow, or other RSIs by ensuring natural arm movement.

What to Look for in Adjustable Armrests

Height Adjustability
One of the most critical features is the ability to raise or lower the armrest so your arms are parallel to the desk surface. It should match your seated elbow height.

Width and Depth Adjustment
Some armrests move inward or outward to suit your body frame and reach. Depth adjustability allows armrests to slide forward or backward depending on arm length and desk setup.

Rotation and Swivel Options
Swivel armrests offer flexibility to match your arm’s natural position. It’s helpful for those who switch between mouse and tablet or different drawing angles.

Padding and Material Comfort
High-density foam or memory foam padding provides a soft resting surface. Breathable, durable materials like mesh or PU leather add to long-term usability.

Locking Mechanisms
Good armrests stay in place once adjusted. Look for locking mechanisms that prevent shifting during work.

Miocololy Adjustable Armrest for Graphic Designer – A Smart Ergonomic Desk Companion

If you’re a graphic designer spending long hours working at a desk, finding the right ergonomic support is critical. The Miocololy Adjustable Armrest offers an excellent solution. This ergonomic arm support is designed to reduce tension in your shoulders, arms, and wrists—making it easier to focus on your creative work. Whether you’re sketching on a tablet, editing images, or typing long emails, this armrest keeps your arm in a natural position to avoid strain.

This armrest attaches easily to the edge of most desks and supports up to 24 pounds. With its 180° horizontal rotation and 90° vertical folding, you can adjust it to the exact position you need. It folds neatly away when not in use and doesn’t take up unnecessary space.

The padded surface is soft yet firm, providing reliable comfort for extended use. It’s built with durable ABS plastic and memory foam padding to ensure longevity and daily comfort. It’s suitable for both right- and left-handed users, making it versatile in any setup.

If you use a mouse, drawing tablet, or keyboard for long hours, the Miocololy Armrest can help prevent wrist fatigue and maintain healthy posture—essential for a graphic designer’s workflow.

A close-up of a clamp-on ergonomic armrest pad attached to a desk. The image highlights its key feature with an arrow showing its 180° swivel motion, making it a highly functional accessory among Adjustable Armrests.
Enhance your workspace ergonomics with these innovative Adjustable Armrest. Designed to clamp directly onto your desk, this accessory provides comfortable support for your arm and wrist, featuring a 180° swivel to accommodate various working positions and reduce strain.

Technical Details:

FeatureSpecification
BrandMiocololy
Product TypeDesk-mounted ergonomic armrest
MaterialABS plastic + high-density memory foam
Surface PaddingAnti-slip, breathable memory foam
Rotation180° horizontal swivel
Folding90° upward folding arm for space-saving
Installation MethodClamp-on, adjustable desk thickness compatibility
Desk CompatibilitySuitable for desks from 0.5 to 2 inches thick
Weight CapacityUp to 24 lbs (approx. 11 kg)
DimensionsArmrest length: 11.5 inches / Width: 5.5 inches
UsabilitySuitable for right- or left-handed users
Use CaseOffice, home desk, remote work, graphic design setups
Recommended ForDesigners, gamers, typists, office professionals

Why Designers Will Love It

This armrest is ideal for repetitive hand movement work like digital sketching, photo retouching, and layout design. It helps prevent shoulder shrugging, wrist compression, and upper arm fatigue. Instead of letting your arm dangle or press against a hard desk edge, the Miocololy provides a stable, cushioned support point.

You’ll also appreciate the quick-fold feature. When you’re done or need more room on your desk, just flip it up. The rotating function adds flexibility, especially if you switch between mouse and drawing tablet frequently.

How to Set Up Your Armrests Properly

Align With Your Elbows
When seated, your elbows should form a 90-degree angle with your forearms resting gently on the armrests. This helps minimize strain on the shoulders and wrists.

Adjust Based on Desk Height
If your armrests are too high or low relative to your desk, they can create pressure or awkward angles. Adjust them to create a smooth horizontal flow from arms to work surface.

Use as a Guide for Chair Height
Once the armrests are aligned with the desk, your chair height should ensure your feet are flat on the floor and your knees are at a 90-degree angle.

Watch for Overuse
While armrests offer support, they shouldn’t restrict movement. Avoid leaning too heavily or relying on them when moving your chair or shifting position.

A collage of images showcasing the Best Adjustable Armrests for Graphic Designer. One image has the title text, while others show a clamp-on armrest that rotates 180° and provides product information, including a punch-free installation method. This highlights the Miocololy Adjustable Armrest as a solution for ergonomic workspace needs.
Enhance your workstation with the Best Adjustable Armrests for Graphic Designer, such as the Miocololy Adjustable Armrest. This ergonomic accessory features a 180° rotation for flexible positioning and a punch-free installation method, providing comfort and support for long creative sessions. Its dimensions are 31cm x 14.5cm x 7.5cm, with a tabletop thickness compatibility of up to 7cm.

Common Mistakes to Avoid

Ignoring Width Adjustment
Many people forget that armrest width plays a big role in comfort. Too wide and your elbows are flared; too narrow and your shoulders get cramped.

Leaving Them Too Low
Low armrests may cause you to slump forward or shrug your shoulders. Keep them aligned with your elbow height to prevent unnecessary tension.

Using Hard, Non-Padded Surfaces
Poor padding leads to pressure points on the forearms. Choose models with adequate cushioning for extended use.

Not Testing with Your Full Setup
Before finalizing your setup, test armrests with your full desk arrangement—keyboard, mouse, drawing pad—to ensure everything flows naturally.

Using Adjustable Armrests in Multi-Device Workflows

Graphic designers frequently switch between mouse, stylus, drawing tablet, and keyboard. Adjustable armrests that pivot and move easily help support the transition.

For Stylus and Tablet Work
When working on a Wacom tablet or iPad, you may benefit from lowering or angling the armrest to allow better wrist mobility without support loss.

For Keyboard and Mouse Use
Higher armrest positioning works well when using a keyboard or mouse. It helps minimize wrist extension and supports the arms at desk level.

For Standing Desk Setups
Some designers alternate between sitting and standing. In these cases, look for detachable or re-positionable armrests that adapt across desk configurations.

Why Designers Should Prioritize Ergonomics

Design isn’t just mental—it’s physical. Your creativity flows best when your body isn’t distracted by discomfort. Ergonomic equipment like adjustable armrests ensures your energy is spent on design, not on adjusting your body to the workspace.

Long-Term Health Gains
Designers who prioritize ergonomics experience fewer long-term health problems, including back pain, arm fatigue, and joint stiffness.

Improved Productivity
When you’re physically comfortable, you can work longer and more efficiently. Armrests contribute directly to your workflow by reducing small inefficiencies and pain-related interruptions.

Better Creative Focus
The less you have to worry about discomfort, the more brainpower you can devote to ideas, layout composition, and visual storytelling.

Affordable Alternatives to Full Chair Upgrades

Not every designer can afford a $1000 ergonomic chair. Fortunately, there are affordable and flexible alternatives.

Desk-Mounted Arm Supports
These attach to the edge of your desk and act as external armrests. Great for laptop users or standing desk setups.

DIY Armrest Cushions
Using memory foam pads or gel wrist supports, you can create a custom solution that aligns with your desk and posture.

Armrest Covers and Extenders
For chairs with basic or hard armrests, adding soft covers or extenders can make a significant comfort difference without breaking the bank.

Maintaining Your Armrests for Long-Term Use

Clean Regularly
Wipe down your armrests with a damp cloth to remove skin oils and dust buildup. This keeps the surface fresh and extends material life.

Tighten Screws and Joints
Over time, adjustable joints can loosen. Regularly check screws and locks to maintain stability and noise-free operation.

Replace Worn Padding
If the foam wears out or the surface peels, look into replacing the covers or upgrading to better cushions. A small investment goes a long way in comfort.

Conclusion: Invest in Comfort to Unlock Creativity

As a graphic designer, you pour your vision and detail into every project. But to consistently perform at your best, you must take care of your body—especially your arms and shoulders.

Adjustable armrests offer a relatively small yet highly impactful way to improve your ergonomic setup. Whether through a full-featured chair or a desk-mounted option, the right armrest keeps your arms aligned, your posture stable, and your creativity uninterrupted.

Choose the model that fits your workflow, test it with your full desk setup, and adjust it until it feels natural. Over time, you’ll notice less strain, more focus, and a much better design experience overall.

Also, check the recent article about the best laptop for graphic design here.


Are adjustable armrests really necessary for graphic designers?

Yes, they help support your arms during long hours of work. This reduces shoulder, neck, and wrist strain while promoting better posture and comfort.

What features should I look for in adjustable armrests?

Look for height, width, and depth adjustability. Soft padding, swivel options, and locking mechanisms are also important for proper ergonomic support.

Can I add adjustable armrests to my existing chair?

Yes, some models clamp onto desks or come as add-ons that fit most standard chairs. They’re great if your chair doesn’t come with built-in adjustable armrests.

Do adjustable armrests work with standing desks?

Some do. Choose armrests that are easy to remove or reposition. There are also models that attach directly to desks and adjust as needed.

How high should my armrests be?

Your elbows should rest at a 90-degree angle with your forearms parallel to the desk. This helps keep your shoulders relaxed and prevents tension.

Can armrests help prevent wrist pain?

Yes, especially when combined with good posture and proper keyboard height. They keep your arms supported and reduce pressure on the wrists.

A modern creative workstation with dual monitors, an ergonomic chair, and various desk organizers. The text BEST GRAPHIC DESIGN AGENCY SETUP ACCESSORIES TO UPGRADE A CREATIVE WORKSTATION is overlaid, highlighting it as a guide for Graphic Design Agency Setup Accessories.

Best Graphic Design Agency Setup Accessories to Upgrade a Creative Workstation

A modern creative workstation with dual monitors, an ergonomic chair, and various desk organizers. The text BEST GRAPHIC DESIGN AGENCY SETUP ACCESSORIES TO UPGRADE A CREATIVE WORKSTATION is overlaid, highlighting it as a guide for Graphic Design Agency Setup Accessories.
Elevate your teams workspace with the best Graphic Design Agency Setup Accessories. This image showcases a productive workstation equipped with essential accessories like dual monitors and ergonomic furniture, perfect for upgrading a creative environment and boosting efficiency.

Introduction

Setting up a high-performance graphic design agency setup accessories goes beyond a sleek desk and a fast computer. For creative professionals, the environment influences how ideas flow, how efficiently work gets done, and how inspiration is translated into visual masterpieces. The right accessories—tailored to the demands of a modern design agency—can turn any average setup into a creative powerhouse.

As client expectations rise and project timelines shrink, investing in smart accessories has become a necessity. Whether you’re working remotely, managing a design team, or upgrading your in-house agency studio, every element you add to your setup should serve a purpose—enhancing comfort, organization, performance, or creative expression.

Let’s explore the best graphic design agency setup accessories and how each plays a role in upgrading your creative space.

Ergonomic Accessories for Comfort

Designing for long hours demands not just creativity but comfort. Graphic designers often spend extensive periods in front of screens—sitting, sketching, editing, and collaborating. While a powerful computer and professional software are necessary, an ergonomic setup is what sustains creative flow without compromising physical health. Ergonomic accessories bridge the gap between comfort and productivity, reducing fatigue, preventing injuries, and keeping designers in top form.

In this section, we’ll explore the essential ergonomic accessories every creative workstation should include, focusing on how they directly benefit a graphic designer’s workflow and wellbeing.

Adjustable Standing Desk

One of the most impactful ergonomic upgrades is an adjustable standing desk. Designers frequently find themselves glued to their chairs for hours, lost in the creative zone. While this focus is commendable, sitting for too long can lead to severe health issues—poor posture, weight gain, back pain, and even cardiovascular concerns. Enter the height-adjustable desk, a game-changer for any creative space.

Standing desks allow users to alternate between sitting and standing positions throughout the day, encouraging movement and improving blood circulation. For graphic designers, this means less muscle fatigue and better concentration. A programmable memory setting enables effortless transitions, letting you return to your preferred height with the push of a button.

Look for models with stable electric motors, spacious desktops, and quiet adjustments—key for distraction-free environments. Bonus features like built-in USB ports or storage drawers can offer added convenience. Whether you’re sketching concepts or aligning vectors, standing desks let you work the way your body prefers.

A corner office with a modern L-shaped Height Adjustable Desk in a home setting. The desk is equipped with a monitor, laptop, and a white ergonomic chair, showcasing a professional and comfortable workspace.
Maximize your workspace and improve your posture with an L-shaped Height Adjustable Desk. This setup provides ample space for multiple monitors and devices while offering the ergonomic benefits of both sitting and standing.

Ergonomic Chair

The throne of any graphic designer’s workstation is the chair. An ergonomic office chair isn’t just about luxury—it’s a necessity. With so much time spent sitting, a poorly designed chair can result in chronic back pain, neck stiffness, and circulation problems. The right ergonomic chair adapts to your body, promotes proper posture, and enhances long-term comfort.

Choose a chair that offers adjustable seat height, armrests, lumbar support, and a recline feature. Breathable mesh backs help regulate temperature during long work sessions, while memory foam or cushioned seats provide softness without sacrificing support.

For agency workstations or shared environments, opt for chairs with a wide range of adjustments to accommodate different users. For solo setups, investing in a high-end ergonomic chair tailored to your body type will pay off in increased productivity and fewer breaks caused by discomfort.

Ergonomic chair

Footrest Cushion

Often overlooked, the footrest cushion is a small but powerful ergonomic tool. It elevates the feet slightly, promoting better posture and reducing strain on the lower back and legs. Especially when seated for long durations, a footrest prevents dangling feet, improves circulation, and encourages a comfortable seated position.

Graphic designers who use high or fixed-height desks will particularly benefit from footrests. They create a grounded posture, preventing slouching and allowing for more balanced weight distribution across the body. Footrest cushions come in angled or flat designs and should ideally offer firm yet comfortable support.

Some footrests also feature textured surfaces or massage rollers for added stimulation, keeping your feet engaged and reducing fatigue over time. Paired with a quality chair and desk, a footrest completes the ergonomic triangle—desk, chair, and feet.

 A collage highlighting a footrest cushion's features, including its reversible design for different comfort levels and its use under a desk. The text THE RIGHT CHOICE To Comfort Your Entire Foot is prominently displayed, showing it as a key item among Footrest Cushion for Graphic Design Agency Setup Accessories.
Enhance the ergonomics of your workstation with a Footrest Cushion for Graphic Design Agency Setup Accessories. This cushion provides comfort and support for your feet, making long hours of sitting more comfortable and reducing strain.

Lumbar Support Pillow

While some chairs come with built-in lumbar support, not all of them are adequate. For graphic designers who work long hours on design-intensive software, a supplemental lumbar pillow can offer targeted relief. These cushions are designed to maintain the natural curve of your spine, reducing pressure on the lower back.

Choose a memory foam lumbar pillow that attaches securely to your chair and conforms to your shape. The right pillow will encourage an upright posture without feeling intrusive. It’s a particularly good investment for designers who already experience mild lower back pain or stiffness.

By preventing slouching and maintaining spinal alignment, lumbar pillows ensure that your focus remains on the design—not the discomfort.

A collage showing a black lumbar support pillow. It highlights its use for both lower-mid and upper-mid back support and its versatility in various settings, from office chairs to car and train seats, making it a valuable Lumbar Support Pillow for Graphic Design Agency Setup Accessories.
Provide ergonomic support for your team with this Lumbar Support Pillow for Graphic Design Agency Setup Accessories. Its versatile design offers crucial back support for long hours spent at a desk, in the car, or on the go.

Adjustable Armrests

Arm positioning might not seem critical, but it plays a major role in preventing shoulder tension and wrist strain. Ergonomic chairs with adjustable armrests allow designers to rest their arms comfortably while typing or using a mouse or tablet.

The ideal armrest position aligns your elbows at a 90-degree angle, close to your body. This reduces the load on your shoulders and neck, which is especially important during long hours of intricate design work. Look for chairs with height, width, and pivot adjustments to ensure maximum flexibility.

In cases where the chair doesn’t support armrest adjustments, consider attachable or external armrests that offer similar benefits.

A close-up of a clamp-on ergonomic armrest pad attached to a desk. The image highlights its key feature with an arrow showing its 180° swivel motion, making it a highly functional accessory among Adjustable Armrests.
Enhance your workspace ergonomics with these innovative Adjustable Armrests. Designed to clamp directly onto your desk, this accessory provides comfortable support for your arm and wrist, featuring a 180° swivel to accommodate various working positions and reduce strain.

Wrist Rests and Desk Mat

Designing involves frequent keyboard shortcuts, typing, and mouse movements. Over time, this repetitive strain can lead to carpal tunnel syndrome or tendon inflammation. Wrist rests and cushioned keyboard pads alleviate this pressure, ensuring neutral wrist alignment.

These accessories are especially beneficial when using mechanical keyboards or extended design tablets. They reduce contact stress and keep your wrists elevated at a comfortable height. Silicone or memory foam options provide softness while maintaining stability.

Combined with a well-positioned desk and chair, wrist supports are one of the easiest ways to prevent long-term injury in a fast-paced agency setup.

 A split image showing a black TECKNET brand Mouse and keyboard Pad. The left side highlights its durable stitched edges and textured surface, while the right shows the large pad laid out on a desk with a keyboard and mouse.
Upgrade your workspace with this spacious and durable Mouse and keyboard Pad. The TECKNET brand pad features a smooth surface for precise mouse control and stitched edges to prevent fraying, making it a long-lasting and essential accessory for any desk setup.

Monitor Stand or Arm

Single Monitor Arm for Graphic Design Agency Setup Accessories

A single monitor arm or stand is one of the most essential ergonomic upgrades for graphic designers working with a solo screen setup. Often, default monitor heights force users to look downward, creating neck and shoulder strain over time. A monitor arm elevates the screen to eye level, maintaining a neutral neck posture and allowing for better focus and comfort during long design sessions.

Adjustable arms with tilt, swivel, and rotation capabilities give you complete control over screen placement. You can angle your display precisely for color-sensitive work, reduce glare, and free up valuable desk space below. Gas-spring models allow smooth height changes with just a touch, perfect for designers who shift between seated and standing positions.

This compact solution is especially helpful in small workstations, letting you optimize space while minimizing physical stress. Whether sketching in Illustrator or finalizing web layouts, proper screen positioning enhances both accuracy and energy levels.

A split image showing a single monitor stand in use. The left side highlights how it creates MORE DESK SPACE for a monitor and laptop setup. The right side emphasizes its WIDE COMPATIBILITY with different monitors, showcasing it as a Single Monitor Stand for Graphic Design Agency Setup Accessories.
Maximize your workspace and improve your workflow with a Single Monitor Stand for Graphic Design Agency Setup Accessories. This stand helps you clear desk clutter and adjust your monitor for optimal ergonomic positioning.

Dual Monitor Arm for Graphic Design Agency Setup Accessories

For designers using a dual-monitor setup, a dual-arm mount becomes a game-changing addition to their ergonomic workspace. Balancing two screens at eye level reduces eye strain caused by constantly switching between different heights and viewing angles. It also allows for seamless multitasking—like keeping a reference image open on one screen while designing on the other.

Dual arms offer horizontal extension, tilt, rotation, and height adjustment, so you can fine-tune each monitor’s position for symmetry and efficiency. Designers working with video editing timelines, 3D modeling tools, or large artboards will particularly benefit from the extended screen real estate.

Additionally, mounting two monitors clears the desktop, creating more surface area for sketchbooks, drawing tablets, or mood boards. Many dual-arm systems support cable management, reducing clutter and improving the overall aesthetic. With better alignment, increased flexibility, and a cleaner setup, dual arms significantly boost comfort and workflow for any serious graphic design agency.

A dual monitor stand with articulated arms and a clamp mount. The image also shows diagrams of both a dual horizontal and a dual vertical monitor setup, highlighting its versatility as a Dual Monitor Stand for Graphic Design Agency Setup Accessories.
Enhance your creative workflow with this versatile Dual Monitor Stand for Graphic Design Agency Setup Accessories. It provides flexible positioning for your screens, allowing for both horizontal and vertical setups to maximize screen real estate and improve ergonomics.

Desk Accessories for Graphic Design Agency Setup That Streamline Organization

An organized desk isn’t just visually pleasing—it’s essential for a productive and focused creative workflow. In a graphic design agency setting, where deadlines are tight and multitasking is constant, clutter can disrupt the creative process and even cause unnecessary delays. That’s why investing in desk accessories that streamline organization is more than just a stylistic choice; it’s a functional necessity. Let’s explore three high-impact tools—desk organizers, cable management systems, and finisher wire clamps—that can help transform your design workspace into a hub of clarity, efficiency, and professional polish.

Desk Organizer for Graphic Design Agency Setup Accessories

At first glance, a desk organizer might seem like a minor accessory, but for graphic designers dealing with both digital and analog tools, it plays a central role. A well-designed organizer provides designated compartments for everyday essentials: pens, markers, styluses, notepads, SD cards, USB drives, paper clips, and even business cards. These items may seem trivial individually, but when they’re scattered across a desk, they add to visual noise and slow down your workflow.

For creative agencies, modular desk organizers are the ideal solution. They can be rearranged to suit your working style and expand or contract as your needs evolve. Some models come with stackable trays, magnetic modules, or sliding drawers that allow for complete customization. Designers can separate their digital tools—like tablet pens and flash drives—from more traditional materials like sticky notes, rulers, or drafting pencils.

What’s more, many organizers come with charging slots or phone holders, offering easy access while reducing desktop clutter. Wood, metal, and acrylic designs also blend seamlessly with different aesthetic themes—from industrial to minimal—ensuring your setup remains both functional and visually cohesive.

A good desk organizer doesn’t just hold tools; it reinforces the discipline of putting things back in their place after each use. This simple habit dramatically reduces the time spent searching for tools and makes transitions between tasks far more seamless. In a fast-paced agency environment, this seemingly minor efficiency can accumulate into meaningful time savings.

Cable Management System

Few things destroy the flow of a creative session faster than a tangled mess of cables. Whether you’re adjusting your monitor, moving your tablet, or trying to plug in a USB drive, unmanaged cables can snag, twist, or simply get in the way. That’s where a proper cable management system becomes crucial. A clean desk not only looks professional—it supports mental clarity and reduces friction between you and your creative tools.

A complete cable management setup typically involves a combination of under-desk trays, cable sleeves, zip ties, adhesive clips, and Velcro straps. These tools work together to route your monitor cords, tablet connections, charging cables, and Ethernet wires along clean, predefined paths. This setup ensures nothing dangles from your desk, crosses your working space, or becomes a trip hazard.

Designers using height-adjustable desks will find cable management even more essential. As the desk moves, loosely hanging wires can be pulled, damaged, or disconnected. Using flexible cable conduits and extension-friendly sleeves allows for fluid motion without interruption. With the increasing number of devices plugged into a designer’s station—multiple monitors, styluses, external drives, and chargers—cable organization moves from optional to essential.

From a psychological standpoint, there’s a proven connection between environment and cognitive load. A visually chaotic desk can create a sense of overwhelm or mental fatigue. Streamlined cable routing, on the other hand, restores a sense of control and clarity—two critical elements in fostering creative focus.

Many premium cable management products now incorporate eco-conscious materials and sleek finishes that integrate beautifully into professional studio aesthetics. Whether hidden underneath or subtly mounted behind your workstation, a reliable cable management system supports both function and form.

Finisher Wire Clamp

When it comes to agency-grade setups, where peripherals like graphic tablets, scanners, desk lamps, and multiple screens demand constant power and data connectivity, the finisher wire clamp becomes an unsung hero. While small and inexpensive, this device offers a major improvement in day-to-day workflow by providing pinpoint control over wire placement and cable routing.

A finisher wire clamp is typically made of plastic or metal, with adhesive or screw-in bases. It’s designed to secure cables along a fixed path—be it the edge of your desk, under the tabletop, or even up a wall. Unlike broader cable trays or sleeves that manage groups of wires, wire clamps are perfect for tidying up individual lines—such as your drawing tablet cable or USB hub connector—that tend to stray and dangle.

 A close-up of a transparent finisher wire clamp holding a black cable. The image highlights its features, including ultra-strong 3M adhesive pads and offset hooks for cable retention, making it a key accessory for Finisher Wire Clamp for Graphic Design Agency Setup Accessories.
Achieve a clean and organized workspace with this Finisher Wire Clamp for Graphic Design Agency Setup Accessories. The transparent, easy-to-use clamps feature a strong 3M adhesive to securely manage cables and keep your desk clutter-free.

The beauty of using a wire clamp lies in its precision. You can fix your monitor’s power cable directly along the rear edge of the desk or run your stylus charger neatly along a leg. This not only reduces unsightly tangles but also prevents cables from being accidentally pulled or stressed—extending the lifespan of both cords and ports.

For height-adjustable desks, clamps ensure the cables stay fixed in key zones, even during raising and lowering. This protects delicate connectors and minimizes interruptions. Some designers even use wire clamps creatively—guiding ambient lighting cables along walls or securing decorative LED strips behind monitors to boost the visual appeal of their space.

Agency setups where multiple designers share a space or shift between stations benefit greatly from a wire clamp system. By anchoring shared device cables in fixed locations, each designer can connect or disconnect tools without rerouting cords or dealing with desk clutter. This improves not just individual organization but team workflow overall.

Moreover, wire clamps are often reusable and repositionable, offering flexibility as your setup evolves. For example, when upgrading from a single monitor to dual displays, you can easily adjust clamp positions and expand cable paths without starting over from scratch.

A collage showing the versatile uses of adhesive cable clips. The images show the clips managing a cable along a bed frame, organizing TV and PC wires, and holding outdoor string lights, demonstrating their function as Adhesive Cable Clips for Wall, Finisher Wire Clamp for TV PC Laptop, and Cable Management Clips Outdoor Light Clips.
Take control of your cable clutter with these versatile adhesive clips. They are perfect for use as a Finisher Wire Clamp for TV PC Laptop and as Cable Management Clips Outdoor Light Clips. This image shows how they can be used to neatly organize wires along furniture, walls, and for decorative lighting, with a recommendation to place a clip every 8 inches/20 cm for optimal results.

Why These Accessories Matter More in Creative Agencies

In a graphic design agency environment, time is money, and chaos is the enemy of creativity. Whether it’s misplacing a flash drive or tripping over a loose cable, every minor disruption can accumulate and chip away at focus and productivity. Desk organizers, cable management systems, and wire clamps might seem like background players in the grand design of a workstation, but they’re foundational to a successful setup.

Imagine working on a tight branding deadline only to lose a critical pen tool in a pile of random gear. Or spending five extra minutes untangling a monitor cable every morning. These interruptions, though small, accumulate over weeks and months—eroding efficiency and adding unnecessary stress to what should be a creative, inspired process.

By using these organization-focused accessories intentionally, you set a standard of cleanliness, structure, and purpose across the agency. New hires, clients, and collaborators will recognize the professionalism of the space instantly. More importantly, your team will enjoy a more fluid, distraction-free workflow that allows their talent to shine.

Lighting Solutions for Focus and Creativity

Lighting isn’t just about visibility—it’s one of the most influential elements in a graphic designer’s workspace. The right lighting setup can reduce eye strain, elevate mood, inspire creativity, and even influence how colors appear on screen or paper. In a fast-paced design agency, where long hours and close attention to visual detail are standard, good lighting is a critical investment—not a luxury.

Two key lighting solutions that make a significant impact are adjustable LED desk lamps and RGB ambient lighting. Together, they balance task efficiency with atmosphere, functionality with aesthetic personalization.

Adjustable LED Desk Lamp for Graphic Design Agency Setup Accessories

An adjustable LED desk lamp is the cornerstone of productive, healthy lighting. Graphic designers often find themselves working late nights, early mornings, or through long editing sessions, and relying solely on ceiling lights or screen brightness isn’t enough. That’s where a dedicated task light comes into play.

Modern LED desk lamps offer a variety of features that go far beyond just turning on and off. One of the most important is adjustable color temperature. This feature allows users to shift between warm yellow light (ideal for evening relaxation) and cool blue-white light (perfect for sharp focus during daytime work). This flexibility lets you match the lighting to your body’s circadian rhythm, helping reduce fatigue and increase alertness at the right times.

Flicker-free illumination is another crucial advantage. Traditional fluorescent lamps or low-grade LEDs may flicker at frequencies that aren’t always visible to the naked eye but can cause eye strain and headaches after prolonged exposure. High-quality LED desk lamps provide stable, flicker-free lighting, which is essential when staring at a monitor or sketchpad for hours on end.

Adjustability and articulation are also vital. Look for models with rotatable heads, swing arms, and adjustable height. These allow you to direct light exactly where you need it—whether you’re tracing a design, reviewing printed materials, or shading in a sketch. A fixed lamp can cast shadows or glare at inconvenient angles, disrupting your workflow and diminishing focus.

Many top-tier desk lamps also include brightness controls or automatic dimming sensors. These intelligent systems detect ambient light in the room and adjust accordingly, keeping your workspace consistently lit without harsh contrasts. Some even remember your preferred settings for different times of the day.

For agency settings where aesthetics matter, LED desk lamps now come in sleek, modern designs—crafted from aluminum, matte black finishes, or wood-accented materials to blend with Scandinavian, industrial, or contemporary interiors. Investing in a model that combines form and function ensures that your workspace looks as professional as it performs.

USB charging ports, wireless charging pads, or touch controls are additional features to consider. They minimize desktop clutter by combining multiple functions into a single device.

Whether you’re working on logo concepts, editing product photos, or simply reviewing emails, a well-placed adjustable LED desk lamp helps maintain optimal concentration and visual accuracy.

A desk lamp illuminates a multi-screen workspace with a monitor and laptop, showcasing a setup ideal for Desk Lamps for Graphic Designers.
This adjustable lamp provides broad, even lighting for a dual-screen setup, perfect for graphic designers.

RGB Ambient Lighting

While task lighting handles function, RGB ambient lighting plays an equally important role in setting the mood and enhancing creativity. Designers thrive in environments that are both stimulating and calming—and nothing sets the tone better than colored light.

RGB lighting, typically installed via LED strips, smart bulbs, or monitor backlights, allows you to control color, brightness, and rhythm. You can set a calming blue wash across the wall, bathe your desk in soft purple during brainstorming sessions, or use dynamic color cycling for creative sprints.

One of the primary benefits of ambient lighting is visual balance. When working in a dark room with only a bright monitor, the contrast between the screen and surroundings can strain your eyes. RGB lighting behind the monitor or under the desk reduces this contrast, softening the environment and promoting longer, more comfortable work sessions.

Psychological impact is another reason designers embrace ambient light. Cool blues and purples can inspire calm and introspection—perfect for conceptual phases of a design project. Warmer hues like orange and amber bring energy, ideal for execution or team collaboration sessions. By setting a different color tone for each task or time of day, you create emotional cues that support productivity.

In shared agency spaces, RGB lighting can also be used to differentiate workstations or zones. A soft green backlight could designate a “quiet” area, while shifting pink tones might signal an open collaboration area. This subtle visual zoning helps teams navigate the studio more intuitively without the need for signs or interruptions.

The creative potential of RGB lighting expands even further when integrated with smart home or automation systems. Many RGB lights are compatible with voice assistants or app control, allowing designers to switch lighting modes without breaking flow. For example, you can say “Design Mode” and instantly shift the ambient color to a crisp white-blue combination while brightening your task lamp.

Some high-end ambient lighting setups can sync with audio or visuals. During presentations or creative sessions, the lights might pulse with music or shift hues according to what’s displayed on screen. This creates a fully immersive experience that not only impresses clients but also energizes the internal team.

Installation is typically easy and cost-effective. RGB light strips adhere to the back of monitors, under shelves, or along desk edges. Smart bulbs fit into existing sockets, and light bars can be placed behind monitors or bookshelves. Most of these systems are plug-and-play, meaning you can transform your creative environment without professional installation.

Combining Task and Ambient Lighting for Maximum Effect for Graphic Design Agency Setup Accessories

While both LED desk lamps and RGB ambient lighting offer value individually, their combined use transforms a standard workspace into a high-functioning creative hub. The desk lamp provides sharp, localized illumination for detailed tasks, while ambient lighting sets the emotional tone and supports long-term comfort.

The key is layering your lighting. Start with a good desk lamp to handle day-to-day productivity. Then, add RGB strips or bulbs to complement your workflow, define your zone, or provide stress relief. Together, they support your health, creativity, and professionalism.

For example:

  • During client meetings: Use neutral white task lighting and subtle blue ambient light to maintain focus and a polished look.
  • During design sprints: Switch to warm task lighting and energetic RGB hues like orange or magenta to stimulate thinking.
  • For late-night editing: Dial down the main lamp to a soft glow and use ambient blues to maintain calm and clarity.

In a collaborative agency, consider standardizing ambient setups across workstations or giving individual designers control over their own lighting profiles. This level of customization helps foster ownership of space while maintaining studio coherence.

Personalization and Creative Motivation

Inspiration Wall or Whiteboard

Above-desk inspiration walls or whiteboards are excellent for visual thinkers. Whether it’s a magnetic pegboard, mini corkboard, or frameless whiteboard, this space gives you room to pin sketches, list priorities, or post design goals.

It’s also an ever-evolving canvas—a visual mood board that can change as your projects or inspirations shift. Keeping daily tasks and creative prompts in your line of sight fuels momentum and helps prevent creative blocks.

Together, a custom desk mat and an inspiration wall create a personalized setup that encourages productivity and self-expression—crucial for anyone in a design-focused agency.

 A collection of minimalist black and white framed posters with motivational phrases like MOTIVATION, HUSTLE, and PERSISTENCE. This Motivational Wall Art for web Design Agency Setup Accessories is shown in a grid layout on a wall, offering inspiration for a creative workspace.
Inspire creativity and drive within your team with this Motivational Wall Art for web Design Agency Setup Accessories. These minimalist posters provide daily inspiration, fostering a positive and productive environment essential for success.

Audio and Communication Tools

In a modern creative agency, communication is constant and multi-dimensional. Whether you’re collaborating with a remote team, jumping into client presentations, or working on multimedia projects, the tools you use to hear—and be heard—can significantly affect your productivity and professionalism. These audio accessories are often overlooked, but they’re vital components of an upgraded creative workstation. Let’s explore the key essentials: studio monitor speakers, noise-canceling headphones, and external microphones.

Studio Monitor Speakers

While often associated with music production or video editing, studio monitor speakers are increasingly becoming part of the graphic designer’s toolkit. Why? Because clarity in audio plays a role in creative decision-making—especially in collaborative environments where feedback is shared over multimedia presentations, design videos, or digital ads that include sound.

Studio monitors offer neutral sound reproduction, meaning they don’t artificially enhance bass or treble. This ensures that audio is heard the way it was intended. When reviewing motion graphics, animations, or UX sound cues, precise audio lets you evaluate projects with a more professional ear.

A split image showing a pair of black studio monitor speakers from different angles. The right panel also shows the various connecting cables, highlighting the full setup for Studio Monitor Speakers for Graphic and web Design Agency Setup Accessories.
Enhance your creative projects with high-fidelity sound using Studio Monitor Speakers for Graphic and web Design Agency Setup Accessories. This set provides a professional audio experience, crucial for video editing, animation, and other multimedia work.

Additionally, for agencies working with cross-disciplinary teams—like marketing, video production, and design—having quality speakers makes brainstorming sessions more immersive and productive. The ability to hear every detail without distortion leads to better team communication and output.

Noise-Canceling Headphones

Every creative knows the value of deep focus. Unfortunately, that’s hard to achieve in noisy workspaces, whether you’re at home or in a shared agency office. Noise-canceling headphones are the antidote to interruption. They use active noise control to block out ambient sounds like conversations, typing, traffic, or even humming appliances.

This means designers can stay fully immersed in their creative flow—sketching, editing, or designing—without being pulled out of concentration. Many modern models also include built-in microphones, intuitive touch controls, and Bluetooth connectivity, making them equally effective for virtual meetings or listening to music during work sessions.

In collaborative environments, these headphones also signal to others that you’re “in the zone,” reducing unnecessary interruptions.

A split image showing black LKVN over-ear headphones with blue accents in two futuristic, tech-themed settings.
Experience immersive sound and focus with the LKVN Noise Cancelling Headphone, featuring a sleek, modern design that is perfect for any workspace.

External Microphone

As remote meetings, video calls, and virtual collaborations become the norm, the quality of your microphone matters more than ever. Built-in laptop mics often produce tinny, low-quality sound, which can make even the most thoughtful feedback sound unprofessional.

An external USB condenser microphone solves that problem instantly. With higher sensitivity, broader frequency response, and low self-noise, it captures your voice clearly and naturally. Whether you’re presenting a design concept to a client or recording a quick voiceover for a mockup, a good mic adds authority and polish.

Mount it on an adjustable boom arm for better placement and use a pop filter to eliminate harsh plosive sounds. This small upgrade enhances not only your meetings but also any media content you create—be it tutorials, reels, or podcasts.

Maintenance and Long-Term Care for Graphic Design Agency Setup Accessories

Designers often invest in premium accessories, monitors, and desks—but without proper upkeep, even the best setups degrade over time. Regular maintenance ensures your creative workstation remains functional, beautiful, and professional in appearance. Beyond just aesthetics, cleanliness and care contribute to better productivity, health, and the longevity of your tools. Two often overlooked but essential elements of workstation care include screen cleaning kits and beeswax for desk surfaces.

Screen Cleaning Kit

Monitors, tablets, and laptop screens are the heart of a graphic designer’s workflow. They display every pixel, gradient, and detail of your work. However, with constant use, these screens quickly accumulate dust, fingerprints, and smudges. Over time, this grime can impact color accuracy and strain your eyes.

Using a proper screen cleaning kit is the most efficient and safe way to keep your displays in optimal condition. These kits typically include a microfiber cloth and a non-abrasive, alcohol-free screen solution. Unlike paper towels or general-purpose cleaners, which can scratch or damage coatings, screen-specific products are designed to preserve your display’s integrity.

Make screen cleaning a part of your weekly routine. Gently wipe your monitor in a circular motion using the microfiber cloth slightly dampened with the solution. Pay attention to the corners and edges where dust tends to gather. A clean screen helps you see your work more clearly and accurately—essential when working with fine details or color-critical projects.

A split image showing the effectiveness of a screen cleaner. The left side shows a before-and-after comparison on a monitor and a list of compatible devices. The right side shows the cleaner being sprayed and wiped on a laptop screen, highlighting it as a crucial Screen Cleaner Spray and Wipe for Graphic and web Design Agency Setup Accessories.
Maintain pristine display quality with a Screen Cleaner Spray and Wipe for Graphic and web Design Agency Setup Accessories. This versatile product is essential for keeping monitors, laptops, and other devices free of dust and smudges, ensuring accurate color and sharp details for all your creative work.

Also, consider using a keyboard cover and a compressed air duster to keep your peripherals and workspace equally clean, preventing debris from migrating to your screen.

Beeswax for Desk Surface

Your desk is more than just a surface—it’s a foundational element of your entire creative flow. Whether you’re working on a handcrafted wooden desk or a composite material with a wood finish, the daily wear of drawing tablets, coffee mugs, and mouse movement can take its toll. Over time, you may notice dull spots, scratches, or water stains.

This is where beeswax comes in. Beeswax is a natural, chemical-free solution that not only polishes your desk but also protects it from moisture, abrasions, and age-related wear. Unlike synthetic polishes that often leave residue or require frequent reapplication, beeswax deeply nourishes the wood, restoring its natural grain and creating a soft, satiny finish.

A before-and-after comparison showing a wooden floor restored with polish. On the right, three bottles of Howard Feed-N-Wax Wood Polish & Conditioner are displayed, showcasing a valuable Beeswax Polish for Graphic and web Design Agency Setup Accessories.
Keep the wooden surfaces in your creative workspace looking their best with this Beeswax Polish for Graphic and web Design Agency Setup Accessories. It’s perfect for restoring and protecting wood desks and furniture, as shown by the impressive before-and-after results.

To apply, start by clearing your desk surface of all accessories and gently wiping it clean with a damp cloth. Once dry, use a clean, lint-free rag to apply a thin layer of beeswax in the direction of the wood grain. Let it sit for about 15–20 minutes, then buff it with another cloth to reveal a rich shine. You only need to do this once every few months to maintain a protected and beautiful workspace.

Regular care with beeswax not only preserves the visual appeal of your workstation but also improves its tactile feel—making your daily tasks more enjoyable and aligned with your agency’s aesthetic standards.

Proper maintenance doesn’t require much time but offers long-lasting results. Clean screens and polished surfaces create a workspace that inspires focus, creativity, and pride in your environment. In a design agency where impressions matter and every detail counts, taking care of your tools is just as important as how you use them.

Accessories for Enhanced Productivity

A well-equipped creative workstation is not just about comfort or aesthetics—it’s also about optimizing productivity. In a graphic design agency, where multitasking is constant and deadlines are tight, having the right accessories can significantly elevate how efficiently and effectively you work. From connectivity solutions to digital focus tools, here are three productivity-boosting accessories that can redefine your daily workflow: the USB-C hub, smart assistant devices, and focus timers or apps.

USB-C Hub

As laptops become slimmer and more minimalist, they often sacrifice port variety for sleekness. While this looks great, it can be a nightmare for a designer juggling external monitors, SD cards, USB devices, and graphics tablets. That’s where a USB-C hub becomes a critical component of any agency setup.

Modern USB-C hubs come with multiple input/output options including USB-A, HDMI, SD card slots, Ethernet, and even power delivery pass-through. With a single connection to your laptop or tablet, you can immediately plug into all the peripherals essential for your workflow. Want to run a dual-monitor setup? Done. Need to transfer photos from a DSLR? Easy. Using a drawing tablet while charging your phone and using a mouse? No problem.

An Acer USB hub with four ports is shown connected to a laptop. The image highlights its convenience by showing various USB devices, positioning it as an essential Multiple USB port for Agency Setup Accessories.
Simplify your workstation with this Acer Multiple USB port for Agency Setup Accessories. It allows you to connect a keyboard, mouse, and other peripherals simultaneously, helping you Say Goodbye to Plug and Unplug and streamline your workflow.

This accessory dramatically reduces desk clutter and plug-unplug fatigue while improving overall desk ergonomics. It’s ideal for agency designers who frequently switch between collaborative tasks, presentations, or different types of media work.

Smart Assistant Device

Voice-controlled smart assistants like Amazon Alexa, Google Assistant, or Apple’s Siri aren’t just for home automation—they’re surprisingly useful at the office too. Integrating one into your desk setup can free up mental energy and reduce the need to manually manage minor tasks throughout your day.

Set voice-controlled reminders, timers, and calendar appointments without touching a keyboard. You can even ask your smart assistant to play ambient music, adjust smart lighting, or give you quick updates on meetings, weather, or current events—all while keeping your hands on your keyboard or pen tablet.

In an agency setting where multitasking is nonstop, voice automation helps maintain your focus and mental bandwidth. Instead of breaking your creative momentum to set a timer or check your next call, just speak and keep moving.

Timer or Focus App

Creativity thrives under focus, not pressure. That’s why a Pomodoro timer or focus app is a game-changer for graphic designers. These tools help structure your day into short, focused sprints—typically 25 minutes of concentrated work followed by a 5-minute break.

This simple system encourages mental clarity, reduces fatigue, and keeps creative burnout at bay. Many apps go beyond timers, offering features like distraction blocking, project tracking, and detailed productivity reports.

Whether you’re using a physical desk timer or an app like Forest, Focus Keeper, or Toggl, adding this element to your agency desk setup creates a mindful work rhythm. It’s especially effective when working on high-focus tasks like designing brand identities, revising client feedback, or prepping for presentations.

Final Thoughts

Upgrading your graphic design workstation isn’t about collecting trendy gadgets—it’s about investing in tools that enhance your creative flow, protect your health, and improve your day-to-day performance. The workspace is more than just a place to work—it’s an extension of your identity as a designer.

Every accessory mentioned here—from ergonomic seating and lighting to wire clamps and beeswax—adds value to your agency setup. Whether you’re building from scratch or optimizing an existing layout, these items ensure that form meets function in your creative environment.

Remember, your workspace should work for you. When it’s thoughtfully equipped and well-organized, your ideas have more space to flourish.

Also, check the recent article about the best laptop for graphic design here.


What are the essential accessories for a graphic design agency desk setup?

The most essential accessories include an ergonomic chair, adjustable desk, monitor stand or arm, USB-C hub, LED desk lamp, noise-canceling headphones, cable management tools, and a high-quality external monitor. These enhance comfort, productivity, and creative performance.

Why is an adjustable desk important for designers?

An adjustable or sit-stand desk allows designers to alternate between sitting and standing, reducing strain on the back and improving circulation during long working hours. It helps boost energy and prevent physical fatigue in high-demand environments.

Are dual monitors necessary for graphic design?

While not mandatory, dual monitors significantly improve workflow efficiency. Designers can work on one screen while referencing assets, managing layers, or reviewing client notes on the second. It enhances multitasking and streamlines complex projects.

What kind of lighting is best for a creative workstation?

A flicker-free LED desk lamp with adjustable brightness and color temperature is ideal. Additionally, RGB ambient lighting can create a personalized, inspiring atmosphere and reduce eye strain caused by screen glare.

How can I manage cable clutter at my desk?

Use cable trays, adhesive clips, zip ties, or finisher wire clamps to route and secure cables neatly. Cable management not only improves aesthetics but also reduces distractions and hazards around the workspace.

Why should I use a custom desk mat?

A custom desk mat protects the desk surface, provides better mouse movement, and adds a branded or creative touch to the setup. It’s both functional and visually appealing.

Is it worth investing in studio monitor speakers?

Yes, especially for designers involved in multimedia work. Studio monitor speakers offer precise, flat sound that helps when syncing visuals with audio, reviewing video projects, or simply maintaining high-quality virtual collaboration.

What’s the benefit of beeswax for desks?

Beeswax protects wooden or composite desk surfaces by sealing pores, preventing scratches and water stains, and adding a natural, polished finish. It’s an eco-friendly way to maintain long-term durability and aesthetics.

Can these accessories benefit freelance designers or home offices?

Absolutely. Whether you’re part of an agency or working solo from home, these accessories help you create a professional, comfortable, and highly functional workspace tailored for creative tasks.

Two modern height adjustable desks are shown, one in a sitting position and one in a standing position, with computer monitors and design tools, highlighting the best Height Adjustable Desks for Graphic Designers.

Best Height Adjustable Desks for Graphic Designers

Two modern height adjustable desks are shown, one in a sitting position and one in a standing position, with computer monitors and design tools, highlighting the best Height Adjustable Desks for Graphic Designers.
Optimize your workspace for health and productivity with the best Height Adjustable Desks for Graphic Designers. These desks allow you to seamlessly switch between sitting and standing, reducing fatigue during long creative sessions.

Table of Contents

Introduction

Graphic designers spend hours at their desks—sketching, editing, illustrating, or working with multiple screens. A poor setup can lead to fatigue, back pain, and reduced creative flow. That’s why investing in the best height adjustable desks for graphic designers is not just a luxury but a necessity. These desks offer ergonomic support, flexibility, and a personalized workspace to suit different creative tasks.

What Is a Height Adjustable Desk?

Definition and Functionality

A height adjustable desk, also known as a sit-stand desk, allows users to switch between sitting and standing positions.

It uses mechanical, electric, or pneumatic mechanisms to raise or lower the tabletop.

These desks cater to different user heights and working styles, which is essential for designers who need posture flexibility.

Why They Matter for Designers

Graphic designers often switch tasks, from drawing tablets to computers, requiring flexibility in desk height.

Standing options can help with circulation and reduce fatigue during long working hours.

These desks support better spinal alignment, essential for preventing work-related injuries.

Transitioning from understanding what these desks are, let’s now consider why they are especially beneficial to graphic designers.

Benefits of Height Adjustable Desks for Graphic Designers

Health and Ergonomics

Reduce the risk of back, neck, and shoulder strain during prolonged sitting.

Promote better posture by allowing users to adjust desk height according to their comfort.

Encourage micro-movements, which are good for blood flow and long-term health.

Improved Productivity and Creativity

Alternating between sitting and standing boosts energy levels and focus.

A comfortable workspace leads to better attention to detail in design work.

Freedom to move leads to fewer distractions and a clearer mental state.

Workspace Customization

Many models come with programmable height settings for convenience.

Compatible with ergonomic accessories like monitor arms, cable trays, and footrests.

Provides enough surface area for tablets, sketchpads, laptops, and dual monitors.

Now that you know how height adjustable desks can positively influence your workflow, it’s time to look at which models truly stand out.

Top Height Adjustable Desks for Graphic Designers:

Glass Small Standing Desk with Drawer (35″ x 20″) by JYLH JOYSEEKER

What Makes the Glass Small Standing Desk Stand Out?

Designed for Creative Simplicity

This desk features a minimal yet elegant design with a tempered glass surface and compact 35″ x 20″ workspace.

Perfect for graphic designers using a single monitor setup—fits just right without excess bulk.

Built-in drawer and USB charging ports elevate convenience in small workspaces.

Sit-Stand Flexibility for Health and Workflow

The electric height adjustment offers a range of 28.7″ to 46.4″, suitable for a variety of sitting or standing positions.

Switching between postures helps improve circulation and reduce fatigue—especially during long design sessions.

Easy up/down touch buttons allow quick transitions without breaking your creative flow.

Now that we’ve touched on what makes this desk unique, let’s explore why height adjustable desks in general are crucial for a designer’s productivity and well-being.

A split image showing a white height adjustable desk with a monitor, keyboard, and mouse. The right side highlights features like a drawer, a control panel, and wheels, showcasing an ideal setup for Height Adjustable Desks for Graphic Designers.
This sleek, white Height Adjustable Desks for Graphic Designers offers a clean and organized workspace. With features like convenient drawers and easy-to-use controls, it provides the ergonomic support and functionality needed for long creative sessions.

Why Graphic Designers Need Height Adjustable Desks

Long Hours Require Ergonomics

Designers often spend 6–10 hours daily on illustration, editing, or concept development.

Prolonged sitting leads to back pain, poor circulation, and reduced energy.

Height adjustable desks help combat these issues with alternating work positions.

Desks for Graphic Designers Boost Creative Focus

Standing while working can enhance concentration and task management.

Movement refreshes the mind, which is vital for idea generation and visual clarity.

A healthy workspace often equals a more productive creative session.

This specific desk not only supports ergonomics but also adds value with its smart features designed for real-world use.

Key Features of the Glass Small Standing Desk

Sleek and Compact Form

The tempered glass surface provides a modern look while being easy to clean.

Its 35″ width is ideal for single-monitor use, leaving enough room for a drawing tablet or sketchpad.

A white finish complements most interior styles—from modern to minimal.

Storage Drawer with Built-In Organization

The drawer helps store essentials like notepads, styluses, pens, or small accessories.

Keeps the desktop clutter-free for a clean design environment.

Dividers inside allow organized storage, which helps boost efficiency.

Electric Height Adjustment System

One-touch control panel adjusts the height quietly and smoothly.

No need for manual cranking—save energy and maintain your focus.

Offers enough height range to accommodate both short and tall users.

Integrated USB Ports

Three USB ports (including one Type-C) are built into the control panel.

Allows quick charging for phones, tablets, or drawing devices.

Eliminates the need for additional power strips or cluttered cords.

Fast Installation

The desk comes 95% pre-assembled—ideal for people who prefer hassle-free setup.

Most users complete installation within 15–30 minutes.

Clear instructions make it beginner-friendly.

As you can see, this desk has features that are well suited for focused, efficient graphic design work. Let’s now break down how this desk fits into specific design tasks.

Perfect for Single Monitor Graphic Design Setups

Desks for Graphic Designers For Digital Illustrators

Allows easy placement of a digital pen display (like Wacom or Huion) next to your main monitor.

Standing mode can be helpful when working on larger strokes or gestural illustrations.

Desks for Graphic Designers For UI/UX Designers

Clean workspace layout helps you focus on wireframes, prototypes, and testing apps.

USB ports support quick device charging for phones or tablets used in app testing.

Tables for Designers Professional For Branding and Print Designers

Built-in storage is great for storing samples, sketchbooks, swatches, and branding guides.

Ample space to review printed materials without cluttering the workspace.

Even in tight spaces, this desk manages to offer flexibility, power, and storage that professional creatives need. But how do you make the most of it?

A split image showing an Ultra-White Glass Desktop and a Wide Height Adjustment range for a white Height Adjustable Desk, highlighting its sleek design and ergonomic features.
This Height Adjustable Desk features an ultra-white glass desktop and a wide height adjustment range, providing a clean and ergonomic workspace for enhanced productivity.

Optimizing Your Desk Setup for Design Success

Use Ergonomic Accessories

Add a monitor riser if your display isn’t at eye level.

Use an ergonomic mouse and keyboard to avoid wrist strain.

A footrest can help reduce fatigue while sitting.

Keep Tools Close

Store styluses, color cards, and sketchpads in the drawer for fast access.

Use a small desk organizer on the surface for daily essentials.

Cable Management

Use Velcro ties or a cable tray to keep USB cables and monitor wires out of the way.

A tidy workspace enhances focus and reduces distractions.

These simple steps can make a big difference in your daily productivity and comfort. But even with great design, common setup errors can hold you back.

Mistakes to Avoid with Small Standing Desks

Overloading the Surface

While the desk is sturdy, it’s meant for streamlined setups—not dual monitor arrays or heavy printers.

Stick to essential tools to maintain balance and avoid tipping risks.

Ignoring Cable Flow

Power cords and USB cables can easily dangle or get pinched during movement.

Always test cable movement after adjusting the desk height.

Standing Too Long

Just because it adjusts doesn’t mean you should stand all day.

Balance sitting and standing for best results.

Avoiding these mistakes ensures you get the full ergonomic and creative benefit this desk offers.

Who Should Buy This Desk?

Ideal Users

Graphic designers working from home or in compact studio environments.

Students in design programs with limited dorm or apartment space.

Freelancers or part-time creatives who need a stylish, functional setup on a budget.

Not Ideal For

Designers who rely on multiple monitors or expansive drafting surfaces.

Professionals needing heavy-duty desk setups with built-in file drawers or large peripheral support.

VIVO Electric Corner L-Shaped Standing Desk (DESK-E3CTB-47)

Why Choose a Corner Standing Desk for Graphic Design?

Maximizing Surface Area

The L-shaped design offers more usable space without occupying more floor area.

Designers can dedicate one side to drawing tablets or sketchbooks and the other to dual or triple monitors.

It encourages better organization between digital and physical tasks.

Enhanced Ergonomics and Workflow

Having screens at the correct height and angle improves posture and reduces strain.

L-desks make it easier to position peripherals within reach, reducing desk clutter.

Alternating between standing and sitting keeps blood flowing and mental clarity high.

Now that we’ve outlined the key benefits of L-shaped standing desks, let’s dive deeper into what makes the VIVO DESK-E3CTB-47 stand out in this category.

A corner office with a modern L-shaped Height Adjustable Desk in a home setting. The desk is equipped with a monitor, laptop, and a white ergonomic chair, showcasing a professional and comfortable workspace.
Maximize your workspace and improve your posture with an L-shaped Height Adjustable Desk. This setup provides ample space for multiple monitors and devices while offering the ergonomic benefits of both sitting and standing.

Features of the VIVO Electric Corner L-Shaped Desk

Expansive Work Surface (63 x 47 Inches)

Supports multiple monitors, laptops, tablets, and sketchbooks simultaneously.

Great for multitasking—ideal for designers who juggle software like Photoshop, Illustrator, and Figma.

Plenty of room for speakers, desk organizers, or mood boards.

Dual Motor Electric Lift System

Smooth and quiet height transitions—perfect for shared or quiet studio environments.

Height range from 29.2″ to 48.4″, accommodating both shorter and taller users.

Strong lifting power allows the desk to hold heavy equipment without wobbling.

Memory Height Control Panel

Four programmable height presets allow you to quickly switch between sitting and standing.

Saves time and encourages healthier work habits throughout the day.

Ideal for designers who share desks or alternate between drafting and editing tasks.

Sturdy Black Frame with Clean Aesthetic

The powder-coated steel frame ensures stability even under full load.

Sleek black finish complements creative studios, home offices, and modern workspaces.

Neutral color palette helps avoid visual clutter, keeping your creative focus sharp.

Cable Management and Frame Flexibility

Includes integrated cable routing to keep power cords and wires tidy.

Optional clamp-on accessories like monitor arms or keyboard trays fit easily.

Frame can be flipped during assembly to suit left- or right-handed users.

This desk isn’t just about the specs—it’s about improving how you work. So how does it benefit specific types of graphic designers?

Who Will Benefit Most from This Desk?

Motion Graphic and Video Editors

Dual or triple screen setups for editing timelines, preview windows, and asset libraries.

Extra surface area for tablets or mixing consoles.

Standing breaks help avoid fatigue during long editing sessions.

3D Designers and Animators

High-performance monitors and workstations fit comfortably with additional room for input devices.

Standing helps ease back strain during rendering waits or brainstorming.

The wide range of motion supports both precision and relaxed work modes.

UI/UX Designers

Allows testing of app layouts or web prototypes across multiple devices and screens.

Great for hosting collaborative feedback sessions with clients or teams.

Maintains comfort over long sprints with user-friendly adjustability.

Freelance Designers with Varied Projects

Enough room to accommodate a flexible workflow that includes branding, social media assets, and illustration.

Store tools, notebooks, and devices separately for faster switching between projects.

Looks professional on client video calls—adds to your studio branding.

This desk brings value to many types of creatives—but only if you set it up with intention.

A VIVO L-shaped Height Adjustable Desk in a modern office setup, with a comparison chart highlighting its premium features like a 0.8-inch thick tabletop and support for heavy monitor setups.
This VIVO Height Adjustable Desk is designed for durability and performance. Its premium tabletop and robust construction support heavy monitor setups and under-desk mounting, making it a superior choice for your workspace.

How to Set Up Your Corner Desk for Maximum Productivity

Layout Strategy

Place monitors in the corner with the right angles for neck comfort and eye level.

Keep sketchpads and tablets on one side for fluid analog-to-digital workflow.

Use a central keyboard/mouse position to avoid shoulder strain.

Cable Management

Mount power strips under the desk for hidden charging solutions.

Use adhesive clips or zip ties to route cables behind the monitor setup.

Keep frequently used USB ports accessible via a dock or USB hub.

Ergonomic Adjustments

Ensure monitors are at eye level—use stands or arms if needed.

Your elbows should be at 90 degrees when typing or drawing.

Invest in a floor mat for comfort if you stand for long stretches.

A thoughtful setup allows you to make the most out of this premium workspace. However, even great desks can be misused if not properly managed.

Common Mistakes to Avoid for Choosing Tables for Graphic Designers

Overloading Without Support

Don’t exceed the desk’s weight capacity (~176 lbs)—especially with multiple monitors and accessories.

Use VESA-compliant monitor arms to distribute weight more evenly.

Poor Height Settings

Incorrect monitor or keyboard heights can cause back and neck strain.

Use the programmable presets to maintain ideal ergonomic settings throughout your day.

Cable Chaos

Don’t let wires dangle or interfere with the moving mechanism.

Use the included cable routing tools to secure them.

Avoiding these common pitfalls will help you keep the desk running smoothly and safely.

Ideal Accessories to Complement This Desk

Monitor Arms

Attach one or more monitors using VESA mounts for full adjustability.

Free up desk space and improve screen alignment.

Anti-Fatigue Mat

Useful for long standing periods—eases pressure on knees and feet.

Desk Shelf or Riser

Add an upper level for speakers, plants, or decor to create an inspiring environment.

Keyboard Tray

Mount beneath the desk for a clean look and ergonomic typing position.

With the right additions, this desk becomes a powerhouse creative station that adapts to your every need.

Comparison Chart: Glass Small Desk vs. VIVO L-Shaped Desk

FeatureGlass Small Standing Desk (35″ x 20″)VIVO Electric L-Shaped Standing Desk (63″ x 47″)
Desk Size35″ x 20″ – compact, single-monitor workspace63″ x 47″ – large, L-shaped for multiple monitors
Best ForFreelancers, students, minimal setupsProfessional designers, multitaskers, heavy workloads
Surface MaterialTempered glass, white finishMDF laminate, black top
Height Range28.7″ to 46.4″ (electric adjustment)29.2″ to 48.4″ (dual-motor electric lift)
Memory PresetsNo memory presets4 programmable height memory settings
Storage FeaturesBuilt-in drawer and 3 USB portsNo drawers; open frame with cable routing
Monitor SetupBest for 1 screen or a tablet/laptop setupSupports 2–3 monitors with room for extra devices
Assembly Time~15–30 minutes; 95% preassembled~1 hour; tools included, more components to assemble
ErgonomicsGood for casual to moderate useExcellent for long hours and ergonomic configurations
Footprint & Space NeedsMinimal – fits in tight corners or small roomsRequires more room – best in dedicated office space
Style/AestheticClean, modern, minimalistFunctional, professional, studio-friendly
Price RangeBudget-friendly, affordableHigher investment for advanced users

Final Verdict

Both desks offer great value, but they are built for different types of graphic designers. The Glass Small Standing Desk is ideal for individuals with limited space and simpler needs—such as working on a laptop or drawing tablet. Its sleek glass design, built-in drawer, and USB ports make it a practical and elegant choice for minimalists and students.

On the other hand, the VIVO Electric L-Shaped Desk is a powerhouse suited for professionals who rely on a multi-monitor setup, need more surface area, and require smart ergonomic features like memory presets and dual motors. It’s perfect for intense workloads, project multitasking, and long hours in front of the screen.

If you’re a freelancer or hobbyist in a small space, the Glass Small Desk offers convenience and a clean design. But if you’re a professional creative managing large design files, editing tools, or switching between multiple software windows, the VIVO L-Shaped Desk is the better long-term investment.

Choose based on how you work—and let your desk support your creative flow.

Conclusion

Choosing the right desk can significantly impact your comfort, productivity, and creative output as a graphic designer. Whether you’re working with a minimal setup or managing a full suite of monitors and tools, your desk should serve your workflow—not hinder it.

The Glass Small Standing Desk offers an excellent solution for those in compact spaces or just starting out. It combines style, storage, and basic ergonomic flexibility—ideal for solo creators with lighter demands.

Meanwhile, the VIVO Electric L-Shaped Standing Desk is built for professionals who need serious space and advanced functionality. With programmable height settings, robust build quality, and room for multiple monitors, it supports extended creative sessions and complex workflows.

Ultimately, the best height adjustable desk for graphic designers depends on your space, budget, and daily demands. Both of these desks serve different purposes exceptionally well—so choose the one that fits your creative journey.

Also, check the recent article about the best laptop for graphic design here.


What is the best height adjustable desk for graphic designers with limited space?

The Glass Small Standing Desk (35″ x 20″) is ideal for small spaces. It offers a compact footprint, built-in drawer, USB ports, and smooth electric height adjustment—perfect for single-monitor or tablet setups.

Can I use the VIVO L-Shaped Desk for video editing or 3D design work?

Yes. The VIVO Electric Corner L-Shaped Desk (63″ x 47″) provides ample surface area for multiple monitors, tablets, and peripherals—making it a strong choice for video editors, animators, and 3D designers.

Are these desks easy to assemble?

The Glass Small Desk is 95% pre-assembled and takes about 15–30 minutes to set up. The VIVO L-Shaped Desk has more components and takes roughly an hour, but it includes tools and clear instructions.

Do both desks support ergonomic work setups?

Yes. Both desks offer height adjustability to help maintain proper posture. The VIVO desk goes further with memory presets and a wider range, making it more suitable for long, intensive work sessions.

Which desk is more suitable for a dual monitor setup?

The VIVO L-Shaped Desk is the better option for dual or triple monitor setups, thanks to its large corner design and stability under heavier equipment.

Do the desks come with built-in power features?

The Glass Small Desk includes three USB ports (including Type-C) for convenient device charging. The VIVO desk focuses on desk space and cable management but does not include built-in USB ports.

Are standing desks really better for designers?

es. Standing desks promote better posture, reduce back and neck pain, and improve energy levels—all of which can boost creativity and productivity for graphic designers who sit for long hours.

Can I use a monitor arm with these desks?

Yes. Both desks are compatible with VESA monitor arms. The larger VIVO desk offers more flexibility for mounting multiple arms and adjusting screen height precisely.

A pair of black over-ear headphones sit on a desk next to a notebook and pen. The text BEST NOISE CANCELING HEADPHONE FOR FOCUSED DESIGN SESSION is overlaid, emphasizing the use of a Noise Cancelling Headphone for creative work.

Best Noise Canceling Headphone for Focused Design Session

A pair of black over-ear headphones sit on a desk next to a notebook and pen. The text BEST NOISE CANCELING HEADPHONE FOR FOCUSED DESIGN SESSION is overlaid, emphasizing the use of a Noise Cancelling Headphone for creative work.
Achieve ultimate concentration during your creative work with the Best Noise Cancelling Headphone for Focused Design Session. This essential tool helps graphic designers block out distractions and immerse themselves in their projects, ensuring every detail is perfect.

Introduction

When you’re immersed in a creative flow, distractions can be your biggest enemy. Whether it’s a noisy office, chatty coworkers, or the hum of city life outside your window, sound disruptions can derail your concentration and productivity. That’s where noise canceling headphones come in—a must-have tool for designers looking to maintain focus and stay in their creative zone. In this guide, we will dive into the best noise canceling headphone models tailored for focused design sessions, helping you choose the right one for your needs.

Why Noise Canceling Headphones Are Essential for Designers

Blocks External Distractions

Noise canceling headphone help block out ambient noise, allowing designers to dive deep into their projects without interruption. Whether you’re working on branding, UX design, or illustration, uninterrupted focus is crucial for producing high-quality work.

Improves Cognitive Performance

Studies show that quiet environments improve cognitive functions like memory, concentration, and problem-solving—all vital skills in the design process. By filtering out background noise, these headphones help you stay mentally sharp.

Enhances Sound Clarity

For multimedia designers working with audio, video, or motion graphics, sound clarity is essential. Noise canceling technology ensures you hear every detail without interference.

Supports Better Mental Health

Constant noise can lead to stress and burnout. Noise canceling headphone create a peaceful auditory environment, helping to reduce stress and maintain mental well-being during long work hours.

Key Features to Look for in Noise Canceling Headphones

Active vs Passive Noise Cancelation

Active noise canceling headphone use microphones and speakers to reduce ambient noise, while passive ones rely on physical insulation. For designers in noisy environments, ANC is typically more effective.

Battery Life

Long-lasting battery life is a must for uninterrupted design sessions. Look for headphones that offer at least 20-30 hours of playback on a single charge.

Comfort and Fit

Designers often wear headphones for extended periods. Lightweight models with cushioned ear pads and adjustable headbands are ideal to avoid discomfort.

Sound Quality

High-fidelity sound ensures you experience audio as it’s meant to be heard. This is especially important for designers working with multimedia.

Bluetooth and Wired Options

A good pair should offer both wireless and wired modes for flexibility. Bluetooth provides freedom of movement, while a wired connection ensures zero latency during critical tasks.

Durability and Build Quality

Since you’ll be using noise canceling headphone frequently, build quality matters. Materials like stainless steel frames, reinforced cables, and sweat-resistant cushions add longevity.

Best Noise Canceling Headphone for Design Professionals

LEVN Hybrid Active Noise Cancelling Headphone

A split image showing black LKVN over-ear headphones with blue accents in two futuristic, tech-themed settings.
Experience immersive sound and focus with the LKVN Noise Cancelling Headphone, featuring a sleek, modern design that is perfect for any workspace.

Technical Details of LEVN Hybrid Active Noise Cancelling Headphone:

FeatureSpecification
BrandLEVN
Model NameHybrid Active Noise Cancelling Headphones
Bluetooth VersionBluetooth 5.4
Noise Cancelling TypeHybrid Active Noise Cancelling (Feedforward + Feedback ANC)
Transparency ModeYes
Audio CertificationHi-Res Audio Certified
Driver Size40mm Dynamic Drivers
Frequency Response20Hz – 40kHz
Impedance32Ω (Ohms)
Sensitivity105dB ± 3dB
Battery Life (ANC Off)Up to 70 Hours
Battery Life (ANC On)Up to 50 Hours
Charging PortUSB Type-C
Charging TimeApprox. 2 Hours for Full Charge
Fast Charging10-Minute Charge = Up to 4 Hours Playback
MicrophoneBuilt-in cVc Noise-Cancelling Microphone
Dual Device PairingYes (Multi-Point Connection)
Latency ModeLow-Latency Mode for Gaming & Video
ControlsOn-Ear Button Controls (Play/Pause, ANC, Volume, Calls, Mode Switching)
Voice Assistant SupportCompatible with Siri and Google Assistant
Wired Mode SupportYes (3.5mm AUX Input)
Foldable DesignYes
WeightApprox. 250 grams
Ear Cup TypeOver-Ear, Memory Foam Cushions
Adjustable HeadbandYes (Ergonomic and Expandable)
MaterialProtein Leather Cushions + Durable ABS Plastic + Metal Reinforcement
CompatibilityiOS, Android, Windows, macOS, Tablets, Laptops, TVs (Bluetooth or AUX supported)
Included AccessoriesUSB-C Cable, 3.5mm AUX Cable, Carry Pouch, User Manual, Warranty Card
Warranty12 Months Manufacturer Warranty
A pair of black LEVN headphones sit on a pedestal, surrounded by a laptop, tablet, and smartphones in a modern studio setting, showcasing the versatility of this Noise Cancelling Headphone.
The LEVN Noise Cancelling Headphone is designed to seamlessly connect with all your devices, providing high-quality audio and a distraction-free experience for your work or leisure.

Why the LEVN Hybrid ANC Headphone Stand Out

In the fast-paced world we live in today, having a reliable, immersive, and distraction-free audio experience is no longer a luxury—it’s a necessity. Whether you’re working from a bustling café, traveling on a noisy train, or trying to focus in a busy office, LEVN Hybrid Active Noise Cancelling Headphones are built to elevate your listening experience.

Backed by cutting-edge features like Bluetooth 5.4, Hybrid Active Noise Cancelling, Hi-Res audio, and a massive 70-hour battery life, these headphones offer more than just sound—they offer a lifestyle upgrade.

Hybrid Active Noise Cancelling: Total Focus, Zero Distractions

Advanced Hybrid ANC Technology

Equipped with dual microphones and precision-engineered ANC chips, the LEVN noise canceling headphone reduce up to 90% of ambient noise. Whether you’re on a flight, commuting, or in a busy office, it tunes out the chaos so you can tune into your world.

Transparency Mode for Safety and Awareness

Need to hear your surroundings without taking off your headphones? The Transparency Mode is your best friend. With one touch, the headphones allow in external sounds like announcements or conversations—ideal for airports, train stations, or work environments.

Adaptive Noise Cancelling for Multiple Scenarios

The headphones intelligently adapt noise canceling headphone depending on your environment. That means optimized performance whether you’re in low-frequency environments like planes or high-frequency ones like offices.

Why the LEVN Hybrid ANC Headphone Stand Out

In the fast-paced world we live in today, having a reliable, immersive, and distraction-free audio experience is no longer a luxury—it’s a necessity. Whether you’re working from a bustling café, traveling on a noisy train, or trying to focus in a busy office, LEVN Hybrid Active Noise Cancelling Headphone is built to elevate your listening experience.

Backed by cutting-edge features like Bluetooth 5.4, Hybrid Active Noise Cancelling, Hi-Res audio, and a massive 70-hour battery life, these headphones offer more than just sound—they offer a lifestyle upgrade.

Hybrid Active Noise Cancelling: Total Focus, Zero Distractions

Advanced Hybrid ANC Technology

Equipped with dual microphones and precision-engineered ANC chips, the LEVN headphones reduce up to 90% of ambient noise. Whether you’re on a flight, commuting, or in a busy office, it tunes out the chaos so you can tune into your world.

Transparency Mode for Safety and Awareness

Need to hear your surroundings without taking off your headphones? The Transparency Mode is your best friend. With one touch, the headphones allow in external sounds like announcements or conversations—ideal for airports, train stations, or work environments.

Adaptive Noise Cancelling for Multiple Scenarios

The headphones intelligently adapt noise cancelation depending on your environment. That means optimized performance whether you’re in low-frequency environments like planes or high-frequency ones like offices.

A split image showing the advanced AI-powered internal circuitry of an ear cup on the left, and a full view of the black LEVN.
Experience next-level audio with the LEVN Noise Cancelling Headphone for All Your Devices. This image showcases its AI-powered technology, designed to provide superior noise cancellation and pristine sound quality, making it the perfect companion for immersive listening on any of your gadgets.

Superior Wireless Performance with Bluetooth 5.4

Lightning-Fast Connection

The LEVN headphones come with the latest Bluetooth 5.4 technology, offering faster pairing, stable signal transmission, and broader compatibility across devices. Say goodbye to lag and connection drops.

Dual Device Connectivity

You can pair the headphones with two devices simultaneously. Switch between your laptop and phone seamlessly, without the need to reconnect every time.

Low Latency Mode for Gaming and Video

Enjoy real-time audio feedback during video streaming or mobile gaming with low-latency transmission, ensuring your sound stays perfectly in sync.

Hi-Res Audio Certification: Hear Every Detail

Certified Hi-Res Audio Drivers

The LEVN headphones are equipped with 40mm dynamic drivers that deliver crystal-clear sound across the frequency spectrum—from crisp highs and balanced mids to resonant bass.

Studio-Quality Sound

Whether you’re listening to classical music, hip hop, podcasts, or voiceovers, you’ll experience the studio-grade sound quality that reveals the hidden layers in your favorite tracks.

Custom Sound Profile

Tailor your listening with adjustable EQ settings via compatible apps. Whether you prefer enhanced vocals, deep bass, or flat tones for accuracy, it’s all possible.

70-Hour Playtime: Power That Lasts for Days

Unmatched Battery Performance

Enjoy up to 70 hours of continuous playback on a single charge with ANC off, and 50 hours with ANC on. It’s the perfect companion for long work sessions, cross-country flights, or weeks without charging.

Fast Charging Support

In a rush? Just 10 minutes of charging gives you 4 hours of playtime, so you’ll never be caught without your music or calls.

USB-C Port for Universal Compatibility

Comes with a USB-C fast charging cable, ensuring reliable and convenient recharging wherever you go.

Comfortable Over-Ear Design for Long Listening Sessions

Ultra-Soft Memory Foam Ear Cups

The ear cups are made of plush memory foam, wrapped in protein leather that feels gentle against your skin, even during marathon use.

Ergonomic Fit for All Head Sizes

A fully adjustable headband and rotatable ear cups ensure the headphones fit snugly and securely, without pinching or pressure.

Lightweight Yet Durable Construction

Weighing just under 250g, the LEVN headphones offer a lightweight feel without compromising build quality. Travel-ready, yet tough enough for daily use.

Designed for Work, Travel, Home, and Office Use

Built-In Mic for Clear Calls

Integrated cVc noise reduction microphone ensures your voice comes through loud and clear, even in noisy environments. Great for Zoom calls, customer meetings, or gaming.

Foldable and Portable

The foldable design and included carrying pouch make it easy to pack and protect your headphones on the go.

Smart Button Controls

Skip tracks, activate ANC, answer calls, and adjust volume using intuitive on-ear control buttons—no need to pull out your phone.

A collage highlighting the features of the LEVN headphones. The image shows the adjustable headband and the compact storage bag, emphasizing the portability and comfort of the LEVN Noise Cancelling Headphone for All Your Devices.
The LEVN Noise Cancelling Headphone for All Your Devices is designed for convenience and comfort. This image showcases its key features, including an adjustable headband for a perfect fit and a storage bag for easy and safe transport, making it an ideal choice for on-the-go listening.

What’s in the Box?

  • LEVN Hybrid Active Noise Cancelling Headphones
  • USB-C Fast Charging Cable
  • 3.5mm AUX Cable (for wired use)
  • Carrying Pouch
  • User Manual
  • Warranty Card

Tips to Get the Most Out of Your LEVN ANC Headphone

Use ANC Only When Needed

To conserve battery, turn off ANC in quiet environments and switch it on only when necessary.

Pair With Hi-Res Audio Tracks

To really appreciate the sound quality, try pairing the headphones with Hi-Res music from platforms like TIDAL, Amazon Music HD, or Apple Music.

Customize EQ Settings

If your mobile device supports it, adjust the EQ via Bluetooth settings or third-party apps to match your listening preferences.

Store Safely

Always fold the headphones and place them in the included pouch when traveling to protect them from damage.

Keep Firmware Updated

Check the LEVN website or instruction manual for firmware updates that might enhance performance or add new features.

How Noise Canceling Headphones Support Specific Design Tasks

Graphic Design and Illustration

Silence enhances focus during creative thinking, layout planning, and fine detail work. With ANC headphones, you can stay in the zone even in open-plan offices.

UI/UX Design

User testing sessions and audio-based usability cues are clearer with good sound isolation. You can also focus better during long design sprints.

Motion Graphics and Video Editing

Precise sound timing is crucial for motion work. ANC headphones help isolate important audio layers, ensuring synchronization and quality output.

Product Design and 3D Modeling

These tasks require intense focus and prolonged sessions. The comfort and sound isolation provided by ANC headphones make them indispensable tools.

Branding and Identity Creation

Noise canceling headphones eliminate the chaos around you, creating a mental space that fosters deep, strategic thinking and concept development.

Tips for Maximizing the Benefits of Noise Canceling Headphones

Pair With Focus Music

Lo-fi beats, ambient sounds, or classical music can work wonders when paired with noise canceling headphones. It keeps your mind engaged without being distracting.

Maintain Your Equipment

Regularly clean your headphones and check for firmware updates. Well-maintained gear performs better and lasts longer.

Create a Routine

Designate specific blocks of time each day for deep work using your headphones. This habit can train your brain to enter “focus mode” more quickly.

Use Companion Apps

Many high-end headphones come with apps that allow customization of sound profiles, ANC levels, and EQ settings. Tweak these to suit your workspace and preferences.

Take Breaks

Even with the most comfortable headphones, it’s important to give your ears and mind a rest. A 5-minute break every hour can boost long-term focus and reduce fatigue.

Things to Avoid When Buying Noise Canceling Headphones

Overlooking Comfort

High-end features mean little if the headphones are uncomfortable. Always prioritize fit and adjustability, especially for long sessions.

Ignoring Battery Life

A low battery in the middle of a critical design task can kill your workflow. Always check the specs before purchasing.

Choosing Style Over Substance

Sleek designs can be misleading. Focus on specs and performance, not just aesthetics.

Buying Without Testing

If possible, test headphones before buying. Everyone’s ears are different, and what works for one designer may not suit another.

Forgetting About Compatibility

Make sure the headphones are compatible with your preferred devices and design software. Incompatibility can hinder your workflow.

Conclusion

The LEVN Hybrid Active Noise Cancelling Headphone strike an impressive balance between premium features and everyday practicality. With advanced Bluetooth 5.4, effective hybrid ANC, long-lasting 70-hour battery life, and Hi-Res Audio certification, they deliver performance typically seen in higher-end models—but at a budget-conscious price.

Whether you’re a remote professional, a frequent traveler, or someone who simply enjoys immersive audio during creative sessions, these headphones adapt to your lifestyle. The comfort-driven design, clear call quality, transparency mode, and multi-device pairing make them an all-around strong choice.

In a market crowded with flashy specs and high price tags, LEVN proves that you don’t have to compromise quality for affordability. For those looking for reliable noise canceling headphone without breaking the bank, this model stands out as one of the smartest buys in its category.

Also, check the recent article about the best laptop for graphic design here.


What type of noise cancellation do these headphones use?

The LEVN Hybrid Active Noise Cancelling Headphones use both feedforward and feedback microphones to create hybrid ANC. This ensures a more precise and immersive cancellation of background noise, whether you’re working, traveling, or relaxing.

How long does the battery last?

With Active Noise Cancelling turned off, the headphones offer up to 70 hours of playtime. When ANC is on, battery life still lasts an impressive 50 hours on a full charge.

Can I use these headphones with a wired connection?

Yes, they come with a 3.5mm AUX port and an included cable, allowing you to use them even when the battery is low or when connected to non-Bluetooth devices.

Are the headphones comfortable for long-term use?

Absolutely. The over-ear design features memory foam cushions and a lightweight, ergonomic structure, making them suitable for extended listening sessions without discomfort.

Do the headphones support multi-device connectivity?

Yes, they support dual device pairing, allowing you to connect to your laptop and smartphone simultaneously and switch between them effortlessly.

Can I use voice assistants with these headphones?

Yes. The built-in microphone and controls are compatible with both Siri and Google Assistant, making voice commands quick and convenient.

Does the transparency mode work well?

Yes, the transparency mode lets in ambient sound so you can stay aware of your surroundings—perfect for walking outside or quick conversations without removing the headphones.

A gray portable external hard drive on a black background. The text BEST PORTABLE EXTERNAL HARD DRIVE FOR GRAPHIC DESIGNERS is overlaid, emphasizing its purpose as a crucial tool for professional use.

Best Portable External Hard Drive for Graphic Designers

A gray portable external hard drive on a black background. The text BEST PORTABLE EXTERNAL HARD DRIVE FOR GRAPHIC DESIGNERS is overlaid, emphasizing its purpose as a crucial tool for professional use.
Secure your valuable creative work with the Best Portable External Hard Drive for Graphic Designers. This device offers reliable, high-capacity storage for large files, ensuring your projects are always backed up and accessible on the go. A must-have for every graphic designer’s toolkit.

Table of Contents

Introduction

The Essential Role of Storage in Modern Design

Graphic design involves working with massive file types—PSD, AI, RAW, 4K video, and layered assets—which quickly consume internal drive space. Without proper storage, your workstation slows down, performance drops, and deadlines become stressful.

Why Portable Storage Beats the Cloud for Designers

Cloud storage is useful, but it depends on internet connectivity, subscription costs, and upload speeds. A portable external hard drive gives you instant, offline access to all your projects with zero delays or limitations.

Types of Portable External Hard Drives

HDD vs. SSD: Which One Should You Choose?

Hard Disk Drives (HDDs) offer higher capacities at lower prices but are bulkier and slower. Solid State Drives (SSDs) are lighter, more durable, and offer lightning-fast speeds—ideal for designers with performance demands.

When SSDs Make Sense for Designers

If you’re constantly editing large files, working off external storage, or traveling frequently, SSDs provide durability, speed, and compact size. SSDs with USB 3.1, USB-C, or Thunderbolt are highly recommended.

Key Features to Consider

Storage Capacity

Choose a drive with a minimum of 1TB if you’re working with standard design assets. Go for 2TB, 4TB, or more if your workflow includes video, 3D renders, or motion graphics. More capacity means fewer compromises.

Data Transfer Speed

Look for drives offering 500MB/s or more. SSDs like the Samsung T7 or SanDisk Extreme reach over 1000MB/s. Faster read/write speeds reduce lag when opening, saving, or transferring large files.

Durability and Ruggedness

Designers on the move need drives that can handle bumps, drops, and environmental conditions. Features like shockproof casings, rubber bumpers, and water resistance can protect your data.

Portability

A slim, pocket-sized design is ideal for mobile designers. Look for compact drives that fit easily in a laptop bag or tech case. Lighter drives reduce travel strain and fit into minimalist work setups.

Compatibility Across Devices

Choose drives that work with macOS, Windows, and possibly mobile devices. exFAT formatting or cross-platform tools allow seamless transitions. USB-C ports ensure future-proof compatibility.

Security and Encryption

Some drives come with built-in password protection or hardware encryption. If you handle sensitive client work, this layer of security ensures your files remain safe in case of theft or loss.

Top Recommendations for Graphic Designers

Lexar 2TB Armor 700 Portable SSD – Rugged Speed for Creators, Gamers, and Professionals

A dark blue Lexar-branded portable external hard drive, shown glowing with blue light. The image highlights its high-speed performance with overlaid text indicating UP TO 2000 READ MB/s* and 2000 WRITE MB/s*.
Experience lightning-fast data transfer with the Lexar Portable External Hard Drive, featuring impressive read and write speeds of up to 2000 MB/s. This high-performance device is perfect for professionals and enthusiasts who need to quickly access and store large files on the go.

Built for Speed and Serious Storage Power

Transfer Files in Seconds with USB 3.2 Gen 2×2

The Lexar Armor 700 sets a new standard in portable storage with blazing read/write speeds of up to 2000MB/s. Perfect for moving large files—like 4K videos, RAW images, or game libraries—this SSD dramatically reduces wait times and increases productivity. It’s built for those who can’t afford a delay, whether you’re editing media or managing creative projects.

Massive Capacity Up to 4TB

Go beyond limits with up to 4TB of ultra-fast NVMe storage, giving you the flexibility to store your entire creative or gaming universe on one portable drive. Ideal for photographers, designers, streamers, and mobile professionals who need ample storage and high-speed access anywhere, anytime.

Rugged Protection for Real-World Use

IP66 Water and Dust Resistance

Don’t let the elements hold you back. The Lexar Armor 700 is IP66-rated, meaning it resists powerful jets of water and prevents dust ingress. It’s the ideal companion for outdoor shooting, travel, and demanding environments where data protection matters most.

Shock-Resistant and Durable Design

The shock-resistant outer shell adds another layer of protection for your data, keeping it safe even if dropped. With a rugged construction and compact profile, it’s ready for action—from your studio desk to your fieldwork backpack.

Universal Compatibility with Your Devices

Works Seamlessly with iPhone 15/16 and USB-C Devices

Thanks to its USB-C interface and USB 3.2 Gen 2×2 compatibility, the Lexar Armor 700 works effortlessly with the latest devices, including iPhone 15/16 models, iPads, and USB-C Android phones. Plug it into your mobile device to offload videos, backup photos, or edit on the go using compatible apps.

Compatible with Cameras, Laptops, Gaming Consoles & More

Whether you’re transferring from your DSLR, running PS5 games, or working on your MacBook, this external SSD is universally flexible. It supports Windows, macOS, Android, iOS, Linux, and major camera file formats. Creative professionals and gamers alike can depend on smooth, consistent performance across devices.

Designed for Mobility and Simplicity

Lightweight and Pocket-Sized for Portability

Don’t let high performance weigh you down. The Armor 700 is ultra-slim, compact, and lightweight, easily fitting in your pocket, backpack, or camera bag. It’s engineered for professionals who need to travel light but still carry serious power.

Plug-and-Play Simplicity

No software installation required. Just connect and go. Whether you’re transferring files between devices or backing up data during a shoot, the Armor 700 is ready to perform right out of the box. USB-C to USB-C and USB-C to USB-A cables are included for maximum flexibility.

Built to Empower Every Workflow

Ideal for Graphic Designers and Content Creators

Working with large design files, video assets, or layered PSDs? The Lexar Armor 700 SSD keeps up with intensive creative workflows. Launch apps faster, access files instantly, and transfer media to and from Adobe Premiere Pro, Photoshop, Illustrator, or DaVinci Resolve without bottlenecks.

Game-Changer for Console and PC Gamers

Expand your gaming library with high-speed external storage. Compatible with PlayStation 5, Xbox Series X/S, and gaming PCs, it lets you store and launch your games quickly—minimizing load times and maximizing fun.

A collage featuring the Lexar Armor 700 Portable SSD. The left panel shows the portable drive itself, while the right panel shows it connected to an iPhone 15 Pro, highlighting its ability to shoot video directly to the drive.

Technical Details

Product Specifications

  • Model: Lexar Armor 700 (LAR700X002T-RNLNU)
  • Capacity Options: 1TB, 2TB, 4TB
  • Interface: USB 3.2 Gen 2×2 Type-C
  • Read/Write Speed: Up to 2000MB/s
  • Compatibility: iPhone 15/16, iPad, macOS, Windows, Android, DSLR cameras, PS5, Xbox
  • Durability: IP66 water & dust resistant, shockproof
  • Dimensions: Approx. 95mm x 55mm x 15mm
  • Weight: Approx. 110g
  • Color: Dark Blue
  • Included Cables: USB-C to USB-C and USB-C to USB-A

What’s in the Box?

Package Contents

  • Lexar Armor 700 Portable SSD
  • USB-C to USB-C Cable
  • USB-C to USB-A Cable
  • Quick Start Guide
  • 3-Year Limited Warranty

Why Customers Love the Lexar Armor 700 SSD

Reliable, High-Speed Performance

Thousands of professionals trust Lexar for secure, fast data handling. Whether you’re backing up shoots or transferring high-res graphics, this SSD delivers uncompromising speed and reliability.

Durable Build for On-the-Go Use

Professionals love the rugged construction that keeps data protected, even in unpredictable conditions. The waterproof, dustproof, and shock-resistant shell offers peace of mind wherever you go.

Versatility and Simplicity

From phones to gaming consoles, the Armor 700 is ready to plug in and perform. It’s the perfect blend of speed, durability, and capacity in one sleek package.

A close-up of a Lexar portable external hard drive, highlighting its compact size and performance. The text STAYS COOL at Blazing-Fast Speeds is shown alongside read and write speeds of up to 2000 MB/s.
This Lexar Portable External Hard Drive stays cool even at blazing-fast speeds of up to 2000 MB/s, making it a reliable choice for professionals who require high performance and durability.

Final Verdict

If you’re a creative professional, gamer, or anyone who demands fast, reliable storage on the go, the Lexar Armor 700 Portable SSD is a must-have. With capacities up to 4TB, ultra-fast 2000MB/s transfer speeds, and a rugged IP66-rated exterior, it’s built to thrive in fast-paced, high-stakes environments. Whether you’re editing 4K footage, running large design files, or expanding your console storage, the Armor 700 delivers performance and protection in one beautiful, compact device.

How to Use Your Portable Drive Effectively

Working Directly from the Drive

Many designers run Adobe software directly from the external drive. With fast SSDs, editing from external storage is seamless. This also prevents cluttering your internal SSD.

Archiving Projects and Versions

Use your portable drive to archive completed projects, backup versions, and unused assets. This declutters your system while ensuring you retain older work for future reference.

Setting Up Automated Backups

Tools like Time Machine (Mac) or File History (Windows) allow you to automate backups. Syncing files regularly helps protect against sudden system crashes or data loss.

Maintenance Tips and Best Practices

Safely Eject and Store Properly

Always eject the drive safely to prevent file corruption. Store it in a padded case or anti-static pouch to protect it from dust and damage.

Monitor Drive Health Regularly

Use built-in utilities or third-party software to check drive health. If performance declines or errors increase, replace it before it fails completely.

Organize File Structure for Speed

Keep your folders clean and clearly named. Avoid excessive nesting, which slows down indexing and searching. Use a consistent naming system to find files quickly.

When to Upgrade or Replace

Signs Your Drive is Slowing Down

If you’re noticing lag when opening files or frequent disconnection messages, it’s time to consider an upgrade. SSDs degrade over time and may slow without warning.

Scaling Storage with Your Workflow

As your client base and file library grow, consider multiple drives: one for active projects, one for backups, and one for archives. This segmentation boosts organization and security.

The Role of External Drives in Modern Creative Workflows

Freedom to Create Anywhere

A portable external hard drive lets you work in coffee shops, studios, or even while traveling. With your entire design library in your bag, you’re free from the constraints of cloud speed or internet access.

Peace of Mind and Professionalism

Clients expect reliability. A robust backup and storage system shows you take your work seriously. It also protects your reputation from lost files or delayed deliverables.

Final Verdict

Choosing the Right Drive

Graphic designers need more than just storage—they need speed, security, portability, and durability. The best portable external hard drive should match your workflow, file size needs, and travel habits. SSDs like the Lexar Armor 700 SSD is the top picks for performance and reliability, while HDDs like WD My Passport Ultra can be a good backup solution for less critical data.

Investing in Your Workflow

Don’t treat your external drive as an afterthought. It’s one of the most vital parts of your toolkit—just like your laptop, tablet, or stylus. By investing in the right one, you boost productivity, protect your work, and prepare yourself for long-term creative success.

Also, check the recent article about the best laptop for graphic design here.


A person sits at a desk with a computer in a dimly lit room, with text overlaid that reads BEST DESK LAMPS FOR GRAPHIC DESIGNERS WHO WORK LATE.

Best Desk Lamps for Graphic Designers Who Work Late

A person sits at a desk with a computer in a dimly lit room, with text overlaid that reads BEST DESK LAMPS FOR GRAPHIC DESIGNERS WHO WORK LATE.
Enhance your late-night work with the best Desk Lamps for Graphic Designers.

Why Late-Night Designers Need Specialized Desk Lamps

Working late hours in a dim or poorly lit environment can lead to eye strain, color misjudgment, and fatigue—issues that directly affect a graphic designer’s output. The right desk lamp is essential for maintaining visual comfort, color accuracy, and productivity when natural light isn’t available.

For designers burning the midnight oil, lighting should mimic daylight, offer high color fidelity, and be gentle on the eyes—without sacrificing style or desk space.

What to Look for in a Late-Night Desk Lamp

Adjustable Color Temperature for Nighttime Comfort

A lamp with a range between 2700K (warm) to 6500K (daylight) lets you shift between soft evening lighting and color-accurate brightness depending on your task and time of night.

High CRI for Accurate Color Perception

A CRI (Color Rendering Index) of 90 or above ensures you see colors as they truly are—critical when reviewing branding, packaging, or print work in artificial light.

Flicker-Free, Low-Glare Illumination

Continuous lighting technology helps prevent eye fatigue and headaches from prolonged exposure, especially important when working on high-detail projects.

Touch Controls and Presets

Convenient touch panels with memory functions allow you to quickly switch between warm night light and bright color-correct light without disrupting your workflow.

Sleek, Flexible Design

A slim profile with adjustable arms, rotating heads, or clamp mounts is ideal for compact workstations, offering targeted lighting exactly where you need it.

Top Desk Lamps for Late-Night Graphic Designers:

1. EYOCEAN 31.5″ Wide 24W Desk Lamp: A Game-Changer for Graphic Designers

Designed for Complete Desk Coverage

This lamp features a 31.5-inch ultra-wide LED light bar, engineered to cast uniform, glare-free illumination across your entire workstation. From your tablet and sketch pad to dual monitors and color swatches, nothing gets left in the dark.

The wide reach eliminates the need for additional lighting, reducing clutter and helping you stay immersed in your design environment.

Bright, Customizable Light for Every Task

With 24 watts of power output, the EYOCEAN lamp is one of the brightest in its category—perfect for high-precision tasks like retouching images or reviewing printed proofs.

Thanks to dimmable brightness settings and adjustable color temperature (ranging from 3000K to 6500K), you can create the exact lighting conditions your work demands—whether it’s warm and cozy for sketching or cool and crisp for color editing.

At 3000K, the light is soft and soothing, ideal for relaxing your eyes during late-night brainstorming. At 6500K, you get sharp, daylight-equivalent illumination for detailed design review and accuracy.

 A split image showing a modern desk setup on the left, with two computer monitors and a third screen above, all lit by a long, overhead desk lamp. The right side is a close-up of the lamp, with arrows indicating light direction, highlighting a key feature of Desk Lamps for Graphic Designers. The main screen shows a video conference call.
Optimize your workspace with the latest “Desk Lamps for Graphic Designers.” This image showcases a sleek, modern desk lamp providing optimal lighting for a multi-monitor setup, which is essential for detailed design work. The lamp’s design minimizes glare and eye strain, making it an ideal choice for graphic designers and digital artists.

Gesture Sensing Technology: Designed for Creative Flow

Interrupting your design flow just to adjust a lamp can be annoying—especially when your hands are busy sketching or editing. That’s why the EYOCEAN lamp integrates smart gesture-sensing controls.

With just a wave of your hand, you can:

  • Turn the lamp on or off
  • Adjust the brightness
  • Avoid fingerprints on the control panel

This feature is especially helpful during nighttime work when you want to make quick adjustments without fumbling for buttons or disrupting your creative rhythm.

Eye-Caring and Flicker-Free for Extended Work Sessions

Late-night work often means staring at screens for hours. The EYOCEAN lamp uses advanced LED technology combined with an optical light guide panel, providing:

  • Flicker-free, uniform illumination
  • Reduced glare and shadow
  • Natural lighting that minimizes eye fatigue

The lamp also helps balance the light between your screen and surrounding environment—reducing the contrast strain that’s common during long hours of computer work.

Clamp-Mount Design: Maximize Your Workspace

Unlike bulky desk lamps that eat up valuable desk real estate, the EYOCEAN light features a sturdy clamp mount. You can attach it securely to the back or side of your desk, freeing up space for sketchbooks, tools, and gear.

This feature is a huge bonus for minimalist workstations or smaller studio setups where every inch matters.

CRI Above 90: Color Accuracy You Can Trust

As a graphic designer, color is your language. The EYOCEAN lamp delivers a Color Rendering Index (CRI) above 90, ensuring the colors you see on paper or screen are as true-to-life as possible.

Whether you’re prepping files for print or working on branding palettes, this level of color fidelity ensures your late-night work holds up under daylight review.

Built to Last: Durability Meets Design

Crafted from high-quality aluminum alloy and ABS plastic, the EYOCEAN desk lamp is both sleek and durable. It complements modern office aesthetics while being tough enough for daily, long-hour use.

The LED panel is rated for 50,000+ hours, giving you years of reliable performance—without ever needing to change a bulb.

 Close-ups of a desk lamp's features: a hidden light source to avoid glare, a contactless switch with an infrared sensor, and a height-adjustable telescopic rod.
This lamp features a glare-free, contactless switch and adjustable height, perfect for graphic designers.

Technical Details:

Designed for modern creatives and late-night professionals, the EYOCEAN ultra-wide LED desk lamp combines high-end functionality with advanced eye protection features. Below are the key technical details of this designer-friendly light.

Lamp Dimensions and Build

  • Lamp Width: 31.5 inches (80 cm)
  • Material: Crafted from durable aluminum alloy and high-quality ABS plastic for strength and heat dissipation
  • Mount Type: Space-saving clamp base that attaches to desks up to 2.1 inches thick
  • Weight: Approx. 3.1 lbs (1.4 kg)
  • Arm Design: Adjustable swing arm for height and angle flexibility

Power and Light Output

  • Power Consumption: 24 watts
  • Light Output: Approx. 1100 lumens (bright enough for large workspaces or dual monitors)
  • Energy Efficiency: Low power usage with high brightness, perfect for all-day use without racking up your electricity bill

Color and Brightness Control

  • Brightness Settings: Stepless dimming plus 5 preset levels for quick selection
  • Color Temperature Range: 3000K to 6500K, offering warm to daylight-white lighting
  • Lighting Modes: Cool light for clarity, warm light for comfort, and multiple mixed settings to reduce eye strain

Eye-Friendly Features

  • Anti-Glare Optics: The lamp uses an asymmetrical lighting system that brightens your workspace without reflecting light onto your monitor
  • Flicker-Free Technology: Consistent light without any flickering, making it suitable for long sessions
  • Blue Light Reduction: Helps minimize digital eye strain and protects visual focus during night hours

Smart Controls

  • Gesture Control: Some models support wave-to-turn-on/off and brightness adjustment via motion sensing
  • Touch Panel: Sleek control panel with intuitive touch buttons for brightness and temperature
  • Remote Control: Available in certain packages for wireless convenience
  • Memory Function: Remembers your last lighting setting after shutoff
  • Timer Feature: Built-in auto-off timer for energy-saving during late hours

Voltage and Compatibility

  • Input Voltage: 24V with included power adapter
  • Safety Note: Designed for indoor, dry-use environments only
A close-up of the controls for an EyOcean desk lamp, showing a circular remote with buttons for Night light, Brightness, Color Temperature, and a Timer Function. The lamp's stem is also shown, highlighting an Infrared Sensor and an Indicator Light, all crucial features for Desk Lamps for Graphic Designers.
Take control of your lighting with EyOcean smart Desk Lamps for Graphic Designers. This image details the intuitive control panel and infrared sensor, allowing you to precisely adjust brightness, color temperature, and set timers. These advanced features provide the perfect lighting environment for long hours of detailed work, making them an essential tool for any graphic designer’s desk.

Why It’s Ideal for Graphic Designers

  • Extra-Wide Light Coverage: Perfect for illuminating large drawing areas, sketchpads, or side-by-side monitors
  • Color-Accurate Lighting: With full spectrum color temperature control, you get lighting that reflects real-world tones—a must for accurate design work
  • Desk-Friendly Clamp: Saves valuable desk space while keeping the lamp firmly in place
  • Low Glare on Screens: Works well for both hand-drawn work and digital art by eliminating distracting reflections

2. Micomlan Architect Desk Lamp with Atmosphere Lighting – 24W Adjustable LED Light for Workstations

Bright and Wide Coverage for Pro-Level Workspaces

With 24 watts of high-intensity LED light, the Micomlan desk lamp provides exceptional brightness without harsh glare or hot spots. Its extended horizontal light bar ensures that even large desks, dual monitors, or workbenches are fully illuminated.

Whether you’re working with physical sketches or a digital display, the lamp evenly spreads the light so your eyes don’t have to struggle between bright and dim zones. It’s ideal for those who multitask across various mediums or tools.

The light distribution is tailored for zero shadow interference and minimal screen reflection—an absolute must for those working on precision-based visual tasks.

Adjustable Color Temperature and Brightness

One of the biggest advantages of the Micomlan desk lamp is its customizable color temperature, which ranges from a soft, warm 3000K to a crisp, cool 6500K. This flexibility means you can easily match the lighting to your task, your time of night, or your personal preference.

Use warmer tones when sketching, ideating, or winding down, and switch to cooler tones for digital color corrections or layout work where accuracy is key. The lamp also includes stepless dimming, allowing you to fine-tune the brightness to any level—not just preset steps—giving you full control over your environment.

 An adjustable desk lamp with a 45-degree angled design to illuminate a computer desk, representing a solution for Desk Lamps for Graphic Designers.
This desk lamp features a 45-degree angled design to illuminate your workspace without causing glare, perfect for graphic designers.

Auto-Dimming for Smart Night Work

What sets this lamp apart is its auto-dimming sensor technology. The built-in light sensor reads the surrounding ambient light and adjusts brightness accordingly to maintain optimal working conditions.

This is especially valuable when working late, as external lighting conditions may vary, and your eyes can quickly become fatigued from too much or too little light. The auto-dimming function ensures that the light stays comfortable, consistent, and responsive to your real-time needs.

Swing Arm and Multi-Angle Rotation

Flexibility is vital for creative work. The rotatable swing arm on the Micomlan lamp offers multi-angle adjustability, so you can direct light exactly where you need it—whether over your keyboard, sketch pad, monitor, or drawing tablet.

It includes a base-mounted pivot, a jointed arm, and a tilting head, making it easy to adapt the lamp to your setup. You can extend it for wide light coverage or fold it down for focused task lighting.

This level of maneuverability makes it ideal for multitasking across your desk or adjusting the light quickly between different creative tools.

Built-In Atmosphere Lighting

Late-night design sessions often benefit from more than just task lighting. The atmosphere light mode on this lamp adds soft, ambient backlight that enhances the workspace without over-stimulating your eyes.

This secondary light is perfect for maintaining a calm, immersive atmosphere while avoiding eye strain caused by stark contrasts between your screen and surroundings. It also adds a stylish glow to your studio, making your space feel more inviting and modern.

For those who work in long, uninterrupted sessions, this ambient feature helps maintain comfort and reduce visual fatigue.

A fully adjustable desk lamp shown with diagrams of its motion and illuminating a monitor, ideal for Desk Lamps for Graphic Designers.
This fully adjustable desk lamp is perfect for graphic designers, providing versatile lighting for both screens and physical documents.

Stable Base for Compact Spaces

Unlike clamp-mount lamps that require edge space, this version of the Micomlan Architect Lamp comes with a weighted base. It sits securely on your desk without wobbling and doesn’t damage your tabletop surface.

The base is space-efficient and ideal for setups where clamp mounting isn’t possible. It holds the lamp steady, even when fully extended, and adds a clean, minimalist profile to your workspace.

Eye-Caring and Flicker-Free Design

Extended screen exposure and poor lighting conditions can lead to headaches, eye fatigue, and blurred vision. That’s why the Micomlan lamp is equipped with flicker-free technology and a glare-reduction panel.

The light it produces is soft and uniform, reducing strain during long hours of design work. It also minimizes blue light exposure at high brightness settings, making it safer for night use.

Whether you’re editing for hours or fine-tuning intricate illustrations, this eye-friendly design ensures your vision stays protected.

Built to Last with Modern Styling

Constructed with high-grade aluminum and durable plastic, the Micomlan lamp is built for long-term use and repeated adjustments. The joints and hinges are reinforced to prevent sagging over time.

Its modern aesthetic blends perfectly with contemporary workspaces, whether in a professional studio or home office. With its matte black finish, sleek lines, and functional shape, it adds a professional touch to any creative environment.

Who Will Benefit Most

This lamp is perfect for late-night graphic designers who need powerful, customizable lighting to match their workflow. It’s also great for illustrators, animators, architects, CAD designers, and content creators who rely on consistent and accurate lighting throughout the night.

Freelancers working from compact home studios will appreciate the compact base and multi-functional design. Professionals using dual monitors or tablets will love the lamp’s width and maneuverability.

Students and entry-level designers on a budget can view this lamp as a smart investment that improves comfort and boosts work quality without breaking the bank.

A desk lamp illuminates a multi-screen workspace with a monitor and laptop, showcasing a setup ideal for Desk Lamps for Graphic Designers.
This adjustable lamp provides broad, even lighting for a dual-screen setup, perfect for graphic designers.

Technical Details:

  • Brightness: 24W LED
  • Color Temperature Range: 3000K – 6500K
  • Light Modes: Stepless Dimming, Auto-Dimming, Ambient Backlight
  • Lighting Area: Ultra-wide coverage (suitable for large desks, dual monitors)
  • Power Source: Plug-in (AC adapter included)
  • Control Type: Touch-sensitive controls
  • Arm Adjustment: Rotatable swing arm and pivoting lamp head
  • Mounting Type: Weighted base (no clamp needed)
  • Material: Aluminum alloy + ABS
  • Dimensions: Adjustable arm length with wide horizontal light bar
  • Flicker-Free & Glare-Free: Yes
  • Eye Protection: Yes
  • Use Cases: Graphic design, digital art, drafting, home office, engineering, gaming setups, video editing
A collage of images showing the assembly steps and construction details of a desk lamp, including an all-aluminum body, damping shaft, and a stable metal base with an anti-slip pad, highlighting the quality of Desk Lamps for Graphic Designers.
This lamp features an all-aluminum body and a stable base, making it a durable and reliable choice among Desk Lamps for Graphic Designers.

Desk Lamp Comparison Chart for Late-Night Graphic Designers

FeatureEYOCEAN 31.5″ Wide 24W Desk LampMicomlan Architect Desk Lamp with Atmosphere Lighting
Lamp Width31.5 inches (ultra-wide bar)Standard architect arm (approx. 20–24 inches)
Light Output1100 lumens (very bright)High brightness with auto-dimming (exact lumens not specified)
Power Consumption24W24W
Mount TypeClamp (space-saving, sturdy)Weighted base (stable, flexible placement)
AdjustabilityVertical rotation onlyMulti-angle swing arm + 360° rotatable base/head
Lighting Modes5 brightness levels + stepless dimmingAuto-dimming + manual dimming
Color Temperature3000K–6500K (warm to daylight)2700K–6500K (includes warm ambient setting)
Eye ProtectionAnti-glare + flicker-free + blue light reductionFlicker-free + ambient lighting + auto-dimming
Smart FeaturesGesture control, memory, auto-off timerAuto-dimming sensor, memory, ambient backlight
Atmosphere/BacklightNoYes — warm ambient backlight for relaxing contrast
Best ForDual-monitor setups, large digital workspacesFocused work, relaxing aesthetic, adjustable lighting feel
Design AestheticMinimalist, modern industrialSleek, functional, creative-friendly
Price RangeMid-to-highMid-range
PortabilityLess (fixed clamp)More (movable base)

Final Verdict: Which Lamp Is Best for You?

When comparing these two desk lamps, both offer excellent lighting for long graphic design sessions, but their strengths differ based on your personal needs and workspace setup.

Choose EYOCEAN if:

  • You work with multiple monitors or large drawing tablets.
  • You need ultra-wide light coverage across your desk.
  • You prefer a clamp-mount for saving desk space.
  • You want gesture control for easy hands-free use.
  • You care more about function over aesthetics.

This lamp is clearly built for productivity-focused professionals who want consistent, bright, glare-free illumination for serious, detail-heavy design work.

Choose Micomlan if:

  • You want more flexibility in lamp movement and placement.
  • You like having an atmospheric lighting option that feels cozy.
  • You prefer auto-dimming technology to reduce eye fatigue over time.
  • You value a portable, base-mounted design.
  • Aesthetic ambiance is as important to you as brightness.

Micomlan’s offering is best for creative thinkers who want a lamp that adapts to mood, comfort, and ergonomics without compromising on brightness.

Conclusion

Both the EYOCEAN 31.5″ Wide 24W Desk Lamp and the Micomlan Architect Desk Lamp offer excellent lighting solutions for late-night graphic designers. The EYOCEAN shines with its ultra-wide coverage and space-saving clamp, perfect for large desks and multi-monitor setups. Meanwhile, the Micomlan offers flexible positioning, auto-dimming, and soothing atmosphere lighting, ideal for those seeking comfort and ambiance. Your choice depends on whether you prioritize broad, bright task lighting or versatile, mood-enhancing illumination. Either way, investing in quality lighting will protect your eyes and boost productivity during late-night creative sessions.

If your priority is wide, stable, task-focused lighting—go for the EYOCEAN.
If you lean toward comfort, flexibility, and ambiance—choose the Micomlan.

Also, check the recent article about the best laptop for graphic design here.


Which lamp is better for large workspaces or dual monitors?

The EYOCEAN lamp has a wider 31.5″ light bar, providing excellent coverage for large desks and multiple screens, making it ideal for expansive workstations.

Can I adjust the color temperature on both lamps?

Yes, both lamps offer adjustable color temperatures ranging from warm (around 3000K) to daylight (up to 6500K) to suit different tasks and moods.

Does the Micomlan lamp have ambient lighting?

Yes, the Micomlan includes built-in atmosphere lighting to create a soft, calming glow that reduces eye strain during long sessions.

Are these lamps suitable for reducing eye strain?

Both feature flicker-free LED technology and glare reduction designed to protect your eyes during extended work hours.

Which lamp is more portable?

The Micomlan has a weighted base, allowing easy repositioning on your desk, whereas the EYOCEAN uses a clamp mount that stays fixed to your desk edge.

Do they have smart controls?

The EYOCEAN offers gesture control and memory functions, while the Micomlan includes auto-dimming sensors and touch controls for convenient adjustment.

A graphic comparing Canva, Figma, and Adobe Creative Suite, asking Which One Wins in 2025? The logos for Canva, Figma, and Adobe Creative Suite are displayed, with large orange question marks below them.

Canva vs. Figma vs. Adobe: Which One Wins in 2025?

 A graphic comparing Canva, Figma, and Adobe Creative Suite, asking Which One Wins in 2025? The logos for Canva, Figma, and Adobe Creative Suite are displayed, with large orange question marks below them.
The ultimate showdown: Canva vs. Figma vs. Adobe. As we look to 2025, which design platform will emerge victorious? Each offers unique strengths for various design needs. What are your predictions for the future of design tools?

Canva vs. Figma vs. Adobe- In 2025, the world of graphic design is more competitive and technologically advanced than ever before. With an ever-growing list of tools available to designers, three platforms continue to dominate the conversation: Canva, Figma, and Adobe Creative Cloud (primarily Photoshop, Illustrator, and XD). Each offers unique strengths, caters to different audiences, and continues to evolve rapidly.

So which one truly wins in 2025? The answer isn’t one-size-fits-all. It depends on your goals, skill level, and use case. Let’s break down these platforms across various dimensions: :

What Are Canva, Figma, and Adobe?

Canva: Design for Everyone

Canva was launched in 2013 with a mission to democratize design. Built as a simple, browser-based editor, it quickly gained popularity among non-designers. By 2025, Canva has evolved into a robust design suite that serves content creators, marketers, educators, and even small businesses.

Thanks to features like drag-and-drop functionality, thousands of templates, stock assets, and built-in branding kits, Canva has become a one-stop solution for creating social media posts, presentations, infographics, and short videos. Recently, AI tools like Magic Design, Magic Write, and text-to-image generators have enhanced its appeal further.

Figma: Collaborative Design Reimagined

Figma entered the scene in 2016 and disrupted the design space with its real-time, collaborative editing. Built for UI/UX design, Figma is fully browser-based and highly flexible, making it an instant hit among product teams, developers, and startups.

In 2025, Figma continues to be the de facto choice for web and app designers, offering features like auto layout, advanced prototyping, reusable design systems, and a growing library of plugins. The introduction of Figma AI and enhanced developer handoff tools has further cemented its place as a professional-grade digital product design platform.

Adobe Creative Cloud: The Industry Standard

No discussion about design software is complete without Adobe. With over three decades of history, Adobe’s Creative Cloud suite is still the most comprehensive offering for creative professionals. Tools like Photoshop, Illustrator, InDesign, and XD cater to everything from photo editing and vector illustration to print publishing and UI design.

By 2025, Adobe remains the gold standard for professional design work. With the integration of Adobe Firefly (its AI toolkit), features like smart background removal, neural filters, and AI-driven content-aware fills make powerful tasks easier to execute. However, Adobe’s steep learning curve and premium pricing still pose challenges for beginners and freelancers.

The Role of AI Integration in 2025

As artificial intelligence continues to revolutionize nearly every industry, its impact on graphic design software has become undeniable. From automating repetitive tasks to generating complete design compositions, AI plays a critical role in the evolution of Canva, Figma, and Adobe.

Canva: AI-Powered Simplicity for All

Canva’s integration of AI has transformed it into one of the most intuitive and efficient design tools for non-professionals. In 2025, Canva continues to lead the charge in AI-assisted design for beginners. Notable AI-powered features include:

  • Magic Design: Users can simply describe the type of design they want, and Canva generates multiple layout options instantly.
  • Magic Write: A copywriting AI that helps users draft headlines, captions, and content directly within the editor.
  • Text-to-Image: Based on user prompts, Canva generates custom images using AI-powered image synthesis.
  • Auto-adjustment and smart alignment: Elements within a design are automatically aligned, color-matched, and resized based on AI predictions.
  • Brand Voice Matching: Canva can mimic tone and style from previous content to ensure consistency across materials.
  • Presentation Enhancer: Automatically suggests slide transitions, image placements, and content flow for better storytelling.

Canva’s goal is to take the thinking out of design. With these AI features, small business owners and marketers can produce brand-consistent, engaging content in minutes.

Figma: Smart Collaboration Meets Predictive Design

Figma has embraced AI in a way that complements its collaborative DNA. By 2025, Figma AI is deeply embedded into the design and development pipeline. Key innovations include:

  • Auto Layout 3.0: Figma AI understands responsive behavior and automatically suggests layout adjustments for multiple screen sizes.
  • Design System Suggestions: Figma suggests styles, components, and spacing rules from an organization’s design system as designers work.
  • Smart Prototyping: AI anticipates user interaction flows and helps speed up the prototyping phase.
  • Plugin Enhancements: Figma’s plugin ecosystem has grown with AI tools for accessibility checks, visual hierarchy analysis, and even brand compliance enforcement.
  • Live Feedback AI: Provides real-time suggestions during design reviews and flags potential usability issues.
  • Contextual Code Recommendations: Helps bridge the gap between design and development by offering code-ready suggestions for frontend components.

Figma’s AI doesn’t just automate tasks—it enhances creative decision-making, especially in teams working on user interfaces or product design.

Adobe: Professional Control Enhanced by Firefly AI

Adobe has taken AI integration to a more sophisticated level, embedding it across almost every application in the Creative Cloud suite. In 2025, the Adobe Firefly engine enables:

  • Text-to-Image and Vector: Designers can generate high-resolution images and scalable vectors from text prompts in Photoshop and Illustrator.
  • Neural Filters: AI-driven filters allow for facial expression changes, skin smoothing, and lighting adjustments—all with sliders.
  • Generative Fill: Photoshop users can now select any part of an image and have the AI fill it with matching content seamlessly.
  • AI Brush Tools: Automatically detect and select objects, people, or backgrounds for editing.
  • Font Matching & Generation: Detect and replicate typography from any image or style.
  • 3D Asset Generation: Generate photorealistic 3D models from sketches or prompts, ready for use in AR/VR content.

Adobe’s AI focuses on augmenting the skillset of professionals rather than replacing their creative input. It’s built for precision, making it ideal for artists, photographers, and advanced graphic designers who require full creative control.

A graphic illustrating AI integration with the logos of Canva, Figma, and Adobe. Glowing lines and abstract AI symbols radiate from a central point, connecting the three brand logos, signifying the blend of artificial intelligence within these design platforms.
Exploring the cutting-edge of design: AI integration across Canva vs. Figma vs. Adobe. This image visualizes how artificial intelligence is becoming a core component of these leading creative platforms, enhancing everything from automation to content generation. Which platform’s AI capabilities do you find most impactful?

Comparing AI Use Cases: Canva vs. Figma vs. Adobe

Feature/FunctionCanva AIFigma AIAdobe Firefly AI
Text-to-ImageBasic, social media-focusedLimitedHigh-quality, customizable
Copywriting AssistanceYes (Magic Write)No (plugins available)Limited (Adobe Express only)
Smart Layout SuggestionsYesYes (Auto Layout 3.0)No
Object Recognition & EditingNoLimited (plugins required)Yes (Photoshop, Illustrator)
Workflow IntegrationSeamless for casual usersDeep integration for teamsAdvanced, but complex
Font Matching/CreationNoLimited (via plugins)Yes (Adobe Firefly)
Live CollaborationBasic (real-time updates)Fully collaborativeLimited (Adobe XD, CC Libraries)
3D/AR Content CreationNoNoYes (Substance 3D, Firefly)

AI: The Future of Design or a Creative Shortcut?

The debate continues—will AI replace designers or simply make them more powerful? In 2025, the answer leans toward augmentation rather than replacement.

  • For beginners and entrepreneurs, AI tools like Canva’s Magic Design reduce barriers to entry.
  • For teams and developers, Figma’s AI fosters more productive and consistent design work.
  • For professionals and artists, Adobe’s AI expands what’s creatively possible while retaining full manual control.

Ultimately, the integration of AI across all three platforms shows one thing clearly: AI is not eliminating creativity; it’s reshaping how we achieve it.

The Verdict on AI Integration in 2025

AI has fundamentally reshaped the graphic design landscape. Each platform—Canva, Figma, and Adobe—has taken a unique path in implementing artificial intelligence, based on their audiences and core missions.

  • Canva wins in ease and speed for casual users through highly automated AI features.
  • Figma excels in team-based, UI/UX-specific tasks with intelligent, predictive assistance.
  • Adobe dominates in complexity, offering unmatched creative freedom powered by sophisticated AI tools.
A horizontal bar chart titled AI Integration comparing Adobe, Figma, and Canva. Adobe is rated Very Good with 80% AI integration, Figma is Good with 70%, and Canva is Moderate with 65%.
This chart illustrates the level of AI integration across three popular design tools: Adobe (80% – Very Good), Figma (70% – Good), and Canva (65% – Moderate). It provides a quick visual comparison for users considering Canva vs. Figma vs. Adobe based on their AI capabilities.

Key categories:

1. Usability and Learning Curve

Canva: In 2025, Canva remains the most user-friendly design tool on the market. It is built for non-designers and beginner-level creatives. Its drag-and-drop interface, pre-built templates, and simplified toolset allow users to create social media graphics, presentations, and even basic videos with ease. Learning Canva takes just minutes, making it ideal for small business owners, content creators, and students.

Figma: Figma strikes a balance between professional power and accessible design. While it’s slightly more complex than Canva, its UI remains intuitive. New features added in 2024 and 2025, such as advanced auto-layout and smart design systems, have made the platform even easier for UX/UI designers to work efficiently. A basic understanding of design principles is recommended, but not required.

Adobe: Adobe Creative Cloud tools are the most powerful, but also the most complex. Photoshop, Illustrator, and XD offer deep functionality and professional-grade features, but the learning curve is steep. In 2025, Adobe has tried to simplify its UX with tutorials and AI-powered assistants, but it still takes time to master these tools.

This visual guide compares the usability and learning curve of Canva vs. Figma vs. Adobe. Canva is ideal for beginners due to its simplicity, Figma suits intermediate users, while Adobe products generally present a steeper learning curve.

2. Collaboration and Cloud Features

Canva: Canva has significantly improved its team collaboration features. In 2025, real-time collaboration, commenting, brand kits, and shared folders are standard for Pro users. It’s great for marketing teams and startups who need quick approvals and fast turnarounds.

Figma: Figma remains the gold standard for collaboration. Multiple users can edit a file simultaneously, leave comments, and manage design systems in real-time. Its browser-based nature makes it platform-independent. In 2025, with Figma Spaces and improved version control, it’s even better for large-scale product teams.

Adobe: Adobe has made strides in collaborative workflows with Adobe Cloud Documents and Coediting in XD. However, collaboration still feels a bit clunky compared to Figma. Files are large, and version control can be tricky.

An image titled Collaboration and Cloud Features, with a cloud and people icon at the top. It compares Canva, Figma, and Adobe for collaboration. A trophy icon equals an X for Canva, indicating it's not ideal. Figma has a checkmark, showing good collaboration features. Adobe also has an X, suggesting limitations in this area.
This visual breaks down the collaboration and cloud features across Canva vs. Figma vs. Adobe. Figma stands out with robust collaboration capabilities, while Canva and Adobe appear to have limitations in this regard, as indicated by the ‘X’ marks.

3. Features and Capabilities

FeatureCanvaFigmaAdobe
Ease of UseExtremely user-friendly, drag-and-drop.User-friendly, but requires some learning.Steep learning curve; powerful but complex.
Design TemplatesThousands of customizable templates.Focused on UI/UX templates, prototyping.Extensive templates for print, web, and mobile.
CollaborationLimited collaboration in the free version.Real-time collaboration for teams.Limited collaboration (Adobe XD is better for this).
Customization & FlexibilityLimited; basic customization options.Highly customizable, ideal for UI design.Highly flexible with full control over every aspect.
AI FeaturesMagic Design, Magic Write, Text-to-Image.Limited AI features, plugins available.Adobe Firefly (advanced AI-powered tools).
PrototypingBasic, not as advanced as Figma.Advanced interactive prototyping.Advanced in Adobe XD (part of Creative Cloud).
Integration with Other ToolsLimited integrations (Google Drive, Slack).Strong integration with other design tools.Comprehensive integration with all Adobe apps.
Stock AssetsAccess to stock photos, illustrations, videos.Limited to user-uploaded assets or external libraries.Extensive stock assets in Adobe Stock.
Platform AvailabilityWeb-based, mobile app.Web-based, with desktop app for offline use.Desktop apps for macOS, Windows (Cloud-based for syncing).
An image titled Features and Capabilities, with an icon block showing message, search, settings, and image icons. It compares the features of Canva, Figma, and Adobe. A trophy icon equals an X for Canva, indicating fewer advanced features. Figma has a checkmark, labeled for UI/UX, suggesting strong capabilities in that area. Adobe also has a checkmark, labeled for power, indicating robust, high-performance features.
This chart outlines the distinct features and capabilities when comparing Canva vs. Figma vs. Adobe. Figma is highlighted for its strengths in UI/UX design, while Adobe is recognized for its powerful, advanced functionalities. Canva, while user-friendly, has fewer advanced features in comparison.

Canva: Canva excels in simplicity but lacks depth. It’s ideal for creating marketing visuals, quick edits, and presentations. In 2025, AI-powered tools like Magic Design and AI text-to-image have enhanced its capabilities, but professional designers may still find it limiting.

Figma: Figma is built for UI/UX design and prototyping. It handles wireframes, responsive design, and design systems incredibly well. With new plugin ecosystems and built-in AI assistance in 2025, Figma is more powerful than ever. However, it doesn’t replace Photoshop or Illustrator for graphic-heavy work.

Adobe: Adobe wins when it comes to depth. Photoshop and Illustrator are unmatched in image editing, vector design, and complex graphic creation. Adobe’s AI tool “Firefly” now powers smart object selection, text-to-image, and content-aware fills more efficiently than ever.

4. Pricing and Accessibility

Canva: Canva offers a generous free plan with thousands of templates. The Pro plan is reasonably priced and offers great value for small teams. In 2025, Canva also provides tailored solutions for educators and nonprofits.

Figma: Figma has a free tier for individuals and small teams. The Professional and Organization plans add advanced collaboration and team management tools. It’s cost-effective for startups and design teams.

Adobe: Adobe is the most expensive of the three. Its subscription model requires payment per app or for the full Creative Cloud suite. Although students and educators get discounts, it can be a barrier for freelancers and small businesses.

Winner: Canva (most affordable), Figma (best value for mid-level teams)

5. Target Audience

Canva: Best for content creators, social media managers, entrepreneurs, teachers, and beginners who need quick, beautiful designs without complexity.

Figma: Tailored for product designers, UX/UI professionals, app/web developers, and teams focused on digital products and interactive design.

Adobe: Designed for professional graphic designers, illustrators, photographers, and visual artists who need industry-standard tools and advanced capabilities.

Winner: It depends on your role. Canva for non-designers, Figma for UX, Adobe for high-level creatives.

6. Community and Ecosystem

Canva: In 2025, Canva’s community is massive. With thousands of free templates, an active marketplace, and user-generated content, there is plenty of inspiration and plug-and-play content available.

Figma: Figma boasts a strong developer and designer community. Its plugin ecosystem and community file library continue to grow. Hackathons, webinars, and free resources are plentiful.

Adobe: Adobe still leads with the richest ecosystem, spanning decades. Behance integration, Adobe Stock, and a global user base provide endless inspiration and collaboration opportunities.

Winner: Adobe (for legacy and reach), Figma (for innovation and accessibility)

Conclusion: So, Which One Wins in 2025?

There isn’t a single “winner” because each platform has its niche:

  • Canva wins for accessibility, affordability, and speed.
  • Figma wins for collaboration, UI/UX design, and cloud functionality.
  • Adobe wins for professional-grade design, depth, and creativity.

But AI is reshaping the battlefield. The 2025 design tool war is no longer just about features—it’s about how seamlessly AI enhances productivity and creativity.

AI Progress in 2025: Who Leads?

Adobe stands at the top when it comes to advanced, high-quality AI capabilities. With Firefly embedded across its apps, Adobe allows professionals to push creative boundaries in ways previously unimaginable.

Figma leads in predictive design and intelligent collaboration, enabling faster prototyping and consistent design systems at scale—ideal for fast-moving product teams.

Canva continues to democratize design, using AI to eliminate guesswork for everyday users. It’s now so efficient that entire brand kits, social campaigns, and presentations can be auto-generated with a few prompts.

Designers Win Either Way

The AI race among Canva, Figma, and Adobe is driving innovation at a breakneck pace. This competition has empowered designers of all levels:

  • Newbies can dive into design with AI-driven assistance.
  • Teams can design faster and smarter.
  • Experts can unlock creative freedom with tools once deemed impossible.

Final Thought

In the end, the best design tool in 2025 is the one that fits your workflow, team dynamics, and creative goals. Whether it’s Canva’s accessibility, Figma’s collaboration, or Adobe’s depth, every designer stands to gain from the advancements AI has brought into these platforms.

So, while there may not be a single winner—in 2025, designers are the real champions.

Also, check the recent article about the best laptop for graphic design here.


What are the key differences between Canva, Figma, and Adobe?

The primary differences between these tools lie in their intended use cases and user base. Canva is designed for speed and simplicity, making it ideal for quick, visually appealing designs. It’s popular among non-designers, small business owners, and individuals who need to produce content for social media, marketing, and presentations.
In contrast, Figma focuses on the design and prototyping needs of UI/UX designers. It is especially valuable for collaborative projects and allows real-time teamwork on design elements, which is crucial for web and app development teams. Adobe, on the other hand, is the industry standard for high-quality, professional design. With tools like Photoshop, Illustrator, and InDesign, it provides an extensive range of advanced design features that cater to graphic designers, illustrators, photographers, and print professionals.

Which platform is best for collaboration?

Figma takes the lead when it comes to collaboration. As a web-based tool, it allows multiple team members to work on the same design project in real-time, making it an excellent choice for teams working remotely or in different locations. It’s particularly popular among UI/UX designers, who need to iterate and gather feedback quickly from clients or team members. Figma’s collaborative features are also enhanced by its version control and commenting system, ensuring that everyone can track changes and provide input seamlessly.
While Canva does offer some basic collaborative features, such as sharing designs and allowing others to edit, it does not provide the same level of real-time, live collaboration that Figma does. Adobe, in contrast, does not specialize in collaboration. Though tools like Adobe Creative Cloud allow for file sharing, Adobe products are generally more isolated and designed for individual work rather than collaborative design.

Which platform is best suited for specific industries or users?

Canva is ideal for social media managers, content creators, small businesses, and marketers. Its ease of use and template-driven approach make it perfect for quick visual content creation.
Figma is best suited for UI/UX designers, web developers, and digital product teams who need a collaborative platform for designing and prototyping apps and websites. Its real-time collaboration tools are essential for teams working remotely or with tight deadlines.
Adobe is the top choice for professionals in graphic design, photography, publishing, and advertising. If you’re working on branding, detailed illustrations, photo retouching, or large-scale print projects, Adobe’s advanced tools are the industry standard.

How do AI features compare across Canva, Figma, and Adobe?

In 2025, AI plays a key role in enhancing the design experience across Canva, Figma, and Adobe—each leveraging it uniquely. Canva focuses on ease, with tools like Magic Resize, AI text-to-image, and background removal, making design fast and accessible for non-designers. Figma uses AI to assist with layout generation, design consistency, and smart UI components, helping streamline workflows and boost collaboration. Adobe, powered by its AI engine Sensei, offers the most advanced features—auto-tagging, AI photo editing, and content-aware tools—designed for precision and professional-grade creativity.

Top 5 Free Mockup Websites for Graphic Designers title card with orange and white text on a dark background, featuring subtle graphic design elements.

Top 5 Mockup Websites for Graphic Designers

Top 5 Free Mockup Websites for Graphic Designers title card with orange and white text on a dark background, featuring subtle graphic design elements.
Discover the top 5 free mockup websites every graphic designer needs to know! Elevate your presentations with stunning, realistic mockups without spending a dime.

Table of Contents

Discover the top 5 free mockup websites for graphic designers: Pixeden Club, Mockup World, and Mockup Cloud. Access thousands of PSD mockups to showcase your designs professionally—without spending a dime!

Introduction

In the world of graphic design, presentation is everything. Whether you’re a freelance designer, part of an agency, or an entrepreneur creating visuals for your brand, how you present your work determines how clients and customers perceive it.

Imagine this: you’ve spent hours crafting a stunning logo, a sleek packaging design, or an eye-catching poster. But when you send a flat JPEG to your client, it doesn’t have the same impact. That’s where mockups come in.

Mockups allow you to place your design in real-life contexts—whether it’s on a business card, billboard, coffee cup, or product packaging. They help your clients visualize the final product, enhancing the professional appeal of your work.

What is a Mockup?

Before we get into the list, let’s quickly cover the basics.

A mockup is a high-resolution template that allows designers to showcase their work in a realistic setting. Mockups are usually PSD (Photoshop) files with smart objects that make it easy to insert your design with just a few clicks.

Common types of mockups include:

  • Logo mockups
  • Business card mockups
  • Packaging mockups
  • Apparel mockups (T-shirts, hoodies, hats)
  • Tech mockups (smartphones, laptops, tablets)
  • Print mockups (posters, flyers, brochures)
  • Web and UI mockups

Using mockups saves time and helps you present your work in a polished, professional way.

Why Use Free Mockup Websites?

There are plenty of premium mockup services out there, but not everyone has the budget for them—especially freelancers, students, or small businesses.

Free mockup websites solve this problem by offering:

  • Cost savings
  • High-resolution PSD files
  • Smart object functionality
  • Realistic scenes and perspectives
  • Licensing flexibility (often for personal and commercial use)

Now, let’s look at the Top 5 Free Mockup Websites for Graphic Designers in detail.

1. Pixeden Club

Website: Pixeden.com

Overview

Pixeden Club is one of the most trusted names in the mockup community. Known for its high-quality mockups and templates, Pixeden offers both free and premium content. Their free section is generous enough to satisfy the needs of most graphic designers.

While Pixeden is not exclusively free (they do have a premium membership), their free mockup collection is extensive and highly professional.

Top Features

High-Quality Free PSD Mockups

To begin with, Pixeden’s free PSD mockups are polished and highly detailed, often rivaling the quality of premium mockup platforms. This allows designers to create professional presentations without spending a dime.

Smart Object Integration

Moreover, Pixeden makes the design process simple by offering easy smart object integration. With just a few clicks in Photoshop, you can insert your design and see it instantly placed in the mockup scene.

Diverse Categories

In addition, Pixeden provides a wide variety of categories, ranging from stationery and branding mockups to iPhone, MacBook, and packaging templates. This makes it a versatile resource for different types of design projects.

Regular Updates

What’s more, the platform is frequently updated with new mockups, ensuring that designers always have access to fresh and trendy materials.

Print-Ready Files

Finally, many of Pixeden’s mockups are high-resolution (up to 300 DPI), making them ideal for both web and print presentations. Whether you need visuals for a digital portfolio or a printed client pitch, Pixeden has you covered.

  • Business Card Mockups
  • Magazine and Book Mockups
  • Apple Device Mockups (MacBook, iPad, iPhone)
  • Cosmetic and Packaging Mockups
  • Apparel and Fashion Mockups

Pros and Cons

ProsCons
Free and premium optionsLimited number of free mockups compared to the premium library
Extremely realistic presentationsRequires registration for some downloads
Wide category rangeSome files are large (require good internet speed)

Who Should Use Pixeden?

  • Freelance graphic designers
  • Branding agencies
  • Packaging designers
  • UX/UI designers needing device mockups
Screenshot of Pixeden Club, one of the top free mockup websites, displaying a black square hard cover book mockup with gold accents and a red hand-holding mug mockup.
Explore Pixeden Club, one of the leading free mockup websites, offering high-quality resources like this elegant square hard cover book mockup and a vibrant hand-holding mug mockup. Find professional assets to showcase your designs.

2. PSDFreeMockup

Website: PSDFreeMockup.com

Overview

PSDFreeMockup is one of the leading free mockup resource sites dedicated to providing premium-quality PSD mockups without charging a cent. Unlike other platforms, PSDFreeMockup focuses entirely on free content, with no hidden paywalls.

Their goal is to help designers save time and elevate their projects with easy-to-edit mockups that fit various industries.

Top Features

1. Huge Free Mockup Collection

PSDFreeMockup features thousands of free PSD mockups in multiple categories, including:

  • Product packaging
  • Apparel and fashion
  • Print and stationery
  • Technology devices
  • Food and beverage
  • Cosmetics and beauty
  • Outdoor advertising

2. Realistic and Modern Designs

The site offers photorealistic and trendy mockups that match current design standards, helping your portfolio stay up-to-date.

3. Instant Download—No Registration Required

Unlike many mockup websites, PSDFreeMockup allows users to download files without creating an account or providing personal information.

4. Commercial Use-Friendly

Most mockups are available for commercial and personal use, although it’s always recommended to check each mockup’s license before use.

5. Multiple File Formats (PSD + JPG Previews)

Each download includes the PSD file and a high-resolution JPG preview, which is helpful for quick client sharing.

6. Organized Categories and Tags

The website is easy to navigate, allowing you to find mockups by:

  • Type (e.g., box, bottle, can)
  • Industry (e.g., food, cosmetics, tech)
  • Orientation (e.g., front view, top view, perspective)
  • Superfood Powder Jar Mockup
  • Coffee Pouch Packaging Mockup
  • Cosmetic Cream Tube Mockup
  • Bistro Menu Card Mockup
  • Square Business Card Mockup
  • Apparel T-shirt Mockup
  • Aluminum Foil Bag Mockup

Pros and Cons

ProsCons
No sign-up requiredSome files are large in size
100% free—no premium sectionRequires Photoshop
Clean and easy-to-use websiteNot all mockups come with scene customization
Commercial-use friendlyLimited to PSD format
Large and regularly updated libraryMinimal support documentation

Who Should Use PSDFreeMockup?

  • Graphic designers building portfolios
  • Print and packaging designers
  • E-commerce sellers needing product visuals
  • Marketing agencies creating social content
  • Students and hobbyists
  • Entrepreneurs wanting DIY marketing materials
Screenshot of the psdfreemockup.com website homepage, one of the top free mockup websites, featuring their logo and a red Free Box mockup with text Welcome to psdfreemockup.
Welcome to psdfreemockup.com, one of the premier free mockup websites offering high-quality, professional-grade mockups like this vibrant free box mockup to elevate your graphic design projects.

3. Mockup World

Website: MockupWorld.co

Overview

Mockup World is a well-curated directory of free, high-quality mockups from designers across the globe. Unlike Pixeden, Mockup World doesn’t create all the mockups themselves—they gather the best free resources and list them in one place.

If you’re tired of browsing hundreds of websites for free mockups, Mockup World is your solution. They handpick the best PSD mockups, saving you hours of searching.

Top Features

Massive Free Mockup Directory

To start with, Mockup World collects links to the best free mockups available online, making it a one-stop shop for designers. This saves you hours of searching across multiple websites.

User-Friendly Interface

Additionally, their website is clean, simple, and easy to navigate. You can quickly find what you need without dealing with cluttered menus or confusing layouts.

High-Resolution PSDs

Furthermore, most mockups listed on Mockup World are high-resolution PSD files and include smart objects for seamless editing. This ensures professional results, even for large-scale presentations.

Wide Variety of Categories

Besides that, Mockup World covers a wide range of categories, including devices, print, apparel, packaging, vehicles, signage, and more. No matter your project type, you’ll likely find a mockup that fits your needs.

Finally, Mockup World often provides direct links to the original creators’ websites, helping to support independent designers and studios. This not only gives credit where it’s due but also allows you to discover even more resources from talented artists.

  • Packaging & Branding Mockups
  • Poster and Frame Mockups
  • Stationery and Office Supplies Mockups
  • Outdoor Advertisement Mockups (Billboards, Banners)
  • Clothing and Fashion Mockups

Pros and Cons

ProsCons
Huge collection of free mockupsSome links redirect to external sites
No registration requiredQuality varies depending on the creator
Simple search and filter optionsOccasional broken links due to third-party hosting
Supports independent designersNot all files are under the same license—check before use

Who Should Use Mockup World?

  • Designers looking for diverse and unique mockups
  • Marketing agencies needing presentation templates
  • E-commerce sellers wanting product mockups
  • Students working on portfolio projects
Screenshot of the Mockupworld website homepage, featuring a search bar for free mockups and categories like T-Shirts, iPhones, Hats, and Books, establishing it as one of the prominent free mockup websites.
Explore Mockupworld, a leading destination among free mockup websites, offering over 18,000 instant mockups for various categories including T-shirts, iPhones, Hats, and Books. It’s your original biggest source for photo-realistic free PSD mockups!

4. Mockup Cloud

Website: MockupCloud.com

Overview

Mockup Cloud is primarily a premium mockup provider, but they offer a selection of free mockups that are worth checking out. The quality of Mockup Cloud’s resources is top-tier, focusing on clean, minimalistic, and professional templates.

Their mockups are often used in branding presentations, portfolio showcases, and marketing material.

Top Features

Photorealistic Scenes

To begin with, Mockup Cloud focuses on photorealistic and stylish mockups that elevate your design presentation. These mockups help you create realistic visualizations that stand out in portfolios and client proposals.

Branding Mockup Kits

In addition, you can download entire branding scenes that include multiple elements such as business cards, letterheads, envelopes, and more. This is especially useful for designers who want to present a complete corporate identity package.

High-Resolution Files

Moreover, the mockups are sharp and highly detailed, making them perfect for close-up presentations. This ensures that your work looks crisp and professional, even when zoomed in.

Customizable Scenes

What’s more, some mockups come with movable objects and fully layered PSD files, giving you total creative control over the scene. You can easily adjust positions, shadows, and highlights to match your design needs.

Freebies Section

Lastly, Mockup Cloud offers a freebie collection that, although small, is extremely high quality. These freebies often include samples from their premium packs, allowing you to access professional-grade resources at no cost.

  • Free Branding Mockup Scenes
  • Stationery Mockups
  • Business Card and Letterhead Templates
  • Device and Screen Mockups

Pros and Cons

ProsCons
Ultra-realistic designsLimited number of free mockups
Perfect for branding projectsMost mockups are premium
Layered PSDs with full customizationRequires Photoshop CC for best use
Some free mockups include multiple itemsFreebies section not updated frequently

Who Should Use Mockup Cloud?

  • Branding specialists
  • Portfolio designers
  • Agencies presenting corporate identity packages
  • Freelancers building client pitch decks

Tips for Using Mockups Effectively

1. Customize Properly
Don’t just slap your design onto a mockup and call it done. Adjust shadows, highlights, and colors to match your brand aesthetic.

2. Use the Right Perspective
Choose a mockup that matches the context of your design. For example, don’t use a flat mockup for a 3D product.

3. Keep File Sizes Manageable
Mockups can be large. Keep your layers organized and consider compressing final presentations.

4. Check the License
Even free mockups may have different licensing terms. Always check if it’s okay to use them for commercial projects.

Screenshot of the Mockup Cloud website, prominently displaying "Premium & Free Mockups" as a key offering among free mockup websites, with categories for branding, stationery, brochures, devices, and t-shirts.
Explore Mockup Cloud, one of the best free mockup websites, offering a vast collection of both premium and free mockups for branding, stationery, brochures, devices, t-shirts, and more. Elevate your presentations and show your work like a pro!

5. Mockup Design

Website: MockupDesign.com

Overview

Mockup Design is a growing platform that offers free premium-quality mockups for graphic designers. Unlike some other websites that recycle the same templates, Mockup Design focuses on unique and modern mockup files. Their library includes packaging, branding, apparel, tech devices, and more.

Mockup Design is built with the designer’s workflow in mind. Every mockup is designed to be user-friendly, photorealistic, and customizable.

Top Features

1. Extensive Free Mockup Library

Mockup Design offers a wide range of free PSD mockups covering:

  • Business cards
  • Product packaging
  • T-shirt and apparel
  • Mobile apps and website UI
  • Posters and billboards
  • Social media templates

2. High-Resolution Files

Most mockups are delivered in 3000px or higher resolution, making them suitable for both print and digital use.

3. Smart Object Layers

Easily insert your designs into mockups using Photoshop smart objects. The process is fast and beginner-friendly.

4. Commercial Use License

Many mockups on Mockup Design are available for personal and commercial use. You can use them in client projects, presentations, or portfolios without worrying about legal issues.

5. New Mockups Every Week

Mockup Design regularly updates its library, ensuring that designers always have access to fresh and trendy resources.

  • Branding Mockups
  • Packaging Mockups
  • Clothing & Apparel Mockups
  • iPhone, iPad, and Laptop Mockups
  • Social Media Post Mockups

Pros and Cons

ProsCons
100% free mockupsSmaller library compared to premium sites
Commercial-use licenseRequires Photoshop (no alternative formats)
Regularly updated with fresh designsSome files are large (need fast internet for downloads)
Easy-to-use smart objectsMinimal tutorials available

Who Should Use Mockup Designs?

Mockup designs are valuable tools for a wide range of users, including:

Social Media Marketers
To create eye-catching content and branded visuals for posts and ads.

Small Business Owners
To visualize product packaging, promotional materials, or branding concepts before launching.

Freelance Graphic Designers
For presenting design ideas professionally to clients and enhancing their portfolios.

Screenshot of the Mockups-Design.com website, showcasing over 23,000 instant free mockups for categories like T-shirts, Devices, Mugs, Hats, Books, and Bags, highlighting it as a premier destination among free mockup websites.
Discover Mockups-Design.com, your daily source for over 23,000 free and high-quality mockups. This is one of the top free mockup websites, offering a vast collection for T-shirts, devices, mugs, hats, books, bags, and more, all without redirections or registration.

Conclusion

In today’s fast-paced design industry, mockups are more than just tools—they are essential storytelling assets. They help designers bridge the gap between imagination and reality, allowing clients and audiences to see how a concept will truly come to life. Whether you’re working on branding, packaging, apparel, UI design, or marketing materials, presenting your designs with high-quality mockups is crucial for making a lasting impression. In a world where first impressions matter more than ever, using mockups from these sites can help you stand out, impress, and succeed in your creative journey.

Also, check the recent article about the best laptop for graphic design here.


What is a mockup, and why do designers use it?

A mockup is a realistic template that showcases how a design will look in real-world settings. Graphic designers use mockups to present logos, packaging, apparel, digital interfaces, and branding materials in professional scenes. Mockups help clients and audiences visualize the final product, making presentations more effective and engaging.

Are the mockups from these 5 websites really free?

Yes, all five websites—Pixeden Club, Mockup World, Mockup Cloud, Mockup Design, and PSDFreeMockup—offer free mockups. Some sites, like Pixeden and Mockup Cloud, also have premium sections, but their free mockup collections are extensive and high-quality.

Do I need Photoshop to use these mockups?

Yes, the majority of mockups on these websites are provided as PSD files that require Adobe Photoshop. These PSD files often include smart object layers, allowing you to insert your design easily. If you don’t have Photoshop, some sites offer previews in JPG or PNG, but full editing usually requires Photoshop.

Are there any hidden fees or subscriptions?

No, the free sections of these websites do not require payment. Some platforms, like Pixeden Club and Mockup Cloud, offer premium membership options for more advanced resources, but you can download free mockups without subscribing or paying.

Can beginners use these mockups easily?

Yes! These mockups are beginner-friendly. If you’re new to Photoshop, you might need a quick tutorial on using smart objects, but once you understand the basics, it becomes a very simple process. Most of the mockups from these sites are designed for easy drag-and-drop functionality.

Can I use these mockups to sell my designs on marketplaces?

You can use mockups to showcase your designs on platforms like Etsy, Fiverr, or Creative Market, but you cannot resell the mockup files themselves. The mockups are meant for presentations, not for redistribution or resale as standalone products.

What if I need help or support while using the mockups?

Most of these websites provide basic instructions within the download files. However, for additional help, you can find tutorials on YouTube or Adobe’s website that teach you how to work with smart objects, adjust lighting, and customize mockups to suit your needs.

social-media-icons

25 Social Media Icons with names (Vector)

Social media icons in vector format have become an impactful part of modern design, playing a crucial role in adding to brand visibility and smoothing social media interactions. These icons represent various social media platforms, allowing users to identify and connect with brands on their preferred networks quickly.

These icons are in various styles, making an excellent choice for a wide range of projects. Whether you’re designing an app, a website, or a social media campaign, these icons will surely add a fun and engaging element to your project.

Free social icons vector set download link –

Social Media Icon

These icons include:

Reddit, WeChat, Messenger, dribble, myspace, telegram, line, Tinder, flicker, yahoo, tumble, Behance, google plus, LinkedIn, skype, threads, Twitter, IMO, WhatsApp, Pinterest, Tiktok, youtube, Instagram, Facebook

Here’s why social media icons in vector format are an essential component of your digital presence:

1. Consistent and Professional Branding: These icon formats ensure a consistent look and feel for your brand across various platforms and devices. By customizing the icons to match your brand’s colors, typography, and style, you create a unified and polished image. This helps people recognize and trust your brand more easily.

2. Seamless Integration and Utility: Vector social icons are highly adaptable and can be seamlessly incorporated into different digital and print materials. They can be used on websites, blogs, email newsletters, digital advertisements, business cards, and other marketing materials. Vector icons can be resized without losing quality, allowing you to adjust them to suit different design needs.

3. Instant Recognition and User-Friendly Experience: Well-designed social icons instantly grab attention and are easily identifiable. Users can quickly spot and connect with your brand on their preferred networks by using vector icons that accurately represent each social media platform. This smooth user experience encourages people to engage with your brand’s social media profiles, fostering interaction and connection.

balance nowmi.de http://equilibriumcbd.co.uk/ elf-bars

These icons will be applied to various marketing materials including:

Websites: Incorporate social icons on your website’s header, footer, or sidebar to provide easy access to your brand’s social media profiles. They can be placed as clickable links that direct visitors to your social media pages.

Blogs: Add social icons to your blog posts to encourage readers to share your content on their preferred social networks. These icons can also be used as links to your brand’s social media accounts, allowing readers to follow you for more updates.

Email Newsletters: Include these icons in your email newsletters, allowing subscribers to connect with your brand on social platforms. These icons can link to your social media profiles, encouraging recipients to engage with your content and share it with their network.

Social Banner and Digital Advertisements: Utilize these icons in digital advertisements to drive traffic to your social media profiles. Placing these icons strategically within your ads can increase visibility and encourage viewers to follow your brand for more updates.

Business Cards, Letterhead, and Print Collateral: Incorporate social icons on your business cards, brochures, flyers, and other print materials. This allows people to easily find and connect with your brand on social media platforms.

Presentations: Enhance your presentations by including social icons on slides. This can be useful when discussing social media strategies, promoting social media campaigns, or highlighting your brand’s online presence.

Also, check the recent article about LinkedIn Cover Mockup Vector here.

If you want to make any customized icons then contact us now.


Linkedin-Cover-Mockup

Linkedin Cover Mockup Vector.

Linkedin Cover Mockup Vector

Here we listed a detailed presentation of a free Linkedin Cover Mockup Vector with the profile picture and the cover image, which can be easily customized via adobe illustrator software.

Here is the download link-

Linkedin Cover Mockup

With this MOCKUP template, you have a pre-designed canvas that sets the dimensions and layout for your Linkedin cover. This saves you valuable time and effort that would otherwise be spent manually creating the framework from scratch. MOCKUP Templates also provide a consistent starting point for multiple projects, ensuring an authentic presentation look.

After downloading the vector file, follow the below steps :

-Open the pdf files on Illustrator

-Then put the logo design in the blank area, click the right button, then arrange and click send backward.

-Next, select the logo and round shape, click the right button of the mouse, and click on Make a clipping mask.

traditionrolex.com

-Then put the Linkedin cover design in the blank area.

-Next do the same for the Linkedin cover design also.

Check out the youtube short content video tutorial from here.


facebook-cover-page

Facebook Cover Page Template/Mockup Vector

Facebook Cover Page Template/Mockup Vector

Here we listed a detailed presentation of a free Facebook Cover Page Template/Mockup Vector with the profile picture and the cover image, which can be easily customized via adobe illustrator software.

Here is the download link-

Facebook Cover Vector Template/mockup

With this template, you have a pre-designed canvas that sets the dimensions and layout for your Facebook cover. This saves you valuable time and effort that would otherwise be spent on manually creating the framework from scratch. Templates also provide a consistent starting point for multiple projects, ensuring an authentic presentation look.

After downloading the vector file, follow the below steps :

-Open the pdf files on Illustrator

-Then put the logo and Facebook cover design in the blank area.

-Next, select the logo and round shape then click the right button of the mouse and click on Create clipping mask.

-Next do the same for the Facebook cover design also.

Check out the youtube short content video tutorial from here.

Also, check the recent article about cryptocurrency Vector Icon Set 50+ here.


ccx_fnft_dialog_name error in illustrator

ccx_fnft_dialog_name error in Illustrator

ccx_fnft_dialog_name error in illustrator

ILLUSTRATOR BUG FIXING (ccx_fnft_dialog_name error in Illustrator)

The ccx_fnft_dialog_name error in Illustrator typically occurs in Adobe Illustrator and is associated with a dialog box-related function. When this error arises, users may experience issues with dialog boxes or encounter unexpected behavior within the application.

ccx_fnft_dialog_name error in Illustrator

While the exact cause of the error may vary, you can take several simple steps to resolve it.

Step 1: Click on the Edit option

Step 2: Go to the bottom preferences option then click

Step 3: After clicking the preferences a new dialog box opens and then click on general

Step 4: Next a new pop-up box will open and click on use legacy “file new” interface then click ok.

If the above steps do not work successfully, you may consider uninstalling and reinstalling Adobe Illustrator. Before doing so, make sure to back up your files and preferences. Uninstall Illustrator using the appropriate procedure for your operating system, and then download and install the latest version from the Adobe Creative Cloud.

However, if the error persists even after following these steps, it is advisable to consult Adobe’s official support documentation or reach out to their customer support for further assistance. Their expertise and resources can provide more specific guidance tailored to your situation, ensuring a quick resolution to the ccx_fnft_dialog_name error and any other technical difficulties you may encounter.

How to fix ccx_fnft_dialog_name error in illustrator?

Follow the above steps carefully.

Also, check the recent article about cryptocurrency Vector Icon Set 50+ here.

Download the latest Abode illustrator software from here.


Emoji vector icon set

Emoji vector icon set ( free download)

In today’s digital age, emojis have become a universal language, used to express emotions, ideas, and concepts across cultures and languages. As a result, designers and developers are increasingly looking for high-quality emoji vector icon sets that can be used in a variety of projects. One such set is the emoji vector icon set 50+.

The Emoji Vector Icon Set 50+ includes over 50 emoji icons in a variety of styles, making it an excellent choice for a wide range of projects. Whether you’re designing an app, a website, or a social media campaign, these icons are sure to add a fun and engaging element to your project.

Free  emoji vector icons set download link –

Emoji vector

Another great feature of this icon set is the variety of styles it includes. There are simple and minimalist outline emojis that are perfect for a clean and modern look, as well as more detailed and intricate emojis that add a playful and fun element to a design.

The Emoji Vector Icon Set 50+ is also designed as vector-based icons, which means they can be easily scaled up or down without losing any quality. This makes them ideal for a variety of applications, from small icons on mobile devices to large graphics on billboards and posters.

Whether you’re designing a social media campaign, a mobile app, or a website, the emoji vector icon set is an excellent choice for adding a fun and engaging element to your project. With over 50 emojis to choose from, a variety of styles, and vector-based designs that can be scaled up or down without losing quality, this icon set is a must-have for any designer or developer looking to add a playful and fun touch to their work.

Also, check the recent article about cryptocurrency Vector Icon Set 50+ here.

If you want to make any customized icons then contact us now.

To get more emoji vector icon click here.


cryptocurrency vector

Cryptocurrency icons vector set.

cryptocurrency vector

Table of Contents

Cryptocurrency has taken the world by storm in recent years, and as its popularity continues to grow, so does the demand for high-quality cryptocurrency icons. Cryptocurrency vector icon sets are an essential tool for designers and developers who want to create stunning visuals for their cryptocurrency-related projects.

This set includes over 50 top cryptocurrency icons in various styles, making it an excellent choice for a wide range of projects.

One of the great things about the Cryptocurrency Vector Icon Set 50+ is that it includes icons for many of the most popular cryptocurrencies. Whether you need an icon for Bitcoin, Ethereum, Litecoin, or any of the other major cryptocurrencies, you’re sure to find what you’re looking for in this set.

Free cryptocurrency vector icons set download link –

Cryptocurrency

Overall, the Cryptocurrency Vector Icon Set 50+ is an excellent choice for anyone who needs high-quality cryptocurrency vector icons for their projects. With over 50 icons to choose from, a variety of different styles, and vector-based designs that can be scaled up or down without losing quality, this icon set is a must-have for anyone working in the cryptocurrency space.

Do you want to buy Cryptocurrency?

Binance: The Best Cryptocurrency Trading Website for Beginners and Pros.

Cryptocurrency continues to revolutionize the financial world, and with more investors entering the market every day, choosing the right cryptocurrency trading website is crucial. If you’re searching for a secure, beginner-friendly, and feature-rich platform, Binance stands out as the best choice in 2025.

Binance is considered the #1 crypto trading website, and can use it to invest in top digital assets like Bitcoin, Ethereum, XRP, Filecoin, and more.

What is Binance?

Binance is the world’s largest and most trusted cryptocurrency exchange by trading volume and active users. Launched in 2017, it has grown into a comprehensive crypto trading platform that supports over 350 digital currencies, spot and futures trading, staking, DeFi, and NFTs.

Whether you’re a beginner learning how to trade crypto, or a professional looking for advanced features, Binance offers everything you need in one place.

Top Reasons to Use Binance:

1. Safe & Secure Crypto Exchange

Binance employs industry-leading security, including two-factor authentication (2FA), cold storage, and anti-phishing tools to keep your funds safe.

2. Over 350 Cryptocurrencies to Trade

Trade popular coins like: Bitcoin, Ethereum, XRP, Filecoin, and more.

3. Low Trading Fees

Binance has some of the lowest crypto trading fees in the market, with additional discounts for users who pay with Binance Coin (BNB) or use a Binance referral code.

4. Beginner-Friendly Interface

5. Passive Income with Binance Earn

6. Global Access with Local Support

Binance supports multiple languages, global fiat deposits, and 24/7 customer support.

How to Get Started on Binance:

👉 Sign up on Binance today : Sign up

crypto
Cryptocurrency

Complete KYC verification.

Fund your account with a bank transfer, card payment, or crypto deposit.

Start trading, staking, or investing in your favorite coins.

Low Trading Fees

Binance is renowned for its low trading fees, starting at just 0.10% per trade. If you use Binance Coin (BNB) to pay for fees, you receive a 25% discount, further lowering your cost. The platform also frequently offers promotions, zero-fee trading pairs, and loyalty rewards for frequent users.

Binance Earn: Passive Income Options

Beyond trading, Binance offers various ways to earn passive income:

Flexible Savings: Earn interest by depositing unused tokens.

Locked Staking: Stake tokens for fixed durations to earn higher rewards.

Launchpool: Stake coins to earn new tokens before they list.

DeFi Staking: Earn yields on decentralized finance protocols via Binance.

Global Reach and Local Support

Binance is available in over 180 countries, supporting multiple languages, including English, Spanish, French, Russian, Chinese, and more. It also accepts a wide range of fiat currencies through bank transfers, credit cards, and peer-to-peer (P2P) markets.

Customer support is available 24/7, and the platform continuously updates its FAQ section, chatbots, and live agents to assist users worldwide.

Real Community and Ecosystem

Binance isn’t just a trading platform — it’s a community. Through Telegram groups, Twitter spaces, meetups, and AMAs (Ask Me Anything), Binance fosters direct engagement with its user base. This open communication builds trust and ensures that the platform evolves according to user needs.

The digital currency space is growing rapidly, and now is the best time to build your crypto investment portfolio. Binance offers the best combination of security, usability, and earning opportunities, making it the perfect cryptocurrency trading site

Here are some cryptocurrency trading websites that can make you a millionaire in a day by Futures trading-

Signup now: Binance, Kucoin, Paxful.

What is cryptocurrency?

Cryptocurrency is a digital or virtual form of currency that uses cryptography for security. It operates independently of a central bank and relies on decentralized technology like blockchain to facilitate secure transactions.

How does it work?

Cryptocurrency operates through a decentralized network of computers that validate and record transactions on a public ledger called the blockchain. Transactions are secured using cryptographic techniques, and new units of cryptocurrency are typically created through a process called mining.

Cryptocurrency market?

The cryptocurrency market refers to the collective activity of buying, selling, and trading cryptocurrencies. It encompasses numerous cryptocurrencies, exchanges, investors, and market participants.Some of them Behance, Kucoin, Paxful.

Cryptocurrency list?

There are thousands of cryptocurrencies available, and new ones are constantly being created. CoinMarketCap and CoinGecko are popular platforms that provide comprehensive lists of cryptocurrencies along with their market data.

Cryptocurrency investment?

Cryptocurrency investment involves purchasing cryptocurrencies with the expectation of future returns. It’s important to conduct thorough research, diversify your investment portfolio, and consider factors like market trends, project fundamentals, team expertise, and community support before making investment decisions.

Also, check the recent article about arrow vector symbols for free download 50+ here.

If you want to make any customized icons then contact us now.


flowers vector

Flower vector icon set free download

flowers vector

If you’re looking for an easy way to add a touch of floral elegance to your designs, then the flower vector icon set is the perfect solution. This beautiful set of icons features over 50 different floral designs that are perfect for a wide range of projects.

Whether designing a website, creating a social media post, or putting together a print brochure, this flower symbol is sure to add a touch of beauty and sophistication. Each flower vector symbol is designed with precision and attention to detail, making them ideal for high-resolution designs.

One of the great things about this set is that it includes a wide range of different flower designs. From classic to more exotic blooms, there’s something here for every design need.

Free flower vector download link –

flower

In addition to the variety of flower vector designs, these symbols also come in a range of different styles. Some are more minimalist and modern, while others have a more traditional and ornate feel. This makes it easy to find the perfect icon for your project, no matter what style you’re going for.

The advantage of using vector icons is that they can be easily scaled up or down without losing any quality. This means that you can use these icons in a variety of different sizes, from small icons on a website to large graphics in a printed brochure.

Overall, the flower vector icon set is a great investment for anyone who wants to add a touch of floral elegance to their designs. With a wide range of different flower designs and styles to choose from, these icons are sure to be a valuable addition to your design toolkit.

Also, check the recent article about arrow vector symbols for free download 50+ here.

If you want to make any customized icons then contact us now.

To get more flower vector symbols click here.


love icon

Love icon vector set 50+

love icon

Love icon has been around for centuries and is still widely used today to convey emotions of love, affection, and admiration. These icons come in various shapes, sizes, and styles, ranging from the traditional heart shape to more abstract and modern designs. With the popularity of digital media, love icons are now available in vector form, making them more versatile and customizable than ever before.

To help you get started, we’ve compiled a list of 50+ love icon set free download that you can use in your design work. These resources include a wide range of love symbols, from simple and elegant to complex and intricate, so there’s sure to be something that meets your design needs.

love icon

Overall, love icon vector sets are an excellent resource for designers and artists who want to add a touch of romance and emotion to their work. With the variety of free resources available online, it’s easy to find the perfect love icon vector set that fits your design needs. Whether you’re creating a Valentine’s Day card, a wedding invitation, or a social media post, incorporating love icons can help you create a more robust and emotional message that resonates with your audience.

Also, check the recent article about arrow vector symbols free download 50+ here.

If you want to make any customized icons then contact us now.

To get the love copy paste emoji click here.


arrow vector

Arrow vector symbols free download 50+

arrow vector

Arrow vector symbols are an essential part of graphic design. They are versatile and can be used in a variety of ways, from directing the viewer’s attention to a specific point to creating flow in a design. The arrow symbol is simple yet effective, making it a popular choice for designers.

To help you get started, we’ve compiled a list of 50+ arrow vector symbols free downloads that you can use in your design work. These resources include a wide range of arrow symbols, from simple and elegant to complex and intricate, so there’s sure to be something that meets your design needs.

Arrow vector

In addition to their visual appeal, arrow vector symbols also have a range of practical uses in design. For example, they can be used to guide the viewer’s eye towards a particular element, indicate direction or movement, or signify progress or growth. By using arrow symbols in your designs, you can add a sense of purpose and direction to your work, helping to convey your message more effectively.

One of the great things about arrow symbols is their versatility. They can be used in a wide range of design contexts, from logos and branding to user interfaces and info-graphics. They also come in a variety of styles, from sleek and minimalist to bold and decorative, making it easy to find a set of arrow symbols that complements your personal design style.

If you’re looking for high-quality arrow symbols to use in your designs, there are a number of resources available online. One of the best places to start is with free vector downloads. Vector graphics are ideal for use in design work, as they can be scaled up or down without losing quality, making them perfect for use in everything from small icons to large posters.

Conclusion:

Arrow vector symbols are an essential part of any designer’s toolkit, offering a wide range of practical and aesthetic benefits. By incorporating arrow symbols into your designs, you can add direction, movement, and purpose to your work, helping to guide the viewer’s eye and convey your message more effectively. With the wealth of free vector downloads available online, it’s easier than ever to find high-quality arrow symbols to use in your design work, so why not explore the options and see how you can incorporate them into your next project?

Also, check the recent article about Heart symbol FREE DOWNLOAD 50+ (VECTOR) here.

If you want to make any customized icons then contact us now.

Arrow symbol copy and paste icon here


Heart symbol

Heart symbol FREE DOWNLOAD 50+ (VECTOR)

Heart symbol

Regarding graphic design, one of the most commonly used symbols is the heart. The heart symbol is universally recognized as a symbol of love, especially romantic love, affection, and emotion. It is used in various design projects, from Valentine’s Day cards to wedding invitations, and even in logos and branding.

However, finding high-quality heart symbols or icons can be a challenge, especially if you are looking for vectors that are free to download.

That is why we have compiled a list of 50+ high-quality heart symbol vectors available for free download.

heart symbol

This set of icons in various styles, including outline, filled, and a combination of both. They are all available in one file and pdf format, making them easy to edit and customize.

These heart vectors are perfect for adding a personal touch to your designs. Whether you are designing a Valentine’s Day card, a wedding invitation, or a logo, these vectors are sure to add a touch of love and emotion to your designs.

It is also often used in combination with other design elements to create a visually appealing and meaningful design. So go ahead and download these vectors and let your creativity run wild!

In conclusion, the heart symbol is a versatile and widely used symbol in graphic design. The 50+ heart symbol vectors that we have shared are all free to download and use, making it easier for you to incorporate this symbol into your designs. We hope that these vectors will inspire you and help you create designs that will leave a long-lasting impression.

Also, check the recent article about the combination mark logo here and lettermark logo here.

If you want to make any customized icons then contact us now.

To get the Heart Symbol – & copy the love emoji click here.


Best-ergonomic-chair-for-a-graphic-designer

The best ergonomic chair for a graphic designer

Table of Contents

Ergonomic Chair?

An ergonomic chair is a type of chair that is designed to provide maximum comfort and support to the user, while also promoting good posture and reducing the risk of injury or discomfort. These chairs are typically adjustable in a variety of ways, including seat height, backrest angle, and armrest height, to accommodate a wide range of body sizes and shapes. They may also include features such as lumbar support, adjustable headrests, and breathable materials to further enhance comfort and support. These chairs are commonly used in offices, but can also be used in homes, schools, and other settings where people sit for extended periods of time.

Ergonomic?

Ergonomic refers to the design of objects, equipment, systems, or environments that are intended to optimize human performance and well-being. This involves considering the physical and cognitive capabilities and limitations of people in order to create products or systems that are comfortable, efficient, and safe to use. Ergonomics can be applied to a wide range of settings, including workplaces, homes, transportation systems, and consumer products.

As a graphic designer, why should one buy an ergonomic chair?

As a graphic designer, you likely spend long hours sitting at your desk working on a computer, which can lead to discomfort and pain if you are not properly supported. Investing in an ergonomic chair can provide several benefits that can improve your work performance and overall well-being. Here are some reasons why you, as a graphic designer, should consider buying an ergonomic chair:

1. Comfort: An ergonomic chair can help to reduce discomfort and fatigue, which can be caused by prolonged sitting. By providing proper support for your back, neck, and arms, an ergonomic chair can help you to stay comfortable throughout the day, allowing you to focus on your work.

2. Improved posture: To seat in a poorly designed chair can cause you to adopt a bad posture, which can lead to back pain and other issues.

3. Increased productivity: When you are comfortable and not distracted by discomfort or pain, you are better able to focus on your work, which can increase productivity. An ergonomic chair can help you to stay focused and productive throughout the day.

4. Reduced risk of injury: Poorly designed chairs can cause musculoskeletal disorders, such as carpal tunnel syndrome, tendonitis, and neck and back strain. An ergonomic chair can reduce the risk of these types of injuries by providing proper support and reducing the strain on your body.

5. Aesthetics: Ergonomic chairs are available in a variety of styles and colors, so you can choose one that complements your workspace and reflects your personal style.

6. Customizable: Many ergonomic chairs come with customizable features, such as adjustable seat height, backrest angle, and armrest height. This allows you to adjust the chair to fit your body and your working style, so you can work comfortably for longer periods of time.

7. Durability: Ergonomic chairs are often designed with high-quality materials that are durable and long-lasting. This means that you can use the chair for years without worrying about wear and tear.

8. Health benefits: By sitting for long periods of time can have negative effects on your health, including an increased risk of obesity, diabetes, and heart disease. An ergonomic chair can help to reduce these risks by promoting movement and good posture.

9. Reduced stress: Sitting in an uncomfortable chair can cause stress on your body, leading to tension and pain. An ergonomic chair can help to reduce stress by providing proper support and reducing pressure on your joints.

10 Investment: While ergonomic chairs may be more expensive than traditional chairs, they are an investment in your health and well-being. By providing proper support and reducing the risk of injury, an ergonomic chair can save you money in the long run by reducing healthcare costs and lost productivity due to injury or discomfort.

Some worthwhile ergonomic chair recommendation

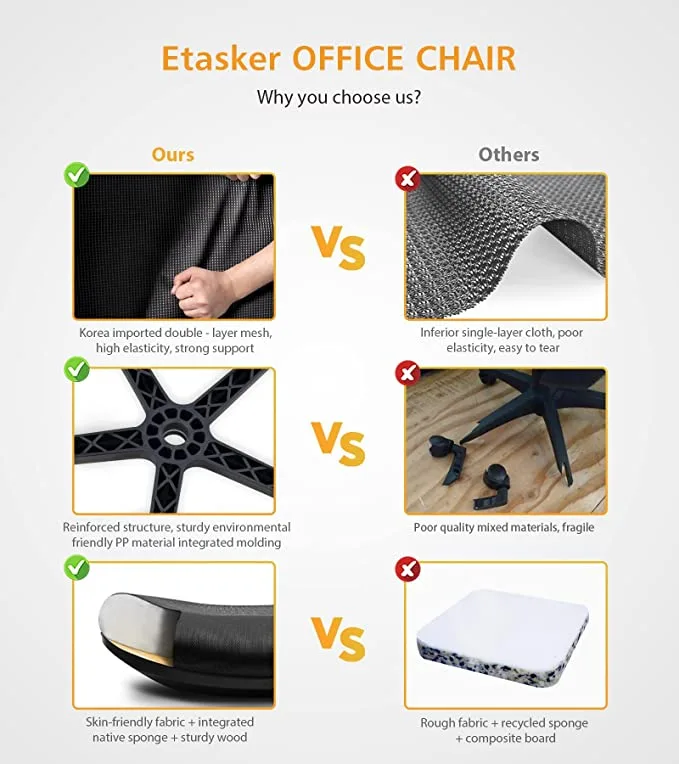
1. ETasker Ergonomic Office Chair

Ergonomic chair

The ETasker Ergonomic Office Chair is a type of ergonomic chair designed to provide comfort and support for individuals who spend long hours sitting at a desk. Some of the key features of the ETasker chair include:

1. Adjustable seat height: The ETasker chair has an adjustable seat height that allows users to adjust the height of the chair to fit their body and work surface.

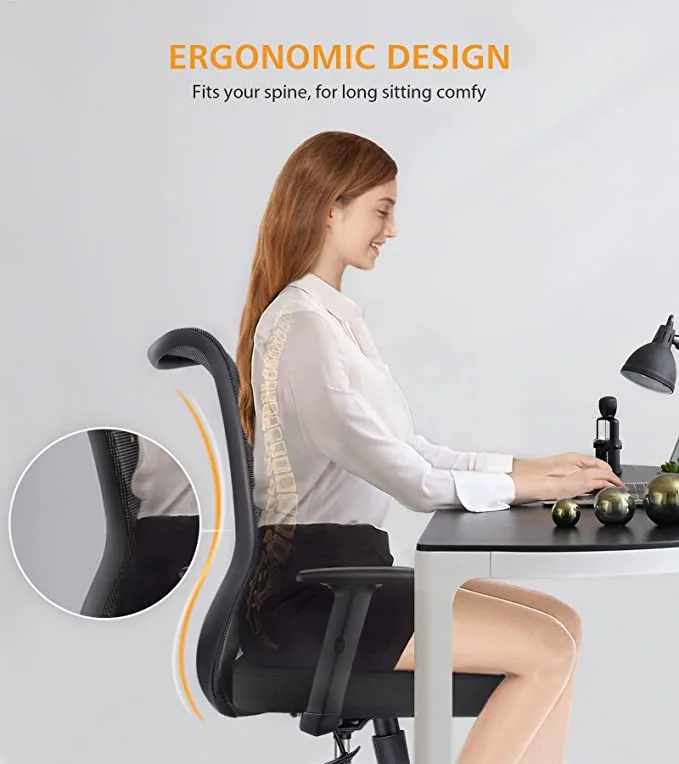
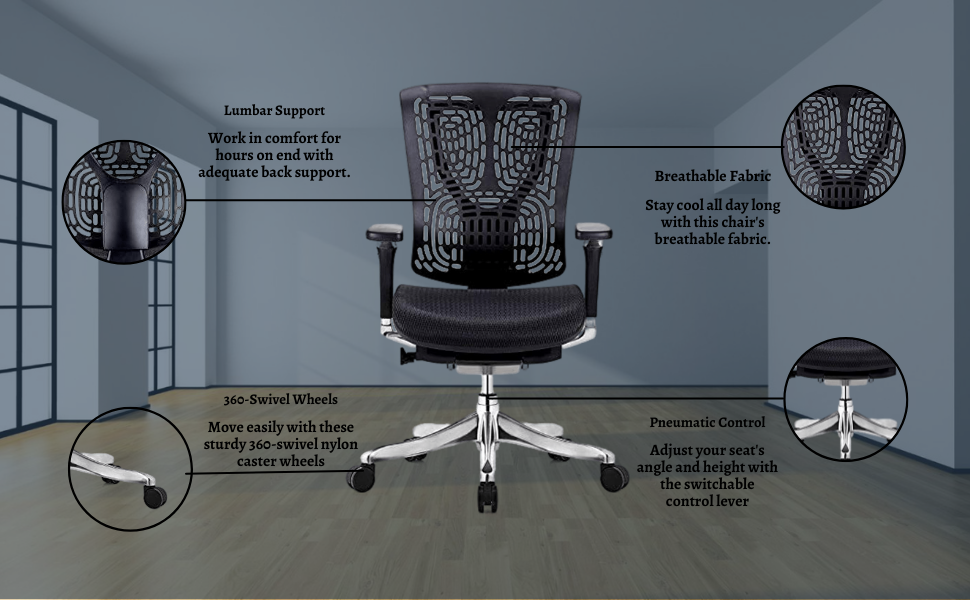
2. Lumbar support: The chair also has built-in lumbar support that helps to reduce stress on the lower back and promote good posture.

3. Breathable mesh backrest: The backrest of the ETasker chair is made of breathable mesh material that promotes airflow and helps to keep the user cool and comfortable.

4. Adjustable armrests: The chair has adjustable armrests that can be moved up or down to provide support for the user’s arms and shoulders.

5. Tilt and recline functions: The ETasker chair has a tilt and recline function that allows users to adjust the chair’s angle and position for optimal comfort and support.

Ergonomic chair
Best ergonomic chair

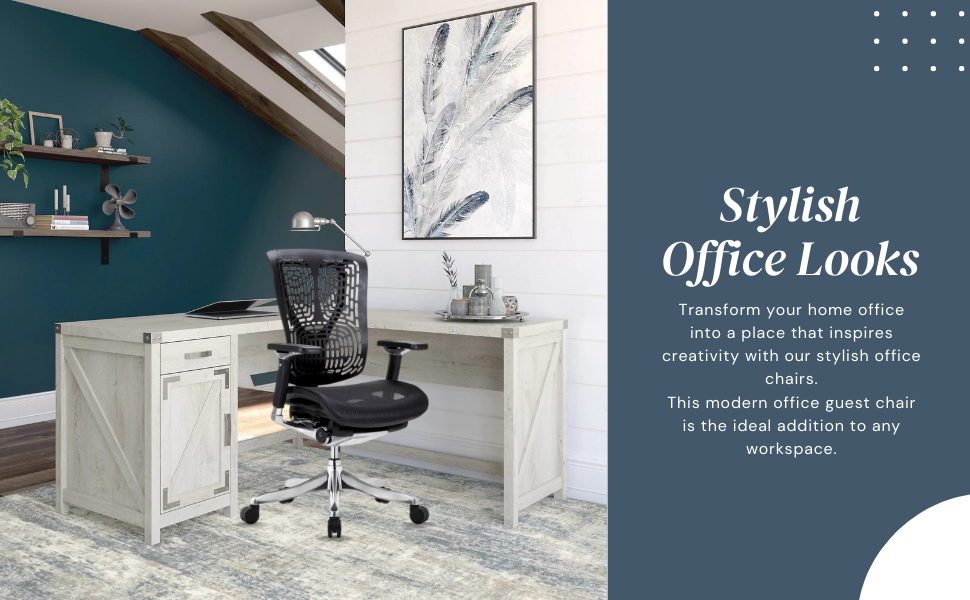
6. Suitable for multi-scene: Not only are our office chairs ergonomic, but they are also aesthetic. Linen gray breathable mesh with a black frame adds style to any office and room. The shape and color are unique on the market. Etasker computer desk chair is the best gift choice for office workers, friends, or students, as an office chair, conference chair, or study chair.

7. Premium office chair: Our home office desk chairs are certified by BIFMA. You need a sturdy chair, not a one-month chair. the excellent quality office chair, we promise 10 years warranty. The seat cushion is molded from a whole piece of foam instead of a cheap re-bonded sponge. Support 300lbs, widened frame, solid five-star base, and cylinder offer more reliability.

8. Comfortable Desk chair: Soft cushion, skin-friendly fabric, and breathable mesh offer a cool comfortable sitting for at least 10 hours. Our ergonomic office chair clearance has height adjustment, 360°swivel, and 90-130°synchronous tilt. PU armrests have 11 height adjust to support arms. Quiet universal rolling wheels are smooth, providing freedom of movement and the convenience of communicating with others.

9. Easy to assemble: Our ergonomic mesh computer chair is easy to assemble and set up, you can complete it in 10 minutes following the installation video. If you have any questions, feel free to contact our customer service. This office desk chair is suitable for offices, living rooms, bedrooms, dens, and more. It will make your space more modern and elegant.

Overall, the ETasker Ergonomic Office Chair is designed to provide users with a comfortable and supportive sitting experience that promotes good posture and reduces the risk of discomfort or injury associated with long periods of sitting.

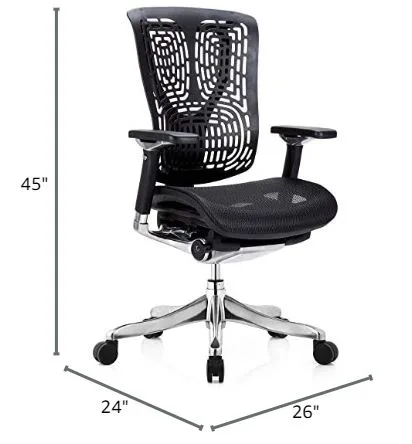
2. GM Seating Ergobilt High-Back Ergonomic Office Chair

Best ergonomic chair

1. Ergonomic Office Chair: The ergonomic chair provides four support points: head, back, hips, and arms. GM Seating designs ergonomic chairs to meet different needs, with seat height, lumbar support, and back support adjustments suitable for long sitting and reducing pain.

2. Breathable Mesh: The mesh back on this office chair provides support while keeping your back cool and comfortable. Air circulates through the mesh, keeping your back sweat-free and allowing you to sit comfortably in the mesh chair for longer periods as compared to traditional chairs.

3. Easy Adjustable Armrest: This ergonomic chair for the home office easily adjusts to your individual body size with height, width, and angle adjustable armrests to help provide you with stability and obtain the perfect ergonomic positioning for your arms. The desk chair’s large support surface fully supports your arms.

ergonomic chair
ergonomic chair
ergonomic chair
Best ergonomic chair
ergonomic chair
ergonomic chair

4. Multi-Function & Sturdy Construction: Smooth dual-wheel rolling casters offer a versatile range of mobility, support 360° swivel freely, and move very easily. GM Seating office chair offers an aluminum chrome base that provides sturdy construction and ensures long-term use.

5. Easy to Install: Simple instructions enable anyone to put this executive chair together in simple steps. The instructions are very easy to follow you just need to count a few screws and bolts, and you can assemble it. You can easily find an ergonomic position that will allow you to work comfortably.

6. Adjustable headrest: The chair has an adjustable headrest that can be positioned to provide support for the neck and head.

7. Synchronized tilt: The chair has a synchronized tilt mechanism that allows the seat and backrest to move together when reclining, providing better support and reducing pressure on the lower back.

6. Adjustable headrest: The chair has an adjustable headrest that can position to provide support for the neck and head.

7. Synchronized tilt: The chair has a synchronized tilt mechanism that allows the seat and backrest to move together when reclining, providing better support and reducing pressure on the lower back.

8. Seat depth adjustment: The chair has a sliding seat depth adjustment feature that allows users to adjust the depth of the seat to accommodate their leg length.

Overall, the GM Seating Ergobilt High-Back Ergonomic Office Chair is a well-constructed and highly adjustable chair that can provide users with a comfortable and supportive sitting experience for extended periods of time. Its additional features such as the adjustable headrest, synchronized tilt, and seat depth adjustment make it a great choice for individuals who require additional support or customization options.

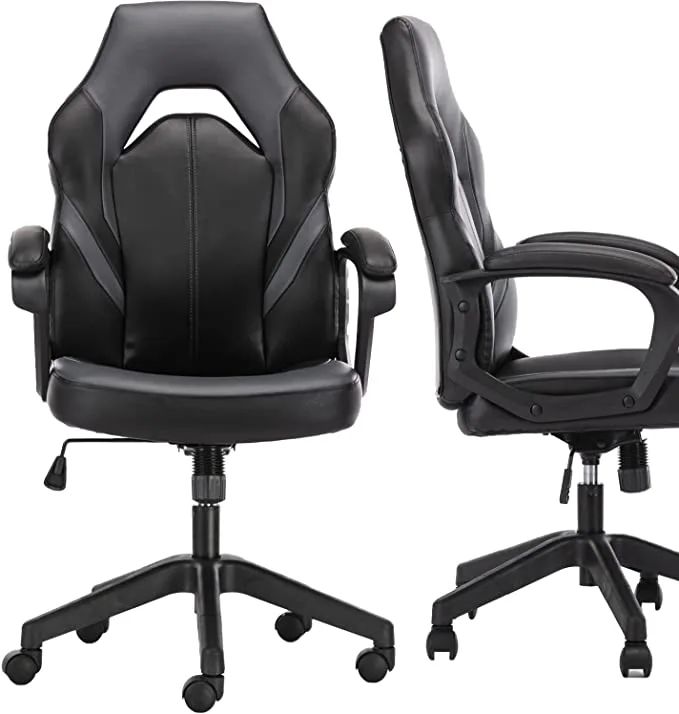
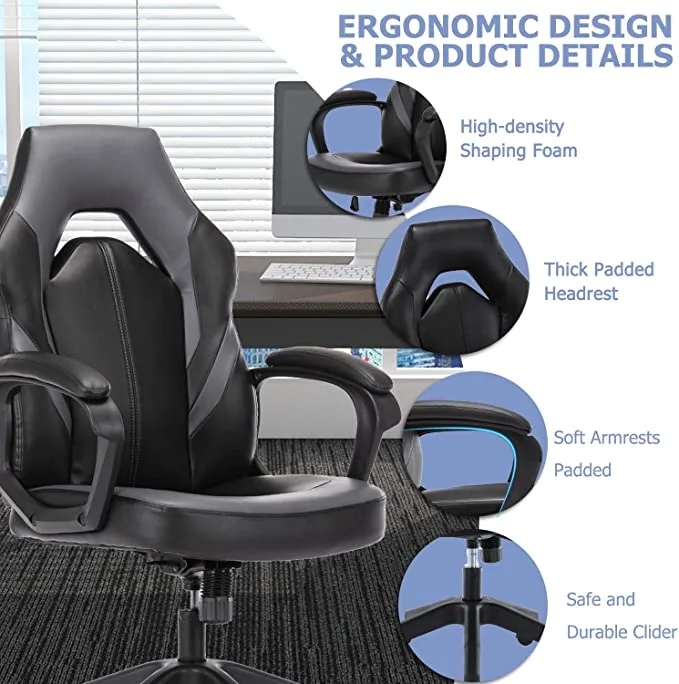
3. Office Chair, Ergonomic High Back Computer Chair

1. Swing Mode, this chair has adjustable tilt tension, allowing you to adjust the resistance to suit your movements and weight. The adjustable and lockable rock function increases the stability and control of different sitting positions. To adjust the tilt tension, turn the knob under the seat to increase or decrease the resistance.

2. Adjustable seat height, the seat height adjust from 19 inches to 21.5 inches to match tables of different heights. When idle, the chair can also adjust to the lowest height and place under the table to save space.

3. Premium leather, thickened headrest position, and lumbar support provide ample support for your back. The ergonomic back design allows your back to fully wrap and support, and no longer bear extra cervical pressure. The thick elastic seat cushion will keep you from getting tired even if you sit for more than 8 hours a day.

4. The metal-plated five-star base ensures safety and stability, is more reliable and sturdy, and the maximum load-bearing capacity can reach 250 pounds. 360-degree swivel, smooth-rolling casters for excellent stability and mobility.

5. The chair has a synchrony-tilt mechanism that allows the seat and backrest to move together when reclining, providing better support and reducing pressure on the lower back.

Also, check the recent article about best laptop for graphic design  here.


best-laptop

Best Laptop for Graphic Design

As a graphic designer, having a powerful and efficient laptop is essential for creating stunning designs and artwork. A slow and outdated machine can lead to frustration, wasted time, and even lost business opportunities. Here are a few reasons why an efficient laptop is required for graphic design:

1. Performance: Graphic design software such as Adobe Photoshop, Illustrator, and InDesign require significant processing power to run smoothly. A laptop with a fast processor, high RAM, and a dedicated graphics card can ensure that the software runs efficiently, reducing lag time and allowing for smooth workflow.

2. Display Quality: A high-quality display is essential for graphic designers. A laptop with a high-resolution display and accurate color reproduction is necessary to ensure that designs and artwork appear as intended. Additionally, a larger display can allow for easier multitasking, enabling designers to work on multiple projects simultaneously.

3. Portability: As a graphic designer, you may need to work remotely or from various locations. An efficient laptop that is portable and lightweight can allow for easy transportation and work on the go. It also enables designers to meet clients on-site and showcase their work without any hassle.

4. Time and Productivity: A fast and efficient laptop can significantly improve productivity, saving valuable time on lengthy processes such as rendering and exporting. This can enable designers to take on more projects, meet tight deadlines, and produce high-quality work quickly.

5. Future-Proofing: Investing in an efficient laptop can future-proof your workflow, ensuring that it can handle the latest software updates and advancements. Upgrading to the latest hardware can also reduce the need for frequent replacements, saving money and reducing waste.

# From our personal user experience and deep research and analysis, we found that Apple 2021 MacBook Pro is the best laptop option for Graphic design work. Let’s provide a more in-depth look at some of the key features that make the Apple 2021 MacBook Pro as best laptop and an attractive option for graphic designers :

⭐ One of the most impressive features of the MacBook Pro is its M1 Pro chip, which provides unrivaled performance and power. The 10-core CPU and 16-core GPU work together to deliver lightning-fast speed and responsiveness, allowing graphic designers to work seamlessly with even the most demanding software.

  • The M1 Pro chip is built on a 5-nanometer process and includes a unified memory architecture that allows the CPU and GPU to share memory, providing fast and efficient access to data. This integration allows the MacBook Pro to deliver powerful and responsive graphics performance, even when working with large files or running multiple programs simultaneously.
  • The 16-core GPU includes a mix of high-performance and energy-efficient cores, allowing it to deliver exceptional graphics performance while also conserving battery life. This means that graphic designers can work for longer periods without needing to plug in their MacBook Pro.
  • The MacBook Pro’s GPU also includes hardware acceleration for machine learning tasks, making it an excellent choice for designers who work with AI-powered tools or want to explore machine learning themselves.
 laptop
 laptop

⭐ This power is especially important for graphic designers who need to work with large files and complex designs. With the MacBook Pro’s 16GB of RAM and 512GB SSD, designers can work with multiple programs and files simultaneously without any lag or slowdowns.

⭐ The MacBook Pro’s 16-inch Retina display is also a standout feature. With a resolution of 3072×1920 and True Tone technology, the display delivers stunning visuals with accurate color representation. This is crucial for graphic designers who need to work with precise colors and details.

Best laptop

⭐ The MacBook Pro’s design is also sleek and stylish, as we have come to expect from Apple. Its thin and lightweight body makes it easy to carry to and from work, and the all-metal finish provides a premium look and feel. The inclusion of a range of ports, including an HDMI port and an SDXC card slot, also makes it easier for graphic designers to connect their devices and peripherals.

⭐ Additionally, the MacBook Pro’s Touch ID sensor and T2 security chip provide enhanced security for sensitive data. With Touch ID, designers can quickly and securely log in to their device, while the T2 chip encrypts data on the device’s storage, keeping it safe from potential breaches.

⭐ Finally, the MacBook Pro’s long battery life of up to 11 hours of web browsing or up to 21 hours of video playback is a significant advantage for graphic designers who need to work on the go. With this much battery life, designers can work for an entire day without needing to recharge.

Best laptop
Best laptop

In conclusion, the Apple 2021 MacBook Pro is a powerful and stylish machine that is an excellent choice for graphic designers. Its M1 Pro chip, stunning display, efficient memory and storage, versatile ports, and portability make it an attractive option for professionals who demand the best performance from their devices. Whether you’re a freelance designer or part of a design team, the MacBook Pro is absolutely best laptop for an investment that will pay off in terms of productivity and creativity.

Also, check the recent article about best budget friendly processor for graphic design here.


payoneer

Payoneer: The best payment gateway provider

# Payoneer:

Payoneer is a digital payment platform that offers financial services for businesses and individuals worldwide. Founded in 2005, the company has grown to become one of the most trusted payment solutions in the industry. It offers a range of payment services, including cross-border payments, merchant services, and working capital.

# Some key benefits of using Payoneer as a digital payment gateway:

1. Ability to facilitate cross-border payments. With Payoneer, businesses and individuals can easily send and receive payments from anywhere in the world. This is particularly helpful for freelancers, online merchants, and other professionals who work with clients or partners located in different countries. Payoneer makes it easy to receive payments in different currencies and convert them into your local currency at competitive rates.

2. With Payoneer, businesses can easily accept payments from customers around the world. This includes support for popular payment methods such as credit cards, bank transfers, and e-wallets. Payoneer also offers a range of tools to help businesses manage their payments, including invoicing, payment tracking, and reporting.

3. Payoneer also offers working capital solutions. This includes loans and lines of credit that can help businesses manage cash flow and invest in growth opportunities. Payoneer’s working capital solutions are designed to be flexible and customizable, so businesses can choose the financing options that best meet their needs.

4. Payoneer strongly focus on security and compliance. Payoneer is regulated by multiple financial authorities and adheres to strict security protocols to protect customer data and transactions. Payoneer also offers 24/7 customer support to help customers with any questions or concerns they may have. Payoneer offers two-factor authentication (2FA) as an additional layer of security to protect user accounts from unauthorized access.

5. This payment service provider offers competitive rates for cross-border payments and currency conversions, which can save businesses and individuals a significant amount of money compared to traditional banking or payment methods. Payoneer’s fees are transparent and easy to understand, so you always know exactly what you’re paying for.

6. Easy setup process. Signing up for a Payoneer account is quick and straightforward. You just need to follow just couple of steps to complete and verify the account.

7. It offers a range of value-added services to help businesses and individuals manage their finances more effectively. This includes features such as the ability to pay suppliers and vendors directly through Payoneer, the ability to receive payments in multiple currencies, and the ability to manage your funds and transactions from a single dashboard.

8. One of the unique features of Payoneer is its Global Payment Service. This service allows businesses and individuals to receive payments from companies and clients in different countries, without incurring high fees or delays. With the Global Payment Service, you can receive payments in local currencies from companies such as Amazon, Google, and Airbnb, as well as from clients and customers around the world.

9. Payoneer also offers a range of mobile and web-based tools to help you manage your finances on-the-go. This includes the Payoneer mobile app, which allows you to view your account balance, track transactions, and receive push notifications about payments and other important events. Payoneer’s web-based dashboard also provides detailed reports and analytics to help you better understand your finances and make informed decisions about your business.

10. Payoneer also offers a prepaid MasterCard that can be used for online and offline purchases, as well as cash withdrawals at ATM’s worldwide. The Payoneer card is a great option for individuals and businesses that need easy access to their funds, without the need to transfer money to a bank account.

One of the advantages of the Payoneer card is that it can be used in any country that accepts Mastercard. This makes it a convenient option for frequent travelers, freelancers, and online merchants who need to make purchases or withdraw cash in different currencies. The Payoneer card also offers competitive exchange rates, which can save you money compared to using a traditional bank card for international transactions.

The Payoneer card can be ordered directly from your Payoneer account, and is shipped to your address within a few days. Once you receive your card, you can activate it online and start using it immediately. The Payoneer card is also compatible with popular digital wallets such as Amazon merchant Pay, Google Pay and Apple Pay, making it even more convenient to use.

One of the benefits of using the Payoneer card is that it offers advanced security features to protect your funds and transactions. This includes the ability to lock and unlock your card by security code and (2FA), set transaction limits, and receive real-time notifications for every purchase or withdrawal. Payoneer also offers 24/7 customer support to help you with any issues or concerns you may have with your card.

11. In addition to the prepaid card, Payoneer also offers a virtual card that can be used for online purchases and transactions. One of the main benefits of using the Payoneer virtual card is enhanced security.

payment

When you make a payment using your virtual card, your personal and financial information is kept private and secure. This is because the virtual card is not tied to your personal bank account, but rather to your Payoneer account, which is protected by advanced security features such as two-factor authentication and biometric login.

The Payoneer virtual card can be easily managed through your online Payoneer account. You can view your virtual card details, track your transactions, and monitor your balance in real-time. You can also easily block or delete virtual cards if needed.

The virtual card can be used to make purchases from any online merchant that accepts Mastercard. This includes popular e-commerce platforms such as Amazon, eBay, and Shopify, as well as smaller retailers and service providers. The virtual card can also be used to pay for online subscriptions and services, such as web hosting and software.

payoneer

# Some key advantages of using Payoneer as a Graphic Designer :

1. Easy and secure payment processing: Payoneer allows graphic designers to receive payments from clients in a quick and secure manner. With Payoneer, you can easily send and receive payments in multiple currencies, which can be helpful if you work with clients from different countries.

2. Low transaction fees: Payoneer offers competitive transaction fees compared to other payment gateways, which can help graphic designers save money on payment processing.

Payoneer

3. Multiple payment options: Payoneer offers various payment options such as bank transfer, local e-wallets, and prepaid Mastercards, which can be useful for graphic designers who need to receive payments in different ways.

4. Faster access to funds: With Payoneer, you can access your funds quickly and easily, which can be helpful if you need to pay for expenses such as software licenses, hardware upgrades, or other business-related expenses.

5. Integration with popular freelance platforms: Payoneer is integrated with various freelance platforms such as Upwork, Fiverr, Freelancer.com, Adobe, Shutterstock, Designhill, 99design and many more. which can be helpful for graphic designers who work on these platforms.

Overall, Payoneer has proven to be a reliable and efficient payment processing solution for businesses and individuals looking to conduct transactions across borders. With its extensive range of services, competitive pricing, and strong focus on security, Payoneer is a valuable asset for anyone looking to expand their global reach and streamline their payment processing.

Is Payoneer safe?

Yes, Payoneer takes security very seriously. They use advanced encryption and fraud detection technology to protect your personal and financial information.

What currencies does Payoneer support?

Payoneer supports over 150 currencies, including USD, EUR, GBP, AUD, and CAD.

Can I use Payoneer for e-commerce payments?

Yes, Payoneer has a service called “Payoneer for E-commerce” that allows you to receive payments from marketplaces like Amazon, Etsy, and eBay.

How long does it take to receive funds through Payoneer?

The time it takes to receive funds through Payoneer depends on the type of transaction and the country you are in. In general, it can take anywhere from a few hours to a few days for funds to be transferred.

Where I found Payoneer live chat support option?

To access the live chat option on Payoneer, Click here.

Also, check the recent article about best micro stock site for contributors here.


frame

Best gallery frame design for your Vector artwork

Selecting the right gallery frame design for your vector artwork is an important step in creating a visually stunning and cohesive display. By considering the style, color scheme, size, and orientation of your artwork, as well as the materials and construction of the frame, you can create a display that showcases your artwork to its fullest potential.

Wall and tabletop gallery frames are a classic and versatile home decor accessory that can enhance the beauty of your home and showcase your cherished memories and artwork. Whether you prefer a traditional, ornate style or a modern, minimalist design, there is a picture frame that will complement your personal style and add a personal touch to your home decor.

It is important to consider the quality of the materials and construction. Look for frames that are made from durable materials and have a solid construction. Cheap frames may seem like a bargain, but they may not last as long or provide the same level of protection for your photos or artwork.

Tabletop frames are perfect for displaying small artwork, such as those from a special occasion or vacation. These frames can place on a desk, mantel, or shelf, adding a personal touch to your home decor. Like wall frames, tabletop frames come in a variety of materials, including wood, metal, and acrylic. Some tabletop frames even have a built-in stand, allowing you to display your photos in either a horizontal or vertical orientation.

For dimension, A square frame is ideal for both Wall and tabletop gallery design. One of the key benefits of a square gallery frame is its balanced and symmetrical design. The square shape provides a sense of stability and harmony that can help to draw the eye to your artwork. It is also a great choice for creating a cohesive display when used in combination with other square frames.

Square gallery frames are available in a range of sizes and materials, allowing you to choose the perfect frame for your artwork or photo. Some popular materials for square gallery frames include wood, metal, and acrylic. Each material has its own unique characteristics, so it is worth considering which option will work best with your artwork or photo.

Another factor to consider when choosing a square gallery frame is the mat board. A mat board can add depth and dimension to your artwork, as well as providing a buffer between the artwork and the frame itself. Mat boards are available in a range of colors, from classic white and black to more vibrant shades, allowing you to customize the look of your frame to suit your personal style.

When it comes to hanging your square gallery frame, it is important to ensure that the frame is securely mounted to the wall. Depending on the size and weight of your frame, you may need to use additional hardware such as anchors or screws to ensure that it is properly supported.

Here are the example of perfect square gallery frame design:

The frame measures 3/4 inch wide and 1 1/8 inch deep, providing a subtle border that draws the eye to your artwork without overwhelming it. The slim profile also makes it easy to group multiple frames together, creating a cohesive display that is perfect for a gallery wall. This Gallery Frame is its high-quality construction.

The frame is made from solid wood, which provides durability and strength. The black finish is applied with a special technique that gives the frame a smooth and even look, while also protecting it from scratches and wear. The Gallery Frame also comes with a high-quality mat board, which adds depth and dimension to your artwork .

The mat board is available in a variety of colors, including white, black, and cream, allowing you to customize the look of your frame to suit your personal style and preferences. However, it is easy to add your own hanging hardware or to use the built-in easel back to display your frame on a tabletop or shelf.

Color Variation:

Tabletop View:

Back-view built-in hanging kit:

This Square Gallery Frame is a beautiful and versatile frame design that is perfect for displaying your artwork or photos. Its slim profile and high-quality construction make it a great choice for those who want a frame that will enhance their artwork without overpowering it. So, whether you are a professional artist or just looking to display some cherished artwork memories this frame is definitely worth considering.


book

Essential books to learn graphic design

Graphic design is an exciting and dynamic field that involves the use of visual communication to convey information and ideas. Whether you are a complete beginner or an experienced designer, there are many essential books that can help you develop your skills and stay up-to-date with the latest trends and techniques.

Here are some of the essential books to learn graphic design:

graphic design book

1.Design Elements, Third Edition: Understanding the rules and knowing when to break them – A Visual Communication Manual by Timothy Samara

The book covers a broad range of topics, from typography to color theory and composition. It provides clear and concise explanations of each concept, accompanied by visual examples and case studies.

One of the strengths of this book is its emphasis on understanding the rules of design and knowing when to break them. It highlights the importance of following design principles, such as balance, contrast, and hierarchy, but also encourages designers to experiment and push the boundaries of traditional design.

Another notable feature of this book is its focus on practical application. Each chapter includes exercises and projects that allow readers to apply the concepts they have learned to real-world design scenarios.

The book is well-organized and easy to navigate, with clear headings and subheadings that make it easy to find specific information. It is also beautifully designed, with plenty of visual examples that illustrate the concepts being discussed.

To find out this book

2.Design Better and Build Your Brand in Canva by Laura Goodsell

This book is for aspiring designers, social media managers, VAs, service-based businesses and solopreneurs with basic experience in Canva, who are looking to advance in a new skill, while creating their brand and perfecting their social and marketing materials on a budget. A basic understanding of Canva, including setting up a free Canva account, creating a basic design using a template, adding images and text boxes and changing the color of fonts will be helpful but not essential.

To find out this book

3. Made by James: The Honest Guide to Creativity and Logo Design by James Martin

Martin’s approach is based on the idea that design should be driven by a clear understanding of the client’s needs and the audience they are trying to reach. He emphasizes the importance of research and collaboration in the design process, and provides numerous examples of how he has worked with clients to create successful designs.

One of the strengths of the book is its focus on the role of creativity in the design process. Martin argues that creativity is not just about coming up with flashy or clever ideas, but about finding simple and effective solutions to complex design problems. He provides practical exercises and tips for developing your creative skills, such as keeping a sketchbook and seeking out inspiration in unexpected places.

The book also includes a section on logo design, which provides a step-by-step guide to the process of creating a memorable and effective logo. Martin emphasizes the importance of simplicity and versatility in logo design, and provides numerous examples of successful logos and the thinking behind their creation.

To find out this book

4. Creating a Brand Identity: A Guide for Designers: (Graphic Design Books, Logo Design, Marketing) by Catharine Slade

The book covers a wide range of topics related to brand identity, including the importance of research, creating a visual identity system, and developing brand guidelines. It also includes case studies and examples of successful brand identities, providing practical insights into the design process.

One of the strengths of the book is its emphasis on the strategic aspects of brand identity. Slade-Brooking argues that a successful brand identity is not just about creating a visually appealing logo or website, but about developing a clear and consistent message that resonates with the target audience.

She provides practical tips for conducting research, developing a brand strategy, and creating messaging that communicates the brand’s values and personality.The book also includes a section on the visual elements of brand identity, such as color, typography, and imagery. Slade-Brooking provides guidance on creating a visual identity system that is flexible, scalable, and consistent across all touch-points.

To find out this book

graphic design book

5. The History of Graphic Design. Vol. 2. 1960–Today by Jens Müller and Julius Wiedemann

The book is organized chronologically and provides a detailed overview of the key movements, designers, and works that have shaped graphic design in the modern era. It covers a wide range of styles and approaches, from Swiss Style and postmodernism to digital design and the rise of social media.

One of the strengths of the book is its emphasis on the social and cultural context in which graphic design has evolved. The authors provide insights into the political and social movements that have influenced design, as well as the technological advancements that have enabled new forms of expression and communication.

The book is also richly illustrated, with hundreds of full-color images of design work from around the world. Each chapter includes profiles of key designers and studios, as well as interviews and essays that provide additional context and insights.

To find out this book

6. Logo Modernism by Jens Müller

The book is a multilingual edition, featuring text in English, German, and French. It is divided into three main sections: Geometric, Effect, and Typographic, each of which explores a different aspect of Logo Modernism.

The Geometric section focuses on logos that use simple shapes and forms, while the Effect section features logos that use optical illusions and other visual effects to create a sense of depth and dimensional. The Typographic section explores the use of typography in logo design, including the use of sans-serif typefaces and grid layouts.

The book also includes essays by leading design experts, as well as interviews with some of the key designers associated with Logo Modernism, such as Paul Rand, Ivan Chermayeff, and Tom Geismar.

It is a comprehensive and visually stunning survey of the Logo Modernism movement, featuring over 6,000 logos and trademarks from the period between 1940 and 1980.

To find out this book

logo design

In conclusion, these are just some of the essential books to learn graphic design. Whether you are a beginner or an experienced designer, these books can help you develop your skills and stay up-to-date with the latest trends and techniques in the field. So, if you want to be a graphic designer invest in a few of these books, and start building your skills and knowledge today.


sutterstock

Shutterstock : Best Micro Stock site for contributors

From our deep research and analysis, we found that Shutterstock is best platform for the contributors.

Shutterstock Contributor is a platform that allows graphic designers, photographers and videographers to sell their work online. With millions of customers around the world, it offers a huge potential market for creative professionals looking to monetize their work. In this article, we’ll explore everything you need to know about becoming a Shutterstock Contributor and how you can make the most of this platform.

What is Shutterstock?

Shutterstock is a stock image, graphics, and video marketplace that provides licensed digital content to businesses, media organizations, and individuals. Besides, it offers a vast collection of high-quality images, vectors, videos, and music that can be licensed for commercial use.

What is Shutterstock Contributor?

Shutterstock Contributor is a platform that allows graphic designers, photographers and videographers to upload and sell their work on the Shutterstock marketplace. As a contributor, you’ll earn a percentage of each sale made on the platform. This platform offers a user-friendly interface for managing and organizing your content, as well as automated key wording and categorization systems that help improve the visibility and discoverability of your work.

How to Become a Shutterstock Contributor?

Becoming a contributor is a simple process. First, you’ll need to create an account on the Shutterstock Contributor website. You’ll be required to provide basic personal information, such as your name, email address, and country of residence. Once you’ve created your account, you can start uploading your photos and videos.

Before you start uploading your work, make sure to read and understand Shutterstock’s Contributor Agreement and Content Guidelines. These documents outline the rules and requirements for submitting content to the platform. Make sure your work meets the technical and aesthetic standards outlined in the guidelines to avoid rejections and ensure your work sells well.

How Much Money Can You Make on Shutterstock Contributor?

As a contributor, you’ll earn a percentage of each sale made on the platform. The exact percentage you’ll earn depends on your contributor level, which is determined by your total earnings and the number of downloads you receive. The more you sell, the higher your contributor level, and the more money you can make. For standard licenses, contributors earn 15% of the sale price and for enhanced licenses, contributors earn 20% of the sale price. This also offers incentives for exclusive contributors who sell their work only on Shutterstock . Besides, Exclusive contributors can earn up to 40% of the sale price.

✦How to Upload Photos and Videos to Shutterstock Contributor?

Uploading your work to contributor is a straightforward process. Once you’ve logged in to your account, navigate to the “Upload” tab and select the media type you want to upload (photos or videos). You can then drag and drop your files or select them from your computer. Shutterstock Contributor will automatically analyze and add metadata to your files to make them easier to discover.

✦Tips for Selling Your Photos and Videos on Shutterstock Contributor

Here are some tips to help you make the most of your contributor account:

1. Upload regularly: The more content you upload, the more potential sales you can make. Try to upload weekly basis.

2. Focus on quality over quantity: Make sure your photos and videos are high-quality and meet the technical and aesthetic standards outlined in Shutterstock’s guidelines.

3. Research popular and trending topics: Look for trends and popular themes in the market and create content that caters to those trends.

4. Use relevant keywords: Make sure to add relevant and descriptive keywords to your files to make them easier to discover.

5. Use appropriate tittle : Tittle should be interconnected with the content.

6. Promote your work: Share your Shutterstock portfolio on social media and other platforms to attract potential buyers.

Moreover, becoming a Shutterstock Contributor is an excellent way to monetize their work. With the tips and strategies outlined in this article, you can increase your chances of success on the platform and make the most of your Shutterstock account. Start uploading your work today and begin your journey as a Shutterstock Contributor.


graphic design monitor

Best budget-friendly monitor for graphic design

There are several budget-friendly monitors that are suitable for graphic design, depending on your specific needs and preferences but after deep research and personal experience here we listed the top two monitors that are not only budget-friendly but also ideal for graphic design work.

Rank 1. Dell Ultrasharp U2415 24-Inch Screen LED-Lit Monitor

When it comes to graphic design, having a high-quality monitor is essential. The Dell Ultrasharp U2415 is a popular option for those who need a reliable and accurate display at an affordable price point.

1. Design and Build Quality:

The Dell Ultrasharp U2415 has a sleek and modern design that will look great on any desk. The monitor has a thin bezel that measures just 6.9mm, which makes it ideal for multi-monitor setups. The monitor stand is adjustable and allows you to tilt, swivel, and pivot the screen, making it easy to find the perfect viewing angle.The monitor is made of high-quality materials and feels sturdy and durable. The screen is coated with an anti-glare layer that reduces reflections and makes it easier to work for extended periods without eye strain.

2. Display:

The Dell Ultrasharp U2415 has a 24-inch IPS display with a resolution of 1920 x 1200 pixels. The screen has a 16:10 aspect ratio, which provides more vertical screen space than standard 16:9 monitors. The IPS panel ensures accurate colors and excellent viewing angles, making it perfect for graphic design work.The monitor has a wide color gamut that covers 99% of the sRGB color space, which is essential for accurate color reproduction. The monitor is factory calibrated, which means that it comes with pre-set color settings that are optimized for color accuracy. However, if you require even more precise color calibration, the monitor also comes with color calibration software that allows you to fine-tune the color settings.

3. Connectivity:

The Dell Ultrasharp U2415 comes with a variety of connectivity options, including two HDMI ports, a Display Port, a mini-Display Port, and a USB 3.0 hub. The USB hub has five USB 3.0 ports, which are great for connecting peripherals such as a keyboard, mouse, or external hard drive.

4. Color Accuracy and Calibration:

As mentioned earlier, the Dell Ultrasharp U2415 comes with a factory-calibrated display that provides accurate and consistent colors out of the box. The monitor’s wide color gamut covers 99% of the sRGB color space, which means that it can display a vast range of colors that are essential for graphic design work.The monitor also comes with a color calibration software called Dell UltraSharp Color Calibration Software that allows you to fine-tune the color settings according to your preferences. This software allows you to adjust the RGB values, brightness, contrast, and other settings to achieve the exact color accuracy that you require.

5. Ease of Use and Productivity:

The Dell Ultrasharp U2415 is an excellent monitor for productivity and multi-tasking. The monitor’s adjustable stand and thin bezels make it ideal for a multi-monitor setup, allowing you to create a seamless and immersive workspace.The monitor also comes with a Picture-by-Picture (PBP) feature that allows you to display content from two different sources side-by-side on the screen. This feature is useful for designers who need to compare two different designs or work on multiple projects simultaneously.

Key Features:

•The Dell Ultrasharp U2415 features a 24-inch IPS display with a resolution of 1920 x 1200 pixels, providing a high-quality image with accurate color reproduction and wide viewing angles.
• A slim bezel design, making it ideal for use in multi-monitor setups. It also features a fully adjustable stand that allows you to tilt, swivel, and adjust the height of the monitor to your desired position.
• The monitor comes equipped with a variety of ports, including HDMI, Display Port, Mini Display Port, and USB 3.0 ports, making it easy to connect to a wide range of devices.
• The Dell Ultrasharp U2415 is ENERGY STAR certified, meaning that it is designed to be energy-efficient and environmentally friendly.
• Has an anti-glare coating that helps to reduce reflections and eye strain, making it ideal for use in brightly lit environments.
• This monitor is compatible with VESA mounts, which means that you can easily mount it to a wall or desk using a VESA mount.
• The Dell Ultrasharp U2415 has a Picture-by-Picture mode that allows you to display content from two different sources side-by-side, as well as a Picture-in-Picture mode that allows you to display content from a second source in a smaller window within the main screen.


Benefits:

• IPS display provides a high-quality image with accurate color reproduction and wide viewing angles, making it ideal for tasks such as graphic design, photo editing, and video editing.
• Slim bezel design makes it easy to set up multiple monitors side-by-side, which can be especially useful for tasks that require multiple windows or applications to be open at the same time.
• The fully adjustable stand allows you to tilt, swivel, and adjust the height of the monitor to your desired position, helping to reduce eye strain and neck pain during long periods of use.
• Variety of ports available on the Dell Ultrasharp U2415 makes it easy to connect to a wide range of devices, including computers, laptops, and other peripherals.
• ENERGY STAR certification means that the monitor is designed to be energy-efficient, helping to reduce your energy bills and minimize your environmental impact.

Rank 2. ASUS ProArt Display PA248QV 24.1

If you’re a creative professional looking for a high-quality monitor that can keep up with your demanding workflow, then the ASUS ProArt Display PA248QV 24.1 is definitely worth considering. This monitor is designed with the needs of designers, photographers, and other creative professionals in mind, and it offers a wide range of features and benefits that make it a top choice for those who need accurate color reproduction, excellent image quality, and flexible connectivity options.

✦ key features and benefits

1. Accurate Color Reproduction: The monitor comes with a factory-calibrated 100% sRGB and Rec. 709 color space for accurate color reproduction, making it an ideal choice for professionals who work with color-sensitive content.

2. Wide Viewing Angle: The monitor has a 178-degree wide-view angle that ensures consistent color and brightness no matter where you are sitting, making it easy to collaborate with others.

3. Excellent Image Quality: The monitor has a 1920 x 1200 resolution, providing a large screen area for multitasking and detailed work. The IPS panel also ensures high contrast ratios and excellent color accuracy, making it a great choice for photo and video editing.

4. Flexible Connectivity Options: The monitor comes with multiple connectivity options, including HDMI, DisplayPort, DVI-D, and VGA, allowing you to connect to a variety of devices.

5. Ergonomic Design: The monitor is designed to be ergonomic with a full range of tilt, swivel, pivot, and height adjustments, ensuring that you can find the perfect viewing angle for your comfort.

6. ASUS Eye Care Technology: The monitor comes with ASUS Eye Care technology, including flicker-free technology and a blue light filter, which reduces eye strain and fatigue during long working hours.

7. Low Blue Light Certification: The monitor has received a TÜV Rheinland certification for low blue light emissions, reducing the risk of eye strain or other eye-related problems.

8. Energy-Efficient: The monitor is designed to be energy-efficient, with a low-power consumption mode that can reduce your energy costs over time.

9. ASUS ProArt Calibration Technology: The monitor comes with ASUS ProArt Calibration Technology, allowing you to calibrate your monitor with a compatible calibration device for even more accurate color reproduction.

10. Professional Design: The monitor has a professional design with slim bezels and a matte finish, making it a great choice for those who want a monitor that looks as good as it performs.

monitor

Overall, both the Dell Ultrasharp U2415 and ASUS ProArt Display PA248QV 24.1 is a high-quality monitor that offers a wide range of features and benefits for creative professionals. Whether you’re a graphic designer, photographer, or video editor, this monitor can help you to work more efficiently and effectively by providing accurate color reproduction, excellent image quality, flexible connectivity options, and ergonomic design. So if you’re looking for a top-of-the-line monitor then any of them will be worth considering.


processor

Best budget friendly processor for graphic design

Introduction

Finding the right processor is very important for graphic design. A fast CPU makes work smoother in Photoshop, Illustrator, and other design tools. But not everyone needs the most expensive option. Many budget-friendly processors can give you great speed and performance without a high price.

In this guide, we look at the best budget processors for graphic design. These CPUs are affordable, powerful, and perfect for students, freelancers, or anyone building a workstation on a budget.

The AMD Ryzen 7 5700G isn’t just for gamers—it’s an ideal choice for graphic designers, 3D artists, and creative professionals who need a fast, reliable processor for intensive design tasks. With 8 cores and 16 threads, this processor handles Adobe Creative Cloud applications (Photoshop, Illustrator, After Effects, Premiere Pro) and 3D rendering software (Blender, Maya, Cinema4D) effortlessly, giving designers a smooth workflow without lag.

Running at up to 4.6 GHz clock speed, combined with a 20MB cache, the Ryzen 7 5700G ensures fast image processing, quicker render previews, and responsive multitasking—perfect for switching between large PSD files, editing 4K video, and managing multiple design tools at once.

Its 65W TDP design balances high performance with energy efficiency, making it great for long design sessions without overheating or excessive power use. Whether you’re designing logos, creating motion graphics, or rendering 3D models, this processor provides the speed, stability, and reliability that design professionals need.

With over 9,000 glowing reviews and a top 20 best seller rank, the Ryzen 7 5700G is trusted by both gamers and creators worldwide. Backed by a 3-year manufacturer warranty and Amazon’s 30-day return policy, it’s a smart investment for any graphic designer’s workstation upgrade.

Technical Details:

SpecificationDetails
BrandAMD
Processor SeriesAMD Ryzen 7
Model NumberAMD Ryzen 7 5700G
Processor SpeedUp to 4.6 GHz
Processor SocketSocket AM4
Cores / Threads8 Cores / 16 Threads
Cache Memory Installed20 MB
Secondary Cache20 MB
Wattage (TDP)65W
Supported PlatformsLinux, Windows
Dimensions (L x W x H)1.57″ x 1.57″ x 0.1″
Weight14.5 oz
Unit Count1
Item TypeDesktop Processor
UPC / GTIN730143313377 / 00730143313377
ASINB091J3NYVF
Customer Reviews⭐ 4.8 out of 5 (9,019 ratings)
Best Sellers Rank#20 in Computer CPU Processors
Warranty3-Year Manufacturer Warranty
Return PolicyAmazon.com 30-day return policy (conditions apply)
ManufacturerAMD

Ryzen Processor Comparison for Graphic Designers:

FeatureAMD Ryzen 5 (5600G Series)AMD Ryzen 7 5700GAMD Ryzen 9 (5900X/5950X Series)
Cores / Threads6 Cores / 12 Threads8 Cores / 16 Threads12–16 Cores / 24–32 Threads
Base / Boost Clock~3.9 / 4.4 GHz~3.8 / 4.6 GHz~3.7 / 4.8 GHz
Cache Memory16 MB20 MB64 MB
TDP (Power Consumption)65W65W105W–125W
Best ForEntry-level design, photo editing, light 2D workProfessional design, 2D/3D work, video editing, multitaskingHeavy 3D rendering, animation, simulations, advanced creative suites
Adobe Photoshop / IllustratorSmooth performance for standard projectsHandles large files and multitasking with easeOverkill unless working on massive projects
Adobe After Effects / Premiere ProBasic video editing (1080p)Smooth 4K editing, motion graphicsBest for 8K workflows, long renders
3D Software (Blender, Maya, Cinema4D)Light modeling and renderingEfficient rendering & complex scene handlingUltra-fast rendering, high-poly models, pro animation
Price RangeBudget-friendlyMid-range (best value for most designers)High-end (premium pricing)
Who Should Buy?Students, hobbyists, freelancers starting outProfessional graphic designers & video editorsStudios, animators, heavy 3D professionals

✦Key Features:

•8 cores and 16 threads, providing ample processing power for demanding applications
•Base clock speed of 3.8GHz and boost clock speed of 4.6GHz, ensuring fast and efficient performance
•Integrated Radeon graphics for excellent visual performance
•16MB of L3 cache, allowing for fast access to frequently used data
•Compatible with a wide range of motherboards, including the popular AM4 socket
•Unlocked multiplier for easy overclocking

✦Benefits:

Powerful performance: The AMD Ryzen 7 5700G is a powerful processor that can handle a wide range of applications, including graphic design.
Affordable price point: Despite its impressive performance, the AMD Ryzen 7 5700G is surprisingly affordable compared to other high-end processors on the market.
Compatibility: The processor is compatible with a wide range of motherboards, which means you won’t have to replace your existing motherboard if you’re upgrading from an older AMD processor.
Integrated graphics: The integrated Radeon graphics provide excellent visual performance, making the processor well-suited to tasks like photo and video editing also accelerate the multitasking ability.
Easy overclocking: The unlocked multiplier and easy-to-use software make it easy to tweak your settings for optimal performance, without risking damage to your processor.

So, should you buy the AMD Ryzen 7 5700G? If you’re a graphic designer or content creator looking for a powerful and budget friendly processor, the answer is a resounding yes. With impressive performance, affordability, compatibility, and overclocking capabilities, this processor is the ultimate choice for anyone looking to take their computing to the next level. So, what are you waiting for? Upgrade to the AMD Ryzen 7 5700G today and experience the ultimate in processing power!

Also, check the recent article about the best laptop for graphic design here.


graphic-design

Graphic design: Start from sketch

Graphic design: Start from sketch

Graphic design is an art form that involves creating visual content to communicate a message to an audience. One of the most essential tools for graphic designers is sketching. Sketching is the process of creating rough drawings of design ideas, concepts, and layouts. Starting from a sketch can help designers visualize and explore their ideas, and bring their creative concepts to life. In this article, we’ll explore why sketching is so important in graphic design and offer some tips on how to get started.

✦ Why Start From Sketching?

Sketching is a powerful tool for graphic designers for several reasons. Firstly, sketching allows designers to visualize their ideas and see how they would look in real life. This helps designers to refine and develop their ideas before moving on to digital design software. Secondly, sketching is a great way to brainstorm new ideas and explore different concepts without committing to a final design. Finally, sketching is a great way to communicate your ideas to clients or team members. Sketches are easy to understand and can quickly convey a concept or layout, helping to ensure everyone is on the same page.

✦ Tips for Starting from Sketching

1. The first step in starting from sketching is to choose the right materials. Pencils, markers, and paper are the most common tools for sketching. Choose a set of pencils with varying hardness, so you can create different shades of gray. Use markers with different nib sizes to create varied line weights. Finally, choose a high-quality paper that can handle your chosen materials without smudging or bleeding.

2. Before you start sketching, it’s essential to plan your design. Think about the purpose of your design, your target audience, and the message you want to convey. Sketch out some basic layouts and ideas before committing to a final sketch.

3. When starting from sketching, it’s important to keep your designs simple. Focus on the key elements of your design, such as typography, color, and composition. Keep your sketches loose and rough, and don’t worry too much about the details. The goal is to capture the essence of your design concept, not create a finished piece.

4. After you’ve created your initial sketch, take a step back and evaluate your work. Look for areas that need improvement or refinement, and iterate on your design. Create new sketches, refine your composition, and experiment with different colors and typography. Keep refining and iterating until you’re happy with your design.

5. Once you’ve finalized your sketch, it’s time to move to digital design software. Use your sketch as a guide to create a final design, adding in more details, colors, and typography as needed. Remember, your sketch is the foundation of your design, but your final design will likely evolve as you work.

✦ Here listed some ways to find fresh ideas and inspiration through sketching:

1. Keep a Sketchbook Handy

Always carry a sketchbook and drawing art pencil kit with you at all times, so you can quickly jot down ideas or sketches as they come to you. Inspiration can strike at any moment, so having a sketchbook handy and drawing art pencil kit will allow you to capture those ideas before they slip away. Here are some cost effective graphic design kit that you may order now in online:

ImageProductDetails  Price
graphic designUCreate Poly Cover Sketch Book, Heavyweight, 9″ x 12″, Black, 75 SheetsUCreate drawing and sketch pads are great for experimenting with various techniques.; making it easy for artists to develop their own creative style.
•Premium drawing paper is 70 lb.
•Durable black poly cover and back
•Spiral bound and Perforated sheets for final art
•Each sketch book contains 75 sheets
Check Price
graphic designArt 101 Doodle and Color 142 Pc Art Set in a Wood Carrying Case, Includes 24 Premium Colored Pencils, A variety of coloring and painting mediums: crayons, oil pastels, watercolors; Portable Art Studio •Art 101 is a leading supplier of innovative and fun artistic products with 13 years of experience providing high-quality artistic tools at an affordable price
-Country of origin : China
-Includes 24 Premium Core Colored Pencils which color, shade, and blend beautifully
-Includes a variety of coloring and painting mediums, including crayons, oil pastels, and watercolors
Check Price
Graphic designU.S. Art Supply 44-Piece Drawing & Sketching Art Set with 4 Sketch Pads (242 Paper Sheets) – Professional Artist Kit, Graphite, Charcoal, Pastel Pencils & Sticks, Erasers – Pop-Up Carry Case, Student•Complete 44-piece professional drawing and sketching art set that includes every tool and sketch pad you need to create amazing sketches! The zippered carrying case has all the tools conveniently stored in an elevated pop-up organizer providing easy access to them!Check Price
   
Graphic designBellofy 33 Piece Drawing Kit with 100 Sheets Pad | Drawing Kit for Adults Comes with Sketch Supplies for Kids, Beginners & Artists | Drawing Set Contains Sketching Pencils, & More Drawing Stuff•Create Masterful Sketches With This Sketch Set – You’ve discovered it too! Art pencils for drawing and shading are developed by artists for you to perfect drawing, sketching & shading techniques.Check Price
Graphic designFaber-Castell Pitt Artist Pen Set• includes bright vibrant colors, Perfect for a colorful mandala. Includes: #247 indanthrene blue (superfine nib), #125 Middle purple pink (superfine nib), #107 cadmium Yellow (Brush nib) and #161 Phthalo green (Brush nib)Check Price
Graphic designSTAEDTLER Mars Lumograph Art Set | Drawing Kit with Art Pencils, Drawing Pens, Eraser and Double Hole Sharpener •7 sketch pencils and 3 pigment liner pens let you lay down sharp lines or soft shades. The most widely used graphite drawing pencil degrees are included. From soft to hard: 8H, 6H, 4H, HB, H, 2H and 4H. Pen widths are 0.3mm, 0.5mm and 1mmCheck Price
Graphic design MarkerCopic Ciao Marker Set, 6-Colors, Primary •This set features a set of six Copic Ciao markers in the primary colors, a perfect base for building your palette
•Replaceable tip
•Ethanol-based ink dries acid-free
•Permanent and non-toxic
•Refillable
Check Price
Graphic design kitArt 101 Doodle and Color 142 Pc Art Set in a Wood Carrying Case, Includes 24 Premium Colored Pencils, A variety of coloring and painting mediums: crayons, oil pastels, watercolors; Portable Art Studio•Art 101 is a leading supplier of innovative and fun artistic products with 13 years of experience providing high-quality artistic tools at an affordable price
•Country of origin : China
•Includes 24 Premium Core Colored Pencils which color, shade, and blend beautifully
Check Price
Amazon Art Pencil KitAmazon Basics Sketch and Drawing Art Pencil Kit•All-in-one 17-piece drawing and sketch supply kit for artists of all skill levels
•Includes 6 pencils (2H, HB, H, B, 2B, 3B), 3 charcoal pencils (soft, medium, hard), and 4 compressed sketch sticks (2 charcoal, 2 conté)
•Also includes 1 standard eraser, 1 kneaded eraser, 1 blender/smudge stick, and 1 dual-barrel sharpener.
Check Price

2. Explore Your Environment
One of the best ways to find inspiration is to simply look around you. Take a walk in your local neighborhood or park, and observe the world around you. Pay attention to the colors, textures, patterns, and shapes that you see. Take photos or make sketches of interesting details that catch your eye, and use them as a starting point for your designs.

3. Use Mind Mapping
Mind mapping is a great technique for generating new ideas and concepts. Start by writing down a central word or idea, and then draw branches that represent related concepts. For example, if you’re designing a logo for a coffee shop, your central word could be “coffee,” and your branches could include concepts like “beans,” “brewing methods,” “cup designs,” and “coffee culture.” By visualizing these concepts, you may come up with new and interesting ideas that you wouldn’t have thought of otherwise.

4. Draw from Life
Drawing from life is a great way to improve your observation skills and hone your drawing abilities. Attend a life drawing class or draw everyday objects around your home or office. By drawing from life, you’ll learn to see the world in a new way, and you may discover new design ideas and concepts.

5. Look to Nature
Nature is a great source of inspiration for designers. Take a walk in a park or botanical garden, and observe the patterns, textures, and colors of plants and flowers. Use these natural elements as inspiration for your designs.

6. Experiment with Typography
Typography is a key element of graphic design, and experimenting with different lettering styles and fonts can spark new ideas. Try hand-lettering, calligraphy, or try experimenting with different font pairings to find unique combinations that stand out.

In conclusion, finding inspiration through sketching is all about exploring new ideas and pushing your creativity to the next level. By trying new techniques, exploring your environment, and collaborating with others, you can find fresh inspiration and create designs that truly stand out. Remember to stay open-minded, experiment, and most importantly, have fun with your sketching process! So, stop wasting time, start your sketching process right now!


indesign

The differences between adobe indesign and illustrator

Adobe InDesign and Illustrator are two of the most popular software programs for graphic design and publishing. While both of these applications are created by Adobe and serve a similar purpose, they differ significantly in terms of their features, capabilities, and intended use.

✦Here are the key differences between Adobe InDesign and Illustrator:

1. Purpose

The first and foremost difference between Adobe InDesign and Illustrator is their intended purpose. Adobe InDesign is primarily used for creating and publishing multi-page documents layout such as books, magazines, brochures, newsletter, email design and other printed materials. On the other hand, Adobe Illustrator is mainly used for creating vector based graphics and illustrations like -Brand identity and brand guidelines design -Packaging and label design -Social media post design -Ad Campaign post design -Logo and business card design -Stationery design -Flyer design -Vector images tracing etc.

2. Design Tools

Another significant difference between Adobe InDesign and Illustrator is the design tools that are available in each application. Adobe InDesign comes with a comprehensive set of tools for laying out text, images, and other page elements, such as tables, charts, and footnotes.

In contrast, Adobe Illustrator provides a powerful set of vector design tools, including shapes, lines, curves, and typography.

3. File Formats

The file formats supported by each software are another area of difference. Adobe InDesign supports a wide range of file formats, including PDF, EPUB, and SWF, which makes it ideal for creating digital publications.

In comparison, Adobe Illustrator primarily supports vector graphics file formats such as AI, SVG, and EPS.

4. Workflow

The workflow in Adobe InDesign and Illustrator is also different. In Adobe InDesign, you can create and manage multiple pages and have master page layouts within a single document, which makes it easy to create multi-page documents.

In contrast, Illustrator is designed for creating single-page designs and there have no master page facilities within the document.

5. Typography

Adobe InDesign is known for its extensive typography features, including paragraph styles, character styles, and Open-type font support. It also has advanced features for controlling type, such as kerning, tracking, and hyphenation.

By comparing, while Illustrator also has some typography features, they are more limited compared to InDesign.

6. Image Editing

Another key difference between InDesign and Illustrator is their image editing capabilities. InDesign has basic image editing features such as resizing, cropping, and color correction.

However, Illustrator has more advanced image editing tools such as the ability to trace bitmap images and create custom brushes.

7. Object Manipulation

Both InDesign and Illustrator have object manipulation tools, but they differ in how they work. In InDesign, you can manipulate objects by resizing, rotating, and skewing them, and adjusting their position and alignment.

In Illustrator, you can manipulate objects by editing their anchor points and paths, and applying various effects such as drop shadows and gradients.

8. 3D Graphics

InDesign has limited 3D capabilities, but it can import 3D graphics created in other applications.

In Illustrator, you can manipulate objects by editing their anchor points and paths and applying various effects such as drop shadows and gradients.

In conclusion, Adobe InDesign and Illustrator are both powerful software applications that offer different features and capabilities. Understanding the differences between these two applications can help you determine which one is best suited for your specific design needs. Ultimately, the choice between InDesign and Illustrator depends on the nature of the project, your level of expertise, and your budget.


photoshop

The differences between adobe photoshop and illustrator

Adobe Photoshop and Adobe Illustrator are two of the most popular graphic design software programs in the world. While both are excellent tools for creating digital artwork, they have distinct differences that make them better suited for specific tasks. Understanding the differences between these two software programs can help you determine which one is right for your needs.

1. Motive

Adobe Photoshop is primarily used for photo editing and image manipulation. It is a raster-based program, meaning that images are made up of pixels. It is excellent for editing and manipulating photographs, creating graphics for websites and social media, and designing layouts for print or digital media.

On the other hand, Adobe Illustrator is primarily used for vector-based graphic design. Unlike raster-based programs, Illustrator creates images using mathematical equations, resulting in infinitely scalable designs. It is an ideal tool for creating logos, icons, typography, and other graphics that need to be scaled up or down without losing quality.

2. Tools

Photoshop has an extensive range of tools for editing and manipulating images, including brushes, filters, and layer masks. It also has features for retouching, color correction, and compositing.

Illustrator, on the contrary, has tools that are specific to vector design. These include shape tools, pen tools, and anchor points for precise control over paths and curves. It also has features for creating gradients, patterns, and typography.

3. Output

The output for both programs is different due to their different workflows. Photoshop is better suited for producing raster-based images for print or web use. Some examples: Photo editing, photo manipulation, photo restoration, Photo retouching, Clipping path, Mockup creation, web template creation, etc.

While Illustrator is better for producing vector-based graphics for print or digital media. Some examples: Logo, Brand identity and brand guidelines design, Packaging and label design, Social media post design, Banner design, Stationery design, Flyer design, Vector tracing, etc.

4. File Formats

Photoshop supports a wide range of file formats for images, including JPEG, PNG, PSD, and GIF.

Illustrator, alternatively, supports vector-based formats such as EPS, AI, and SVG. Both programs can also import and export various file formats.

5. Typography

Both programs have typography features, but Illustrator is better suited for creating and manipulating vector text. Illustrator has advanced typography tools, such as kerning, tracking, and ligatures, that allow for precise control over text. Photoshop also has some typography features, but they are more limited in comparison.

6. Image Resolution

Because Adobe Photoshop is a raster-based program, image resolution is an important consideration. The resolution of an image is determined by the number of pixels it contains, and higher resolutions are necessary for print work or high-quality images. Photoshop has advanced tools for adjusting and optimizing image resolution, such as upsampling or downsampling.

Illustrator, by contrast, is a vector-based program, so image resolution is not a concern. Vector graphics are made up of mathematically defined shapes, so they can be scaled up or down without losing quality.

7. Filters and Effects

Photoshop has an extensive library of filters and effects that can be applied to images, such as blurs, distortions, and color adjustments. These filters and effects are designed to work with raster-based images, and they can be applied to layers or selections.

Illustrator also has some filters and effects, but they are designed for vector graphics. These filters and effects can be used to add texture, stylize vector graphics, or apply effects to text.

In conclusion, Adobe Photoshop and Illustrator are both powerful software programs for creating digital artwork, but they have distinct differences in purpose, tools, workflow, learning curve, output, layers, file formats, color management, typography, price, image resolution, pen tool, filters and effects, integration with other Adobe software, and use cases. By understanding these differences, you can choose the right tool for your specific needs and create stunning digital artwork.


canva

The differences between adobe Illustrator and Canva

When it comes to graphic design software, Adobe Illustrator and Canva are two of the most popular options available. Both programs have their own strengths and weaknesses, and which one you choose will depend on your specific needs and preferences.

✦ Here are some of the key differences between Adobe Illustrator and Canva:

1. User Interface

One of the most noticeable differences between Illustrator and Canva is their user interface. Illustrator has a more complex and technical interface, which can be intimidating for beginners.

On the contrary, the interface of Canva is simple and intuitive, making it a great option for those new to graphic design.

2. User Preference

User preference plays a significant role in choosing between Adobe Illustrator and Canva. Some designers prefer the technical precision and scalability of Illustrator, while others prefer the simplicity and user-friendliness of Canva. Designers who are comfortable with Adobe’s suite of software may prefer Illustrator due to its compatibility with other programs, advanced features, and ability to work with a wide variety of file formats.

traditionrolex.com

illustrator vs canva
Adobe illustrator interface

On the other hand, designers who prioritize ease of use and collaboration may prefer Canva. Canva’s intuitive interface, extensive library of templates and design elements, and real-time collaboration features make it a great choice for teams that need to work together on projects.

illustrator vs canva
Canva User Interface

Ultimately, the choice between Illustrator and Canva will depend on a designer’s individual needs and preferences. It’s essential to consider factors such as the type of design work you do, the size of your team, and your budget before making a decision.

3. Design Capabilities

Illustrator is a vector-based design software, which means that it uses mathematical equations to create shapes and graphics. This allows for more precise and scalable designs, making it ideal for logos, icons, branding, social media post, flyer, brochure, and other graphics that need to be resized without losing quality.

Canva, on the other hand, is primarily a template-based design software, which means that it offers pre-designed layouts and elements that users can customize to their liking.

4. Pricing

Another major difference between the two programs is their pricing.

Illustrator is part of Adobe Creative Cloud, which is a subscription-based service that starts at $20.99/month.

illustrator pricing

Canva, then again, offers both free and paid plans, with the paid plans starting at $6.49/month.

5. Integration with Other Software

Illustrator integrates seamlessly with other Adobe software such as Photoshop and InDesign, making it a great option for designers who work with multiple programs.

Canva, on the other hand, offers limited integration with other software, which can be frustrating for those who need to transfer designs between programs.

6. Learning Curve

As mentioned earlier, Illustrator’s interface can be complex and technical, which can make it difficult for beginners to learn. Canva, however, has a simpler interface and offers a variety of tutorials and resources to help users get started.

7. Collaboration Features

Illustrator does not have as many collaboration features, making it less ideal for team projects but has some plugins and extensions.

Conversely, Canva is designed for collaboration, making it an excellent choice for teams that need to work together on projects. It offers features such as shared design folders, team templates, and real-time collaboration.

8. File Formats

Illustrator is known for its ability to work with a wide variety of file formats, including EPS, AI, PDF, and SVG.

Canva, in other ways, primarily exports designs as JPG, PNG, or PDF files, making it less versatile when it comes to exporting designs.

9. Advanced Design Features

Illustrator is a powerful design software that offers advanced features such as the ability to create 3D graphics, work with perspective grids, and use advanced typography tools.

Canva, while it offers a wide variety of design elements, does not have as many advanced design features.

10. Mobile App

Illustrator does not have a mobile app, making it less convenient for mobile users.

Then again, Canva has a robust mobile app that allows users to design on the go, which is a significant advantage for those who need to work from their mobile devices.

In conclusion, both Adobe Illustrator and Canva have their own unique features and strengths. Illustrator is a powerful, industry-standard design software that offers advanced design features, precise design capabilities, and the ability to work with a wide variety of file formats. Canva, on the other hand, is a user-friendly design software that offers collaboration features, an extensive library of templates and design elements, and a robust mobile app. Ultimately, the choice between the two will depend on your specific needs and preferences as a designer.

Is Canva and Adobe Illustrator the same?

Certainly! Here are some specific advantages of Adobe Illustrator over Canva:
Advanced Vector Editing
Customizability
Drawing Tools and Pen Tool
Blend Modes and Effects
Industry Compatibility
Extensive File Format Support
Remember, while Adobe Illustrator offers advanced features and precision, Canva has its own advantages, especially for quick and accessible design projects. Ultimately, the choice between the two depends on the specific needs, expertise, and preferences of the designer.

Does Canva support Illustrator files?

Canva partially support Adobe Illustrator (AI) files as an importable file format. Canva primarily focuses on providing a user-friendly web-based design platform with its own proprietary file formats. However, Canva does offer the option to import and work with other common image file formats such as JPEG, PNG, and SVG.
It’s important to note that exporting an Illustrator file to a raster format like PNG may result in a loss of vector scalability. If retaining the vector scalability is important, saving the file in SVG format would be a better option as it preserves the vector nature of the design.

Can Canva replace graphic designers?

Canva is a useful tool for simple design tasks, but it lacks the expertise, creativity, and strategic thinking that professional graphic designers bring to the table. Graphic designers are essential for complex projects, customized designs, maintaining brand consistency, and delivering impactful visual communication.

Do graphic designers use Canva?

Yes, graphic designers can use Canva as one of the tools in their design workflow. While Canva is often associated with non-designers or individuals without extensive design experience, professional graphic designers may utilize Canva for certain purposes. They might use Canva for quick mock-ups, simple designs, or as a starting point for design concepts. However, graphic designers typically rely on a combination of tools, including industry-standard software like Adobe Illustrator, Photoshop, or InDesign, to create more sophisticated and customized designs. Canva can be a valuable addition to a graphic designer’s toolkit, offering convenience and a wide range of templates for certain design tasks.

Do big companies use Canva?

es, many big companies and organizations use Canva as part of their design workflow. Canva offers a user-friendly platform with a wide variety of templates, stock images, and design elements that can be customized to create visually appealing graphics. It provides an accessible and efficient solution for creating social media posts, presentations, marketing materials, and other design assets.

What programming language is Canva?

Canva, as a web-based design platform, utilizes a combination of programming languages for its development and functionality. The specific programming languages used by Canva may include:
JavaScript
HTML/CSS: HTML (Hypertext Markup Language) and CSS (Cascading Style Sheets)
Python
Other technologies: Canva may also utilize frameworks and libraries such as React, Angular, or Node.js, which are commonly used in modern web development.
It’s important to note that the exact programming languages and technologies used by Canva may not be publicly disclosed, and the platform’s development stack may have evolved or changed over time.

How to earn money with Canva?

While Canva is primarily a design platform used to create graphics and visual content, there are several ways you can potentially earn money with Canva:
1. Freelance Design Services: If you have design skills and expertise, you can offer your services as a freelance graphic designer using Canva. Create custom designs, templates, or social media graphics for clients and charge a fee for your design services.
2. Selling Templates: You can create and sell customizable templates on platforms like Etsy or your own website. Design templates for social media posts, presentations, invitations, or any other popular design category, and market them to individuals or businesses looking for ready-made designs.
3. Print-on-Demand Products: Canva has integration with print-on-demand services like Printful, where you can create and sell your designs on various products such as t-shirts, mugs, or phone cases. Design your graphics on Canva, upload them to the print-on-demand platform, and earn a profit from each sale.
4. Digital Products: Create digital products like ebooks, workbooks, or design resources using Canva. These products can be sold online through platforms like Gumroad or your own website.
5. Affiliate Marketing: Canva has an affiliate program that allows you to earn a commission by promoting Canva’s premium subscriptions or other related products. Sign up for the Canva affiliate program and generate income by referring customers to Canva.
It’s important to note that the specific method you choose to earn money with Canva depends on your skills, creativity, marketing strategies, and the demand for your products or services. Additionally, it’s crucial to review Canva’s terms of use and any applicable licensing restrictions when monetizing your designs created on the platform.

Can I sell my Canva designs on Etsy?

Yes, you can sell your Canva designs on Etsy, provided you comply with Etsy’s policies and any applicable licensing restrictions. Here are a few steps to consider:
1. Create Unique Designs: Using Canva, design unique and original graphics that are not in violation of any copyright or licensing restrictions.
2. Customize and Personalize: Make sure to customize and personalize the designs to make them unique to your brand or style. Avoid using Canva’s pre-made templates or elements without modification, as they may not meet the criteria for originality.
3. Check Licensing Terms: Review the licensing terms of any Canva elements or graphics you use in your designs. Ensure that you have the appropriate rights and permissions to use and sell those elements commercially.
Create High-Quality Listings: Take high-resolution screenshots or export your Canva designs in a suitable format for listing on Etsy. Craft compelling descriptions and present your designs attractively.
4. Describe Usage Rights: Clearly communicate the usage rights of your Canva designs in the Etsy listings. Specify whether the designs are for personal use only or can be used for commercial purposes.
5. Comply with Etsy Policies: Familiarize yourself with Etsy’s seller policies, intellectual property guidelines, and any other relevant rules to ensure compliance.
Remember, while Canva can be a useful tool for creating designs, it’s important to ensure that your designs are original and comply with licensing requirements. If you have any concerns or questions about selling Canva designs on Etsy, it’s advisable to consult Canva’s support, review Etsy’s guidelines, or seek legal advice for further clarification.


brand

Brand Identity VS Brand Style Guidelines


Brand identity is the overall visual and emotional representation of a brand, which includes the logo, imagery, letterhead, envelope, social media identity including Facebook, Twitter, Instagram, LinkedIn cover page, and other visual elements that help define and differentiate the brand from its competitors. It encompasses the brand’s personality, values, and attributes, and should be consistent across all touch-point to create a strong and recognizable brand image.

A brand style guide, on the other hand, is a set of guidelines that defines how the brand identity should be used in various applications, such as marketing materials, website design, packaging, social media, and other brand touch points. It outlines specific rules and recommendations for using the brand’s visual and verbal elements, such as the preferred logo usage including vertical and horizontal orientation, logo sizes, color palette, typography, tone of voice, and messaging guidelines. The style guide helps ensure consistency and accuracy in all brand communications and helps maintain the brand’s integrity and equity.

In summary, brand identity is the visual and emotional representation of a brand, while a brand style guide is a set of guidelines that defines how the brand identity should be used in various applications to maintain consistency and accuracy.